Tutorial on Spring Remoting with JMS
This tutorial was kindly donated to Apache Camel by Martin Gilday.
Preface
This tutorial aims to guide the reader through the stages of creating a project which uses Camel to facilitate the routing of messages from a JMS queue to a Spring service. The route works in a synchronous fashion returning a response to the client.
Prerequisites
This tutorial uses Maven to setup the Camel project and for dependencies for artifacts.
Distribution
This sample is distributed with the Camel distribution as examples/camel-example-spring-jms.
About
This tutorial is a simple example that demonstrates more the fact how well Camel is seamless integrated with Spring to leverage the best of both worlds. This sample is client server solution using JMS messaging as the transport. The sample has two flavors of servers and also for clients demonstrating different techniques for easy communication.
The Server is a JMS message broker that routes incoming messages to a business service that does computations on the received message and returns a response.
The EIP patterns used in this sample are:
Pattern | Description |
|---|---|
We need a channel so the Clients can communicate with the server. | |
The information is exchanged using the Camel Message interface. | |
This is where Camel shines as the message exchange between the Server and the Clients are text based strings with numbers. However our business service uses int for numbers. So Camel can do the message translation automatically. | |
It should be easy to send messages to the Server from the the clients. This is achieved with Camel's powerful Endpoint pattern that even can be more powerful combined with Spring remoting. The tutorial has clients using each kind of technique for this. | |
The client and server exchange data using point to point using a JMS queue. | |
The JMS broker is event driven and is invoked when the client sends a message to the server. |
We use the following Camel components:
Component | Description |
|---|---|
We use Apache ActiveMQ as the JMS broker on the Server side | |
We use the bean binding to easily route the messages to our business service. This is a very powerful component in Camel. | |
In the AOP enabled Server we store audit trails as files. | |
Used for the JMS messaging |
Create the Camel Project
For the purposes of the tutorial a single Maven project will be used for both the client and server. Ideally you would break your application down into the appropriate components.
Update the POM with Dependencies
First we need to have dependencies for the core Camel jars, spring, jms components, and finally ActiveMQ as the message broker.
Writing the Server
Create the Spring Service
For this example the Spring service (our business service) on the server will be a simple multiplier which trebles in the received value.
Define the Camel Routes
Configure Spring
The Spring config file is placed under META-INF/spring as this is the default location used by the Camel Maven Plugin, which we will later use to run our server.
First we need to do the standard scheme declarations in the top. In the camel-server.xml we are using spring beans as the default bean: namespace and springs context:. For configuring ActiveMQ we use broker: and for Camel we of course have camel:. Notice that we don't use version numbers for the camel-spring schema. At runtime the schema is resolved in the Camel bundle. If we use a specific version number such as 1.4 then its IDE friendly as it would be able to import it and provide smart completion etc. See Xml Reference for further details.
Notice that we also have enabled the JMXAgent so we will be able to introspect the Camel Server with a JMX Console.from="jmsbroker:queue:numbers).to("multiplier");
We use the vm protocol to connect to the ActiveMQ server as its embedded in this application.
component-scan | Defines the package to be scanned for Spring stereotype annotations, in this case, to load the "multiplier" bean |
camel-context | Defines the package to be scanned for Camel routes. Will find the |
jms bean | Creates the Camel JMS component |
Run the Server
The Server is started using the org.apache.camel.spring.Main class that can start camel-spring application out-of-the-box. The Server can be started in several flavors:
- as a standard java main application - just start the
org.apache.camel.spring.Mainclass - using maven jave:exec
- using camel:run
In this sample as there are two servers (with and without AOP) we have prepared some profiles in maven to start the Server of your choice.
The server is started with:
mvn compile exec:java -PCamelServer
Writing The Clients
This sample has three clients demonstrating different Camel techniques for communication
- CamelClient using the ProducerTemplate for Spring template style coding
- CamelRemoting using Spring Remoting
- CamelEndpoint using the Message Endpoint EIP pattern using a neutral Camel API
Client Using The ProducerTemplate
We will initially create a client by directly using ProducerTemplate. We will later create a client which uses Spring remoting to hide the fact that messaging is being used.
camelContext | The Camel context is defined but does not contain any routes |
template | The |
jms bean | This initialises the Camel JMS component, allowing us to place messages onto the queue |
And the CamelClient source code:ProducerTemplate is retrieved from a Spring ApplicationContext and used to manually place a message on the "numbers" JMS queue. The requestBody method will use the exchange pattern InOut, which states that the call should be synchronous, and that the caller expects a response.
Before running the client be sure that both the ActiveMQ broker and the CamelServer are running.
Client Using Spring Remoting
Spring Remoting "eases the development of remote-enabled services". It does this by allowing you to invoke remote services through your regular Java interface, masking that a remote service is being called.
The proxy will create a proxy service bean for you to use to make the remote invocations. The serviceInterface property details which Java interface is to be implemented by the proxy. The serviceUrl defines where messages sent to this proxy bean will be directed. Here we define the JMS endpoint with the "numbers" queue we used when working with Camel template directly. The value of the id property is the name that will be the given to the bean when it is exposed through the Spring ApplicationContext. We will use this name to retrieve the service in our client. I have named the bean multiplierProxy simply to highlight that it is not the same multiplier bean as is being used by CamelServer. They are in completely independent contexts and have no knowledge of each other. As you are trying to mask the fact that remoting is being used in a real application you would generally not include proxy in the name.
And the Java client source code:
- The Spring context is created with the new camel-client-remoting.xml
- We retrieve the proxy bean instead of a
ProducerTemplate. In a non-trivial example you would have the bean injected as in the standard Spring manner. - The multiply method is then called directly. In the client we are now working to an interface. There is no mention of Camel or JMS inside our Java code.
Client Using Message Endpoint EIP Pattern
This client uses the Message Endpoint EIP pattern to hide the complexity to communicate to the Server. The Client uses the same simple API to get hold of the endpoint, create an exchange that holds the message, set the payload and create a producer that does the send and receive. All done using the same neutral Camel API for all the components in Camel. So if the communication was socket TCP based you just get hold of a different endpoint and all the java code stays the same. That is really powerful.
Okay enough talk, show me the code!"mina:tcp://localhost:61610" then its just a matter of getting hold of this endpoint instead of the JMS and all the rest of the java code is exactly the same.
Run the Clients
The Clients is started using their main class respectively.
- as a standard java main application - just start their main class
- using maven jave:exec
In this sample we start the clients using maven:
mvn compile exec:java -PCamelClient
mvn compile exec:java -PCamelClientRemoting
mvn compile exec:java -PCamelClientEndpoint
Also see the Maven pom.xml file how the profiles for the clients is defined.
Using the Camel Maven Plugin
The Camel Maven Plugin allows you to run your Camel routes directly from Maven. This negates the need to create a host application, as we did with Camel server, simply to start up the container. This can be very useful during development to get Camel routes running quickly.
All that is required is a new plugin definition in your Maven POM. As we have already placed our Camel config in the default location (camel-server.xml has been placed in META-INF/spring/) we do not need to tell the plugin where the route definitions are located. Simply run mvn camel:run.
Using Camel JMX
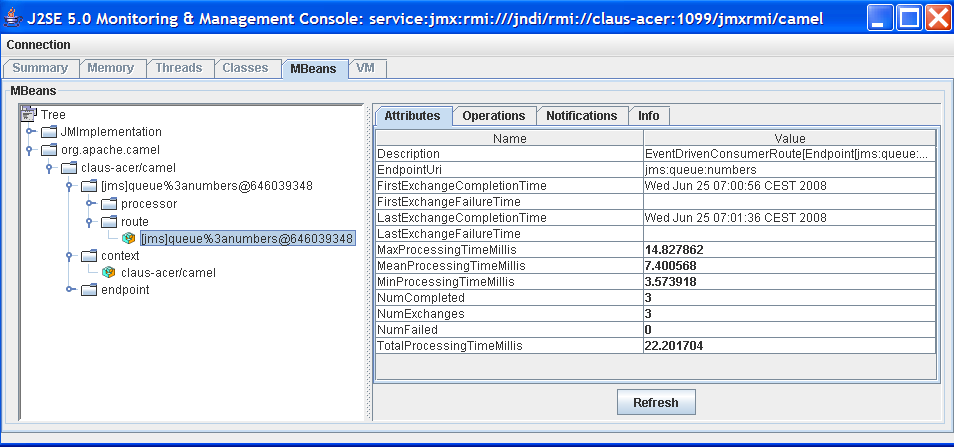
Camel has extensive support for JMX and allows us to inspect the Camel Server at runtime. As we have enabled the JMXAgent in our tutorial we can fire up the jconsole and connect to the following service URI: service:jmx:rmi:///jndi/rmi://localhost:1099/jmxrmi/camel. Notice that Camel will log at INFO level the JMX Connector URI:
In the screenshot below we can see the route and its performance metrics:
2 Comments
Timo Veldt
It looks the Spring example for the client misses the connectionManager definition. I had to add the following to the XML definitions.
<bean id="connectionFactory" class="org.apache.activemq.ActiveMQConnectionFactory"> <property name="brokerURL" value="tcp://localhost:${tcp.port}" /> </bean>Christian Mueller
The configuration
<!-- Camel JMSProducer to be able to send messages to a remote Active MQ server -->
<bean id="jms" class="org.apache.activemq.camel.component.ActiveMQComponent">
  <property name="brokerURL" value="tcp://localhost:${tcp.port}"/>
</bean>
sets up the connection factory under the cover.