...
- Launch Eclipse and create a dynamic web project as shown in the figure

- Give the fields for the Web Project as shown in the following figure

- Select Finish
- Right-click on the SimpleJSF project and select properties Properties, then select Project Facets
- Check the box for JavaServerFaces and under the version tab select 1.2 as the version. Select the
 Further configuration required... indicator to display the JSF Capabilities pane.

- On the JSF Capabilities window check the box and select new as shown in the figure

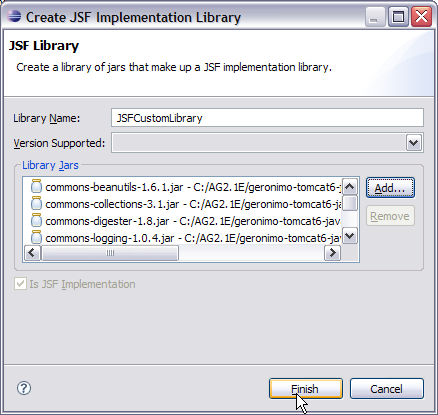
- The next window is used to create a JSF Implementation library. Give the library name as JSFCustomLibrary and add the following jars. Select Finish once done. See the figure below:
- <GERONIMO_HOME>\repository\commons-beanutils\commons-beanutils\1.7.0\commons-beanutils-1.7.0.jar
- <GERONIMO_HOME>\repository\commons-collections\commons-collections\3.2\commons-collections-3.2.jar
- <GERONIMO_HOME>\repository\commons-digester\commons-digester\1.8\commons-digester-1.8.jar
- <GERONIMO_HOME>\repository\commons-logging\commons-logging\1.0.4\commons-logging-1.0.4.jar
- <GERONIMO_HOME>\repository\org\apache\myfaces\core\myfaces-api\1.2.3\myfaces-api-1.2.3.jar
- <GERONIMO_HOME>\repository\org\apache\myfaces\core\myfaces-impl\1.2.3\myfaces-impl-1.2.3.jar
- Check Deploy and modify the URL pattern to *.jsf as shown in the figure. Select Ok.

This finishes the setting up of the Eclipse IDE for application development.
...