...
- Start the server and Launch the Administrative Console using the URL http://localhost:8080/console.
- Enter default username and password.
- In the welcome page, Under Embedded DB, Select DB Manager.

- On the next page create a database userdbs and Select create.

- Once done you can see the userdbs database listed in DB Viewer portlet under Databases. This confirms that the database has been successfully created.

- As shown in the figure under Use DB, select userdbs from the dropdown box.

- Run the query as shown in the figure. This query will create table USERINFO with the columns FIRSTNAME, LASTNAME, SEX, USERNAME, PASSWORD.
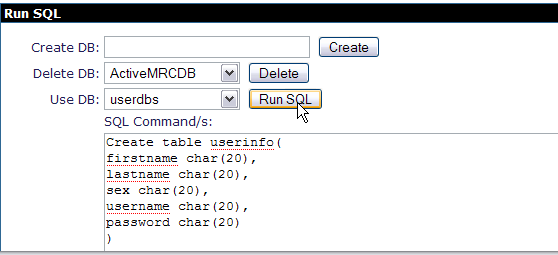
Code Block title CreateTable.sql borderStyle solid CREATE TABLE USERINFO ( FIRSTNAME char(20), LASTNAME char(20), SEX char(7), USERNAME char(20), PASSWORD char(20) )
- To verify the table creation is successful. Under View Tables for userdbs Database, Select Application.

- The next window will show the table USERINFO associated with userdbs Database.

Creating a datasource
...
with a plan
- Start the server and Launch the Administrative Console using the URL http://localhost:8080/console.
- Enter default username and password.
- Once in the welcome page. In console navigation, Under ServicesApplications, Select Database PoolsDeploy New.


- On the next screen, Create a new database pool using Geronimo database pool wizard.

named jdbc/userds using a xml plan file as followed.Code Block <?xml version="1.0" encoding="UTF-8"?> <connector xmlns="http://geronimo.apache.org/xml/ns/j2ee/connector-1.2"> <dep:environment xmlns:dep="http://geronimo.apache.org/xml/ns/deployment-1.2"> <dep:moduleId> <dep:groupId>console.dbpool</dep:groupId> <dep:artifactId>jdbc_userds</dep:artifactId> <dep:version>1.0</dep:version> <dep:type>rar</dep:type> </dep:moduleId> <dep:dependencies> <dep:dependency> <dep:groupId>org.apache.geronimo.configs</dep:groupId> <dep:artifactId>system-database</dep:artifactId> <dep:version>2.1.4</dep:version> <dep:type>car</dep:type> </dep:dependency> </dep:dependencies> </dep:environment> <resourceadapter> <outbound-resourceadapter> <connection-definition> <connectionfactory-interface>javax.sql.DataSource</connectionfactory-interface> <connectiondefinition-instance> <name>jdbc/userds</name> <config-property-setting name="DatabaseName">userdbs</config-property-setting> <config-property-setting name="UserName"/> <config-property-setting name="LoginTimeout"/> <config-property-setting name="Password"/> <connectionmanager> <xa-transaction> <transaction-caching/> </xa-transaction> <single-pool> <max-size>10</max-size> <min-size>0</min-size> <match-one/> </single-pool> </connectionmanager> </connectiondefinition-instance> </connection-definition> </outbound-resourceadapter> </resourceadapter> </connector> - Select the tranql-connector-derby-embed-xa-1.4.rar as the archive and above xml file as the plan, then click DeployOn the next screen give the name as suggested in the figure. This will initiate the process to create a Derby Embedded XA datasource.
Select the Driver jar and give the database name as userdbs(Remember this is the database we created in the previous step). Rest all fields can be set to default.
Select Deploy to deploy the connector plan.

- Once done you can see the Database Pool jdbc/userds listed in the available database pools.

...