...
This application will make you understand how Model(M), View(V), Controller(C) architecture is implemented in JavaServer Faces. This application will make use of UI components, Validator, Navigation and Bean component available with JSF.
...
The application development will take you through the following
| Table of Contents |
|---|
Once you have all the pre-requisites installed follow the following steps to create a project with Eclipse
...
- Under the project explorer right click on the SimpleJSF project and create a new class

- Fill the New Java Class form with jsf as the package name and FirstName as the bean class name. Select Finish once done

- Add the following code to the FirstName bean class
code
JAVAborderStyle solidtitle FirstName.javaJAVA package jsf; public class FirstName { String username; public String getName() { return username; } public void setName(String name) { username = name; } } - Create a second Bean class LastName and add the following code to the class
Code Block borderStyle solidtitle LastName.javaJAVA package jsf; public class LastName { String lastname; public String getLName() { return lastname; } public void setLName(String lname) { lastname = lname; } } This completes the Model definition and implementation of bean class.
...
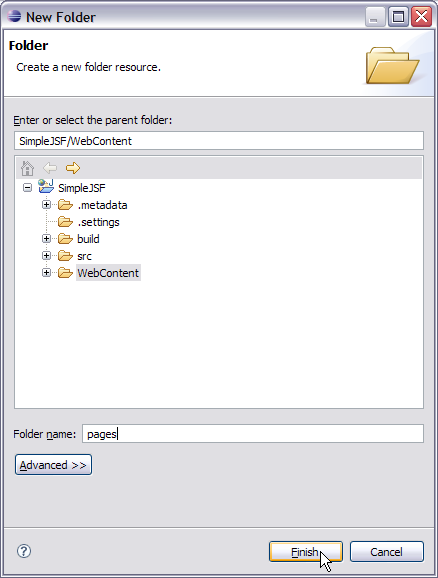
- Right Click on WebContent and create a New Folder with the name pages
- Right Click on pages folder and create a jsp page login.jsp. Select Finish.

- Similarly create another jsp page welcome.jsp.
- Moving forward now we now have to include Tag Library Descriptors(TLD) in our application.
Geronimo comes packaged with the TLD's required for application. The TLD's can be found inNo Format borderStyle solid title solidLocation of TLD<GERONIMO_HOME>\repository\org\apache\myfaces\core\myfaces-impl\1.2.2\myfaces-impl-1.2.2.jar\META-INF\myfaces-html.tld and <GERONIMO_HOME>\repository\org\apache\myfaces\core\myfaces-impl\1.2.2\myfaces-impl-1.2.2.jar\META-INF\myfaces_core.tld #To add these two TLD's in the application, In Eclipse Under project Explorer right click on WEB-INF. Create a folder tld. Copy myfaces-html.tld and myfaces_core.tld to this folder.
#Next step is to populate login.jsp and welcome.jsp with dataCode Block borderStyle solidtitle login.jspActionScript <%@ taglib uri="/WEB-INF/tld/myfaces-html.tld" prefix="h" %> <%@ taglib uri="/WEB-INF/tld/myfaces_core.tld" prefix="f" %> <html> <head> <meta http-equiv="Content-Type" content="text/html; charset=ISO-8859-1"> <title>Welcome to Apache Geronimo</title> </head> <body> <f:view> <h1><h:outputText value="Welcome to Apache Geronimo" /></h1> <h:form> <h:message for="firstName" style="color: red;" /> <h:message for="lastName" style="color: red;" /> <br> <h:outputText value="Enter your first name" /> <br><br> <h:inputText id="firstName" value="#{firstName.name}" required="true"> <f:validateLength minimum="4" maximum="10" /> </h:inputText> <br> <h:outputText value="Enter your last name" /> <br><br> <h:inputText id="lastName" value="#{lastName.LName}" required="true"> <f:validateLength minimum="3" maximum="10" /> </h:inputText> <br> <h:commandButton id="submit" action="validated" value="Enter" /> </h:form> </f:view> </body> </html> Code Block borderStyle solidtitle welcome.jspActionScript <%@ taglib uri="/WEB-INF/tld/myfaces-html.tld" prefix="h"%> <%@ taglib uri="/WEB-INF/tld/myfaces_core.tld" prefix="f"%> <%@ page language="java" contentType="text/html; charset=ISO-8859-1" pageEncoding="ISO-8859-1"%> <!DOCTYPE html PUBLIC "-//W3C//DTD HTML 4.01 Transitional//EN" "http://www.w3.org/TR/html4/loose.dtd"> <html> <head> <meta http-equiv="Content-Type" content="text/html; charset=ISO-8859-1"> <title>Welcome</title> </head> <body> <f:view> <h3><h:outputText value="You have successfully Logged in" /> <h:outputText value="#{firstName.name} " /> <h:outputText value="#{lastName.LName}" /> <h:outputText value="!" /></h3> </f:view> </body> </html> Lets now try to understand what each line of code represents. - The first two lines in login.jsp defines two tag libraries
Code Block borderStyle solidtitle Code Snippet from login.jspActionScript <%@ taglib uri="/WEB-INF/tld/myfaces-html.tld" prefix="h" %> and <%@ taglib uri="/WEB-INF/tld/myfaces_core.tld" prefix="f" %> These two sets of tags are defined by JSF. First one with the namespace "h" is used to generate html views. Second one with the namespace "f" handles the core functionalities of JSF like type conversions, validations and listeners for input from user. - The next few lines contains the usual html tags
Code Block borderStyle solidtitle Code Snippet from login.jspActionScript <html> <head> <meta http-equiv="Content-Type" content="text/html; charset=ISO-8859-1"> <title>Welcome to Apache Geronimo</title> </head> <body> - <f:view>- This tag represents the start of JSF code.code
- ActionScript
borderStyle solidtitle Code Snippet from login.jspActionScript <h:inputText id="firstName" value="#{firstName.name}" required="true"> Represents the input tag. id="firstName" and value="firstName.name"
comes from the Managed Bean. Use the Faces Configuration Editor, Select firstName bean under Managed Bean tab. The Managed Bean Name is firstName. See the figure below

This completes the implementation of View(V) in the application.
The other tags <f:validateLength> and <h:commandButton> will be explained in the next section.
...
- Launch the Faces Configuration Editor by double clicking on faces-config.xml
- Select the Navigation tab in the Configuration Editor. Under the Palette window select Page. This will select a GUI object, page.

- Drag the mouse over the Navigation Rule Window and click on the window. This will give a Select JSP file window. Select login.jsp as shown in the figure and select OK.

- Similarly add the welcome.jsp page on the Navigation Rule window. See the figure below

- Select Link from the Palette window and join the two pages as shown in the figure

- Select the link and between the two pages and go to properties view and set the value for From Outcome field as validated. This is because of the tag <h:commandButton id="submit" action="validated" value="Enter" />. Once all the input are valid the action taken is validated. See the figure

- Once done have a look the source tab in the Faces Navigation Editor. A <navigation-rule> tag has been introduced into the faces-config.xml. This rule suggests the Controller that if you all the inputs are valid from a form in the /pages/login.jsp, and the action is 'validated', then go to page /pages/welcome.jsp.

Now lets add a index.jsp under WEB-INF as followsCode Block borderStyle solidtitle index.jspActionScript <%@ page language="java" contentType="text/html; charset=ISO-8859-1"pageEncoding="ISO-8859-1"%> <\!DOCTYPE html PUBLIC "-//W3C//DTD HTML 4.01 Transitional//EN" "http://www.w3.org/TR/html4/loose.dtd"> <html> <body> <jsp:forward page="/pages/login.jsf" /> </body> </html> Now what is this login.jsf in the forward path. If you look at the web.xml *.jsf is used as the URL pattern to suggest that forwarded page be taken care by Java Server Faces Servlet.
This completes the Application Development process. Next step is to deploy and test the application.
...