Page History
| Table of Contents | ||
|---|---|---|
|
Airavata PHP Command Line Student Tutorial
Update
The PHP command line scripts have been moved to the Apache Airavata git repository.
Introduction
An Airavata user or a gateway developer can also exercise using PHP client through command line to execute jobs in the computational Resources.
Prerequisites
- Make sure you have PHP & GIT installed in your machine.
NOTE: The tutorial steps are given for Linux environment.
You Will Learn
- Execution of Airavata API methods using PHP client-command line.
- How to enter/modify input parameters for the methods in command-line.
Tutorial I - Preparation
- Create a folder (ex: SciGaP) in a preferable location in your local machine to clone download the PHP samples from GitHub. Open the created SciGaP folder (...../ cd SciGaP) and clone the files using GitHuB ‘HTTPS clone URL’
git clone https://git-wip-usdist.apache.org/repos/asf?p=airavata.git
Once the cloning is completed you would get a completed message. /dist/dev/airavata/0.13/RC0/. - In the given location download the apache-airavata-php-sdk-0.13-SNAPSHOT-bin.tar.gz
- Open the folder which contains the PHP sample scripts.
SciGaP → airavata/apache-airavata-api/airavata-client-sdks/airavata-php-sdk/src/main/resources/php-php-sdk-0.13-SNAPSHOT/php-cli-samples - client-samples folder contains PHP scripts to exercise currently existing Airavata API methods;
- add-compute-resources.php
- GetAPIVersion.php (a sanity check)
- createProject.php
- updateProject.php
- getAllUserProjects.php
- createExperiment.php
- getExperiment.php
- updateExperiment.php
- cloneExperiment.php
- getAllExperimentsInProject.php
- getAllUserExperiments.php
- search_experiments_by_name.php
launchExperiment- search_experiments_by_description.php
getExperimentStatus- search_experiments_by_application.php
getExperimentOutputs- launchExperiment.php
- terminateExperiment.php
list-application-interfaces- getExperimentStatus.php
list-compute-resources- getExperimentOutputs.php
airavata-client-api-tester- registerComputeResource.php
- add-compute-resources.php
- Apart for the scripts for the API methods the folder contains;
- airavata-client-properties.ini - contains the server. port and timeout period information
- README-PHP-CLI-Examples.txt - Gives the script execution order
- Navigation to working directory;
cd SciGaP/airavata/airavata-api/airavata-client-sdks/airavata-php-sdk/src/main/resources/php-cli-samples
Tutorial II - Sanity Check
- Get Airavata Version
Execute php getAPIVersion.php and confirm the Airavata API version.
Tutorial III - Create, Update & List Projects
Create Project
...
- Format;
php createProject.php<space><project_owner><space><project_name>
...
- Sample values;
project_owner: Thomas
project_name: Test_Project
...
- getAllComputeResourceNames.php
getComputeResource.php
deleteComputeResource.php
- registerApplicationModule.php
- getApplicationModule.php
- getApplicationDeployedResources.php
- registerApplicationInterface.php
- updateApplicationInterface.php
- getAllApplicationInterfaceNames.php
- deleteApplicationInterface.php
- getAvailableAppInterfaceComputeResources.php
- registerApplicationDeployment.php
- getApplicationDeployment.php
getApplicationInputs.php
- getApplicationOutputs.php
- deleteGatewayComputeResourcePreference.php
- getGatewayComputeResourcePreference.php
- airavata-client-api-tester.php
- Apart for the scripts for the API methods the folder contains;
- getAiravataClient.php - This script is referred by all other scripts to obtain Airavata client. Not for stand alone execution.
- README.txt - Gives an introduction to the scripts and also reference links to wiki pages with command line script execution information
- Navigation to working directory;
cd SciGaP/airavata/airavata-api/airavata-client-sdks/airavata-php-sdk/src/main/resources/php-cli-samples
Tutorial II - Sanity Check
- Get Airavata Version
Execute php getAPIVersion.php and confirm the Airavata API version.
Tutorial III - Create, Update & List Projects
Create Project
- Use; createProject.php to create new projects.
project_owner and project_name can be given
...
Update Project
- Use; updateProject.php to modify or add project description.
project_ID and project_description are passed into the script as command line arguments.- Format;
php updateProjectcreateProject.php<space><project_ID><space><projectowner><space><project_description>name>
- Format;
- When creating new projects both project_owner and project_name When updating Projects currently user can only update the project description. Description cannot contain spaces.
- Sample values;
project_owner: Thomas
project_IDname: Test_Project_4063b440-332a-49af-a6de-aea21d77bb2f
project_description: Test_Airavata_Project
- Sample values;
- Successful creation Successful modification of project will give confirmation message with the Project ID
Project<space><project_id><space>successfully<space>modified.ID><space>is<space>created! - Tutorial tryout;
Add project name description as a command-line argument to the existing updateProjectcreateProject.php script and execute.
...
Update Project
- Verify the existence of the above created project by using getAllUserProjects.php file
- User = Project owner who creates the Project. User name is given as a command line argumentUse; updateProject.php to modify or add project description.
project_ID and project_description are passed into the script as command line arguments.- Format;
php getAllUserProjectsupdateProject.php <space><user> - Sample values;
user: Thomas
- Format;
- Execute the file; all the projects created by the given user will get listed with project information.

Image - Project Detail Listing
Tutorial IV - Create, View , Update & Clone Experiment
Create Experiment
- <space><project_ID><space><project_description>
- When updating Projects currently user can only update the project description. Use quotes around the description to include spaces.
- Sample values;
project_ID: Test_Project_4063b440-332a-49af-a6de-aea21d77bb2f
project_description: Test_Airavata_Project
- Sample values;
- Successful modification of project will give confirmation message with the Project ID
Project<space><project_id><space>successfully<space>modified. - Tutorial tryout;
Add project name as a command-line argument to the existing updateProject.php script and execute.
List Project
- Verify the existence of the above created project by using getAllUserProjects.php file
- User = Project owner who creates the Project. User name is given as a command line argumentCreate an experiment with above created project using createExperiment.php script. When creating experiment User, Experiment name and Project ID (username, experiment_name, project_ID) are passed as arguments to the script.
- Format;
php createExperimentgetAllUserProjects.php<space><username><space><experiment_name><space><project_ID>
- <space><user>
- Sample values;
user: Peter
- Format;
- Execute the file; all the projects created by the given user will get listed with project information.

Image - Project Detail Listing
Tutorial IV - Create, View , Update & Clone Experiment
Create Experiment
- Create an experiment with above created project using createExperiment.php script. When creating experiment User, Experiment name and Project ID (username, experiment_name, project_ID) are passed as arguments to the script.
- Format;
php createExperiment.php<space><username><space><experiment_name><space><project_ID>
- Format;
- Changing other parameters require opening the script and modifying and saving values inside the script.
Sample values;Parameter
Sample Values
NOTE
Project ID
PHP_EXP1_17a34aa5-68cb-41e6-b189-dc94548660a6
Project iD is validated against existing projects
Passed as an argument to the script
Creating User
Donald
Users are validated against existing Airavata gateway users.
Passed as an argument to the script
Experiment Name
PHP_EXP
Not a unique value. Use can enter any value
Passed as an argument to the script
Resource Host ID
From Application Catalog Total CPU Count
10
Number of CPUs required for the experiment
nodeCount
10
Number of nodes required in each CPU
Queue Name
normal
if left blank it will pick default queue
Wall Time Limit
10
This is given in minutes
Application ID
From Application Catalog
Input Key
echo_input
Input Value
echo_output=Hello World
- Script has all the resource listed; User has to select a resource to run the experiment and comment the others. User can change existing other parameters as well in the script.
- Depending on the computational resource used the resource scheduling data part need to be entered by the user. Other defined resource scheduling parts should be commented.
Parameter
Sample Values
NOTE
Project ID
Test_Project_4063b440-332a-49af-a6de-aea21d77bb2f
Project iD is validated against existing projects
Passed as an argument to the script
Creating User
Thomas
Users are validated against existing Airavata gateway users.
Passed as an argument to the script
Experiment Name
Exp_Test_Project_1
Not a unique value. Use can enter any value
Passed as an argument to the script
Resource Host ID
trestles.sdsc.edu
stampede.tacc.xsede.org
Computational Project Account
Total CPU Count
10
Number of CPUs required for the experiment
nodeCount
10
Number of nodes required in each CPU
Number of Threads
10
Number of threads per node
Queue Name
normal
if left blank it will pick default queue
Wall Time Limit
10
This is given in minutes
JobStartTime
0
Total Physical Memory
0
Application ID
SimpleEcho2
Existing application in the selected resource
Input Key
echo_input
Input Value
echo_output=Hello World
Output Key
echo_output
Image - PHP Script Sample
Execute the file; experiment will be created and experiment ID will be generated; ID is the unique value which identifies the experiment in Airavata. - Experiment creation confirmation message;
Experiment<space><exp_ID><space>created!
View Experiment (Search by Experiment ID)
- To search and view above created experiment use getExperiment.php.
- This would list experiment parameters and information about the experiment such as output, number of nodes, status, etc…
- To view the experiment use;
- php getExperiment.php
- Format:
php getExperiment.php<space><exp_ID>
- All experiment related information will be listed along with experiment ID, experiment name, resource, application , user configuration data, etc…
Update Experiment
- To update above created experiment use updateExperiment.php.
- Currently the script modifies only the experiment name, by adding a generated text at the end of the name.
- To modify the experiment use;
- php updateExperiment.php
- Format:
php updateExperiment.php<space><exp_ID>
- Once executed experiment details will be displayed along with the new experiment name.
- Tutorial tryout;
- Modifying the script to update more data in the experiment the same way; Try updating exp_description.
- Update the script to modify existing configuration data by feeding the new values as command line arguments.
Clone Experiment
- To clone above modified experiment use cloneExperiment.php.
- Cloning will create exact copy of the existing experiment with a new experiment ID, new experiment name in CREATED state.
- To clone the experiment use;
- php cloneExperiment.php
- Format:
php cloneExperiment.php<space><exp<space><experiment_ID>id>
- Experiment modification confirmation message;
- Experiment<space><exp_ID><space>cloned!
Created<space>clone<space>with<space>ID<space><Experiment_id><space>named<space><experiment_name>
- Experiment<space><exp_ID><space>cloned!
- User can clone any experiment created by him/her irrespective of the experiment status.
- User can change existing information by updating the newly created experiment.
- Tutorial tryout;
- Try adding parameters to the script to change other data in the new experiment. E.g.: Exp name, Application, Resource, etc… and execute.
Tutorial V - Search Experiments
Get All Experiments In Project
- To view all experiments created under one project we use getAllExperimentsInProject.php.
- Format:
php getAllExperimentsInProject.php<space><project_ID>
- Format:
- All the experiments and their details created using the given project_ID will be listed.
Get All Experiments by User
- To view all experiments created by a single user we use getAllUserExperiments.php.
- Format:
php getAllUserExperiments.php<space><username>
- Format:
- All the experiments and their details created by the given user/username will be listed.
Search Experiments by Experiment Name
- Experiments can be searched by providing username along with experiment name or part of the experiment name.
- Format;
php search_experiments_by_name.php<space><username><space><experiment_name> - Example;
php search_experiments_by_name.php Test_User Exp
- Format;
- When the script is executed; all the experiments which has the given text as part of the name will be listed along with all experiment information.
- To view all experiments created by the user use percentage mark (%) in the place of experiment name.
Search Experiments by Experiment Description
...
- Experiments can be searched by providing username along with experiment description or part of the experiment description.
- Format;
php search_experiments_by_description.php<space><username><space><experiment_description> - Example;
php search_experiments_by_description.php Test_User Test
- Format;
- When the script is executed; all the experiments which has the given text as part of the description will be listed along with all experiment information.
- To view all experiments created by the user use percentage mark (%) in the place of experiment description. This would list experiment which has no description as well.
Search Experiments by Application
- Experiments can be searched by providing username along with applicationId or part of the applicationId.
- Format;
php search_experiments_by_application.php<space><username><space><applicationID> - Example;
php search_experiments_by_application.php Test_User Echo
- Format;
- When the script is executed; all the experiments which has the given text as part of the application ID will be listed along with all experiment information.
- To view all experiments created by the user use percentage mark (%) in the place of applicationID.
Tutorial VI - Launch & Cancel Experiments
Launch Experiment
- launchExperiment.php is used to launch individual experiments.
- Currently with the scripts to launch an experiment user need to pass only the experiment ID as a command line arguments to the script.
- Format;
- php launchExperiment.php<space><experiment_id>
- Upon successful launch a confirmation message will be displayed;
Experiment<space><experiment_id><space>is<space>launched!
Cancel/Terminate the Experiment
- Experiments which are not in statuses COMPLETED, CANCELED, UNKNOWN can be canceled/terminated.
- In order to cancel use;
- Format;
php terminateExperiment.php<space><Experiment ID>
- Format;
- User provided with the message; 'If there are no exceptions, assume the experiment terminated successfully'
- Experiment will be terminated/canceled. The status can be viewed by using the command getExperimentStatus.php. Status will be immediately changed to CANCELING and then to CANCELED.
Tutorial VII - Get Experiment Results & Status
Check Experiment Status
- To check the experiment status;
- Format;
php getExperimentStatus.php<space><experiment_id>
- Format;
- Experiment status will be displayed to the user in the command line.
- experiment status = COMPLETED
Check Experiment Output
- Once the experiment is COMPLETED (Status of the experiment is checked using above getExperimentStatus.php) user can check the output.
- To check the output
- Format;
php getExperimentOutputs.php<space><experiment_id>
- Format;
...

Image - Sample output
Tutorial VIII - Computational Resources
Register Computational Resource
- To add computational resources use script; registerComputeResource.php
- In order to run the script hostName and resourceDescription are passed as command line arguments.
- Format;
php registerComputeResource.php<space><hostName><space><resourceDescription>
- Format;
- Execute the above and a confirmation message will be prompted along with the resource ID (computResourceId)
Compute Resource<space><computeResourceId><space>is<space>registered! - Tutorial Tryout;
Add other parameters to the script as command line arguments and improve the script.- hostAliases
ipAddresses
Tutorial IX - Application Modules
Register Application Module
View Computational Resource
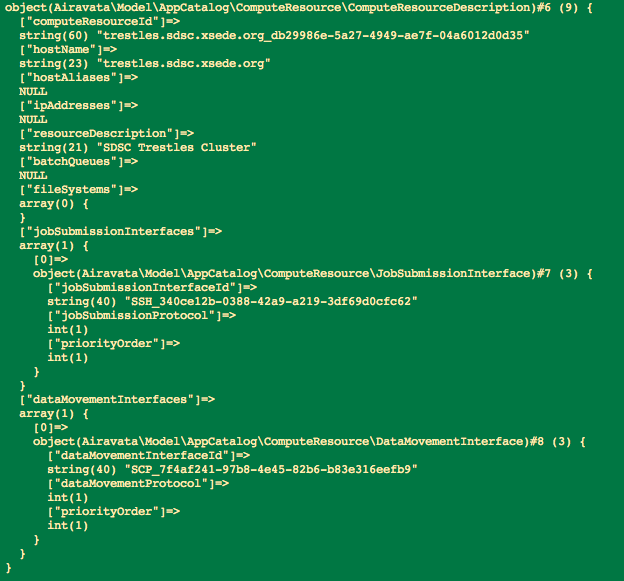
- To view computational resource information after creating above; use the script getComputeResource.php
- Format;
- php getComputeResource.php<space><computeResourceId>
Given information will be available when the script is executed;
View All Computational Resources
- User can view all existing resources linked with the gateway using script; getAllComputeResourceNames.php
- To add new application module use the script; registerApplicationModule.php
- Parameters appModuleName, appModuleVersion and appModuleDescription are passed as command line arguments to the script.
- Format;
php registerApplicationModulegetAllComputeResourceNames.php<space><appModuleName><space><appModuleVersion><space><appModuleDescription>
- Format;
- Successful execution of the script will display the created application module object along with the confirmation message

- Confirmation message contains the application module ID generated at module creation.
Application Module <appModuleId><space>is<space>registered!
Tutorial X - Application Interfaces
Register Application Interface
- php
- Computational resource names and their IDs will be listed at the script execution.

Delete Computational Resource
- User can delete existing computational resource form the gateway by using script; deleteComputeResource.php
- Format;
php deleteComputeResource.php <computeResourceId>
- Format;
- Once the script is executed user will be prompted a successfully deleted message
Computational Resource<space><computeResourceId><space>successfully<space>deleted
Tutorial IX - Application Modules
Register Application Module
- To add new application To register a new application interface using above created application module use the script; registerApplicationInterfaceregisterApplicationModule.php
- Along with application interface name and description also need to provide application module ID as command Parameters appModuleName, appModuleVersion and appModuleDescription are passed as command line arguments to the script.
- Format;
php registerApplicationInterfaceregisterApplicationModule.php<space><appName><space><appDescription><space><appModuleId><appModuleName><space><appModuleVersion><space><appModuleDescription>
- Format;
- Successful execution of the script will display the created application interface module object along with the confirmation message

- Confirmation message contains the application interface module ID generated at module creation.
Application Interface <applicationInterfaceId><space>is<space>registeredModule <appModuleId><space>is<space>registered!
...
View Application
...
Module
- Gateway user can view a particular application module details using script; getApplicationModule.php
...
- Use script updateApplicationInterface.php to update the above registered application interface.
- Format;
php updateApplicationInterfacegetApplicationModule.php<space><appInterfaceId>php<space><appModuleID>
- Format;
- Execution of Executing the script will update name of the application input and application output.

- Confirmation message contains the application interface ID generated at update.
Application Interface <applicationInterfaceId><space>is<space>updated!
List Application Interfaces
- display application module object with Application module ID, Application Module name, Description and version.

Search Application Deployments
- To view all application deployments of a particle application module use the script; getApplicationDeployedResources.php
- By providing the application module ID can view all available application deployments of the applicationFor user to view all existing applications and their application interface ID use; getAllApplicationInterfaceNames.php script.
- Format;
php getAllApplicationInterfaceNamesphp getApplicationDeployedResources.php
- Format;
- All the applications used within the gateway will be listed along with the application interface ID.

Delete Application Interface
- <space><appModuleID>
- Output will look like;

Tutorial X - Application Interfaces
Register Application Interface
- To register a new application interface using above created application module use the script; registerApplicationInterface.php
- Along with application interface name and description also need to provide application module ID as command line arguments to the script.User can delete existing application interface by providing the application interface ID as a command line argument to the script; deleteApplicationInterface.php
- Format;
php deleteApplicationInterfaceregisterApplicationInterface.php<space><appInterfaceId>
- Format;
- At sucesful execution a confirmation message will be prompted to coinfrm the deletion
Application Interface <applicationInterfaceId><space>successfully<space>deleted
List Computational Resources by the Application Interface
- php<space><appName><space><appDescription><space><appModuleId>
- Successful execution of the script will display the created application interface object along with the confirmation message
- Confirmation message contains the application interface ID generated at creation.
Application Interface <applicationInterfaceId><space>is<space>registered!
Update Application Interface
- Application interface registration is required to indicate gateway user, what inputs and outputs required for an application. To register an application interface use script updateApplicationInterface.php to update the above registered application interface.User can view all the computational resources which has a particular Application deployed by using the script; getAvailableAppInterfaceComputeResources.php
- Format;
php getAvailableAppInterfaceComputeResourcesupdateApplicationInterface.php<space><appInterfaceId>
- Format;
- All the resources with the provided application
Tutorial X - Airavata API tester
- This special script consist of several API method executions.
- Format;
php airavata-client-api-tester.php<space><username>
- Format;
- By this single script user can create project, update the project, create experiment, launch experiment, view experiment, clone experiment, etc...
- Explore the script for more infomration and build on this script.
Useful Commands
...
Action
...
Command
...
Make a directory
...
mkdir <directory name>
...
Navigate to directory
...
cd <directory name>
...
List directory content
...
ls <directory name>
...
Navigate to a directory giving path
...
cd <..../….../…../ directory name>
cd SciGaP/Airavata-PHP-Client-Samples/client-samples
...
Check for PHP existence
...
php –v
...
Install PHP & GIT
...
sudo apt-get install php5-cli
sudo apt-get install git
...
The given sequence will ensure getting a new copy from git reverting all the local changes have made to the local scripts
...
git reset --hard HEAD
git pull
- php<space><appInterfaceId>
- Execution of the script will update name of the application input and application output.
- Confirmation message contains the application interface ID generated at update.
Application Interface <applicationInterfaceId><space>is<space>updated!
List Application Interfaces
- For user to view all existing applications and their application interface ID use; getAllApplicationInterfaceNames.php script.
- Format;
php getAllApplicationInterfaceNames.php
- Format;
- All the applications used within the gateway will be listed along with the application interface ID.

Delete Application Interface
- User can delete existing application interface by providing the application interface ID as a command line argument to the script; deleteApplicationInterface.php
- Format;
php deleteApplicationInterface.php<space><appInterfaceId>
- Format;
- At sucesful execution a confirmation message will be prompted to coinfrm the deletion
Application Interface <applicationInterfaceId><space>successfully<space>deleted
List Computational Resources by the Application Interface
- User can view all the computational resources which has a particular Application interface deployed by using the script; getAvailableAppInterfaceComputeResources.php
- Format;
php getAvailableAppInterfaceComputeResources.php<space><appInterfaceId>
- Format;
- name and computational resource ID of all the resources which has the provided application deployed will get listed.
Tutorial XI - Application Deployments
Register Application Deployment
- When an application module is registered in the system AIravat need to register the deployment of the application module in one or many computational resources. In order to do so user can execute the script;
registerApplicationDeployment.php- Format;
php registerApplicationDeployment.php<space><appModuleId><space><computeHostId><space><executablePath>
- Format;
- In order to do deploy user has to give application module ID, computational Host ID and also the executable path of the application deployment.
- Tutorial tryout; User can enhance the script to add other parameters such as appDeploymentDescription, libPrependPaths, etc... as command line arguments.
View Application Deployment
- Execution of getApplicationDeployment.php script will show all the information related to the application deployment.
- Format;
php getApplicationDeployment.php<space>< appDeploymentId>
- Format;
- When the script is executed it will show;

Tutorial XII - View Application Input & Output
View Application Input
- In order to view a particular application input data this script can be used with providing application interface ID
- Format;
php getApplicationInputs.php
- Format;
- At script execution user will be provided with information on application inputs.
Sample inout information on Echo application
View Application Output
- In order to view a particular application output data this script can be used with providing application interface ID
- Format;
php getApplicationOutputs.php
- Format;
- At script execution user will be provided with information on application outputs.
Sample: Application Output Name: Echoed_Output Output Type STRING
Tutorial XIII - Gateway Preferences
View Gateway Preference
- A gateway can have a resource preference to execute an application when the same application is available in multiple reseoruces.
- To find out the gateway preference user can use getGatewayComputeResourcePreference.php script.
- Format;
- php getGatewayComputeResourcePreference.php<space> <gateway id><space><compute resource id>
Delete Gateway Preference
- To delete an existing gateway preference one can use deleteGatewayComputeResourcePreference.php script.
Tutorial XIV - Airavata API tester
- This special script consist of several API method executions.
- Format;
php airavata-client-api-tester.php<space><username>
- Format;
- By this single script user can create project, update the project, create experiment, launch experiment, view experiment, clone experiment, etc...
- Explore the script for more infomration and build on this script.
...
Overview
Content Tools
Apps