...
This
...
application
...
will
...
make
...
you
...
understand
...
how
...
Model (M),
...
View (V),
...
Controller (C)
...
architecture
...
is
...
implemented
...
in
...
JavaServer Faces.
...
This
...
application
...
will
...
make
...
use
...
of
...
UI
...
components,
...
Validator,
...
Navigation
...
and
...
Bean
...
component
...
available
...
with
...
JSF.
...
This application will take a user First Name and Last Name. Later these fields will be validated by JSF and using the controller bean and Navigation rule the output will be displayed. This application will also introduce a UI component which is a submit button.
To run this tutorial, as a minimum you will be required to have installed the following prerequisite software:
- Sun JDK 6.0+ (J2SE 1.6)
- Eclipse IDE for Java EE Developers, which is platform specific
- Apache Geronimo Eclipse Plugin 2.1.x
- Apache Geronimo Server 2.1.x
Geronimo version 2.1.x, Java 1.5 runtime, and Eclipse Ganymede are used is used in this tutorial but other versions can be used instead (e.g., Geronimo version 2.2, Java 1.6, Eclipse Europa)
Details on installing eclipse are provided in the Development environment section. This tutorial is organized in the following sections:
...
Once you have all the prerequisites installed, follow the following steps to create a project with Eclipse.
Setting Eclipse for application development
- Launch Eclipse and create a dynamic Web project as shown in the figure.

- Give the fields for the Web Project as shown in the following figure.

- Select Finish.
- Right click on the SimpleJSF project and select Properties, then select Project Facets.
- Check the box for JavaServerFaces and under the Version tab select 1.2 as the version. Select the
 Further configuration required... indicator to display the JSF Capabilities pane.

- On the JSF Capabilities window check the box and select new as shown in the figure.

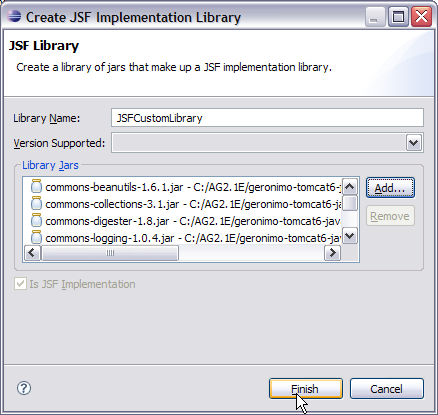
- The next window is used to create a JSF Implementation library. Give the library name as JSFCustomLibrary and add the following jars. Select Finish once done. See the figure below:
- <GERONIMO_HOME>\repository\commons-beanutils\commons-beanutils\1.
...
- 7.
...
- 0\commons-beanutils-1.
...
- 7.
...
- 0.jar
...
- <GERONIMO_HOME>\repository\commons-collections\commons-collections\3.
...
- 2\commons-collections-3.
...
- 2.jar
...
- <GERONIMO_HOME>\repository\commons-digester\commons-digester\1.8\commons-digester-1.8.jar
...
- <GERONIMO_HOME>\repository\commons-logging\commons-logging\1.0.4\commons-logging-1.0.4.jar
...
- <GERONIMO_HOME>\repository\org\apache\myfaces\core\myfaces-api\1.2.
...
- 3\myfaces-api-1.2.
...
- 3.jar
...
- <GERONIMO_HOME>\repository\org\apache\myfaces\core\myfaces-impl\1.2.
...
- 3\myfaces-impl-1.2.
...
- 3.jar
- 3.jar
- Check Deploy and modify the URL pattern to *.jsf as shown in the figure. Select Finish.

This finishes the setting up of the Eclipse IDE for application development.
Define and Implement the application Model (M)
The Model as suggested by MVC architecture handles data and logic of the application. In an enterprise application. Java Beans are used to represent collection of data and operation on that data. In JSF we use Java Beans to define the Model.
- Under the project explorer right click on the SimpleJSF project and create a new class.

- Fill the New Java Class form with jsf as the package name and FirstName as the bean class name. Select Finish once done.

- Add the following code to the FirstName bean class:
JAVAsolidFirstName.javapackage jsf; public class FirstName { String username; public String getName() { return username; } public void setName(String name) { username = name; } } - Create a second Bean class LastName and add the following code to the class: JAVAsolidLastName.java
package jsf; public class LastName { String lastname; public String getLName() { return lastname; } public void setLName(String lname) { lastname = lname; } } This completes the Model definition and implementation of the bean classes.
Define and implement Model (M) objects to Controller
- In a JSF application the Controller is implemented by a configuration file called
WebContent/WEB-INF/faces-config.xml.
...
- Double
...
- click on
...
- the
...
- file.
...
- This
...
- will
...
- open
...
- the Faces
...
- Configuration
...
- Editor.

- Select the ManagedBean tab in the editor. Select the request Managed Bean Element and select Add.

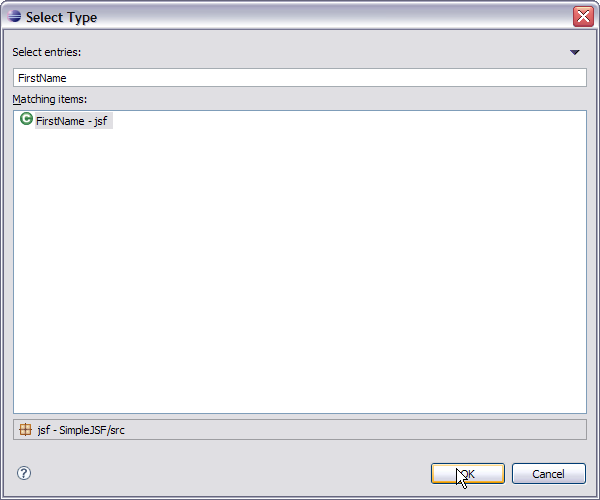
- Choose the Using an existing Java class option, select Browse. Give the search element as FirstName and select OK.
- Select Finish on the next window. Similarly add the other bean LastName. Now select the Source tab in the Faces configuration Editor. It displays the bean components (i.e., the Model) in the controller.

This completes the description of Model to Controller.
Define and implement View (V) in application
- Right click on WebContent and create a new folder with the name pages.

- Right click on pages folder and create a JSP called
login.jsp. Select Finish.

- Similarly create another JSP page called
welcome.jsp. - Now we have to include the Tag Library Descriptors (TLD) in our application. Geronimo comes packaged with the required TLD's, which can be found in:
solidLocation of TLD<GERONIMO_HOME>\repository\org\apache\myfaces\core\myfaces-impl\1.2.
...
3\myfaces-impl-1.2.
...
3.jar\META-INF\myfaces-html.tld
...
and
...
<GERONIMO_HOME>\repository\org\apache\myfaces\core\myfaces-impl\1.2.
...
3\myfaces-impl-1.2.
...
3.jar\META-INF\myfaces_core.tld
...
- To add these two TLD's
...
- in
...
- the
...
- application,
...
- in Eclipse under the Project Explorer right click on WEB-INF.
...
- Create
...
- a
...
- folder
...
- called tld.
...
- Copy
...
myfaces-html.tld
...
- and
...
myfaces_core.tld
...
- to
...
- this
...
- folder.
...
- The next step is to populate
login.jsp
...
- and
...
welcome.jsp
...
- with
...
- data
...
- ActionScript
...
- solid
...
- login.jsp
...
<%@
...
taglib
...
uri="/WEB-INF/tld/myfaces-html.tld"
...
prefix="h"
...
%>
...
<%@
...
taglib
...
uri="/WEB-INF/tld/myfaces_core.tld"
...
prefix="f"
...
%>
...
<html>
...
<head>
...
<meta
...
http-equiv="Content-Type"
...
content="text/html;
...
charset=ISO-8859-1">
...
<title>Welcome
...
to
...
Apache
...
Geronimo</title>
...
</head>
...
<body>
...
<f:view>
...
<h1><h:outputText
...
value="Welcome
...
to
...
Apache
...
Geronimo"
...
/></h1>
...
<h:form>
...
<h:message
...
for="firstName"
...
style="color:
...
red;"
...
/> <h:message
...
for="lastName"
...
style="color:
...
red;"
...
/>
...
<br>
...
<h:outputText
...
value="Enter
...
your
...
first
...
name"
...
/>
...
<br>
...
<h:inputText
...
id="firstName"
...
value="#{firstName.name}"
...
required="true"> <f:validateLength
...
minimum="4"
...
maximum="10"
...
/>
...
</h:inputText>
...
<br>
...
<h:outputText
...
value="Enter
...
your
...
last
...
name"
...
/>
...
<br>
...
<h:inputText
...
id="lastName"
...
value="#{lastName.LName}"
...
required="true">
...
<f:validateLength
...
minimum="3"
...
maximum="10"
...
/>
...
</h:inputText>
...
<br>
...
<h:commandButton
...
id="submit"
...
action="validated"
...
value="Enter"
...
/>
...
</h:form>
...
</f:view>
...
</body>
...
</html>
...
- ActionScriptsolidwelcome.jsp
...
<%@
...
taglib
...
uri="/WEB-INF/tld/myfaces-html.tld"
...
prefix="h"%>
...
<%@
...
taglib
...
uri="/WEB-INF/tld/myfaces_core.tld"
...
prefix="f"%>
...
<%@
...
page
...
language="java"
...
contentType="text/html;
...
charset=ISO-8859-1"
...
pageEncoding="ISO-8859-1"%>
...
<!DOCTYPE
...
html
...
PUBLIC
...
"-//W3C//DTD
...
HTML
...
4.01
...
Transitional//EN"
...
"http://www.w3.org/TR/html4/loose.dtd">
...
<html>
...
<head>
...
<meta
...
http-equiv="Content-Type"
...
content="text/html;
...
charset=ISO-8859-1">
...
<title>Welcome</title>
...
</head>
...
<body>
...
<f:view>
...
<h3><h:outputText
...
value="You
...
have
...
successfully
...
logged in: "
...
/>
...
<h:outputText
...
value="#{firstName.name}
...
"
...
/>
...
<h:outputText
...
value="#{lastName.LName}"
...
/>
...
<h:outputText
...
value="!"
...
/></h3>
...
</f:view>
...
</body>
...
</html>
...
- Lets
...
- now
...
- try
...
- to
...
- understand
...
- what
...
- each
...
- line
...
- of
...
- code
...
- represents.
...
- The
...
- first
...
- two
...
- lines
...
- in
...
login.jsp
...
- defines
...
- two
...
- tag
...
- libraries
...
- ActionScript
...
- solid
...
- Code
...
- Snippet
...
- from
...
- login.jsp
...
<%@
...
taglib
...
uri="/WEB-INF/tld/myfaces-html.tld"
...
prefix="h"
...
%>
...
and
...
<%@
...
taglib
...
uri="/WEB-INF/tld/myfaces_core.tld"
...
prefix="f"
...
%>
...
- These
...
- two
...
- sets
...
- of
...
- tags
...
- are
...
- defined
...
- by
...
- JSF.
...
- The first one
...
- with
...
- the
...
- namespace
...
- "h"
...
- is
...
- used
...
- to
...
- generate
...
- html
...
- views.
...
- The second one
...
- with
...
- the
...
- namespace
...
- "f"
...
- handles
...
- the
...
- core
...
- functionalities
...
- of
...
- JSF
...
- like
...
- type
...
- conversions,
...
- validations
...
- and
...
- listeners
...
- for
...
- input
...
- from
...
- user.
...
- The
...
- next
...
- few
...
- lines
...
- contains
...
- the
...
- usual
...
- html
...
- tags
...
- ActionScript
...
- solid
...
- Code
...
- Snippet
...
- from
...
- login.jsp
...
<html>
...
<head>
...
<meta
...
http-equiv="Content-Type"
...
content="text/html;
...
charset=ISO-8859-1">
...
<title>Welcome
...
to
...
Apache
...
Geronimo</title>
...
</head>
...
<body> - The tag <f:view>
...
- represents
...
- the
...
- start
...
- of
...
- JSF code.
- This line of code Represents the input tag. The id="firstName" and value="firstName.name" comes from the Managed Bean. ActionScriptsolidCode Snippet from login.jsp
<h:inputText id="firstName"
...
value="#{firstName.name}"
...
required="true">
...
- Using the Faces Configuration Editor, select firstName bean under Managed Bean tab. The Managed Bean Name is firstName. See the figure below.

This completes the implementation of View (V) in the application. The other tags <f:validateLength> and <h:commandButton> will be explained in the next section.
Define the Validator Component
The code <f:validateLength minimum="4" maximum="10"/>
...
defines
...
the
...
input
...
text
...
length
...
to
...
be
...
minimum
...
of
...
4
...
characters
...
and
...
maximum
...
of
...
10
...
characters.
...
This
...
is
...
the
...
standard
...
validation
...
provided
...
by
...
core
...
tag
...
libraries.
...
Other
...
examples
...
of
...
validators
...
are
...
Validate
...
Long
...
Range
...
tag,
...
Validate
...
Double
...
Range tag , and so on. JSF also provides a Validator interface which can be implemented to create custom validators.
The code <h:message for=""
...
style="color:
...
red;"/>
...
defines
...
the
...
error
...
message.
...
When
...
the
...
user
...
inputs
...
the
...
controller
...
validates each
...
of
...
the
...
inputs.
...
If
...
the
...
inputs
...
are
...
invalid
...
Controller
...
displays
...
the
...
same
...
page
...
again
...
with
...
an
...
error
...
message
...
for
...
the
...
errors.
...
The
...
color:red
...
suggests
...
that
...
the
...
error
...
message
...
will
...
be
...
displayed
...
in
...
red
...
color.
...
Define
...
and
...
implement
...
the
...
View
...
navigation
...
by
...
Controller (C)
...
This
...
step
...
uses the
...
JSP
...
page
...
navigation
...
in
...
the
...
order
...
of
...
user
...
inputs
...
and
...
validation
...
by
...
controller.
...
If
...
all
...
the
...
inputs
...
are
...
valid
...
than
...
the
...
controller
...
performs
...
the
...
action
...
as
...
suggested
...
by
...
the
...
HTML
...
form.
...
This
...
action
...
is
...
submitted
...
by
...
the
...
HTML
...
form as
...
a
...
command
...
button.
...
The
...
code
...
in
...
the
...
input.jsp
...
<h:commandButton
...
id="submit"
...
action="validated"
...
value="Enter"
...
/>
...
checks to determine if all the inputs are valid. This is the button which submits the form to controller if all inputs are valid. In this case the commandButton tells the controller to execute the validated action if all the inputs are valid.
The pages navigation in a JSF applicaiton is defined by faces-config.xml.
...
Follow
...
the
...
steps
...
before to
...
define
...
the
...
pages
...
navigation.
...
- Launch
...
- the
...
- Faces
...
- Configuration
...
- Editor
...
- by
...
- double
...
- clicking
...
- on
...
faces-config.xml
...
- Select
...
- the
...
- Navigation
...
- Rule tab
...
- in
...
- the
...
- Configuration
...
- Editor.
...
- Under
...
- the
...
- Palette
...
- window
...
- select
...
- Page.
...
- This
...
- will
...
- select
...
- a
...
- PageFlow Page GUI
...
- object
...
- .

- Drag the mouse over the Navigation Rule Window and click on the window. This will give a Select JSP File window. Select the
login.jspas shown in the figure and select OK.

- Similarly add the
welcome.jsppage on the Navigation Rule window. See the figure below:

- Select Link from the Palette window and join the two pages as shown in the figure:

- Select the link between the two pages and go to properties view and set the value for From Outcome field as validated. This is because of the tag <h:commandButton id="submit" action="validated" value="Enter" />. Once all the inputs are valid the action taken is validated. See the figure.

- Once done have a look the Source tab in the Faces Navigation Editor. A <navigation-rule> tag has been introduced into the
faces-config.xml. This rule instructs the Controller that if all the inputs are valid from a form in the/pages/login.jsp,
...
- and
...
- the
...
- action
...
- is
...
- validated
...
- ,
...
- then
...
- go
...
- to
...
- page
...
-
/pages/welcome.jsp.
...

- Now lets add a
index.jsp
...
- under
...
- WebContent as
...
- follows
...
- : ActionScript
...
- solid
...
- index.jsp
...
<%@
...
page
...
language="java"
...
contentType="text/html;
...
charset=ISO-8859-1"pageEncoding="ISO-8859-1"%>
...
<\!DOCTYPE
...
html
...
PUBLIC
...
"-//W3C//DTD
...
HTML
...
4.01
...
Transitional//EN"
...
"http://www.w3.org/TR/html4/loose.dtd">
...
<html>
...
<body>
...
<jsp:forward
...
page="/pages/login.jsf"
...
/>
...
</body>
...
</html>
...
- What is the
login.jsf
...
- in
...
- the
...
- forward
...
- pathtag.
...
- If
...
- you
...
- look
...
- at
...
- the
...
web.xml
...
- , *.jsf
...
- is
...
- used
...
- as
...
- the
...
- URL
...
- pattern
...
- to
...
- suggest
...
- that
...
- forwarded
...
- page
...
- be
...
- taken
...
- care
...
- by
...
- Java
...
- Server
...
- Faces
...
- Servlet.
...
This
...
- completes
...
- the
...
- Application
...
- Development
...
- process.
...
- The next step
...
- is
...
- to
...
- deploy
...
- and
...
- test
...
- the
...
- application.
...
Deploy
...
and
...
Test
...
the
...
application
...
Right
...
click on
...
the
...
project
...
SimpleJSF
...
and
...
select Run
...
As ->
...
Run
...
On
...
Server.
...
This
...
will
...
deploy
...
the
...
sample
...
on
...
the Apache
...
Geronimo
...
Server
...
and
...
a
...
Login
...
page
...
will
...
be
...
launched
...
.

Lets give some sample inputs:
Sample Input #1:
First Name: Mickey
Last Name: Mouse
Both the First Name as well as Last Name fulfills the validation rules, so this form will be submitted to controller and according to the navigation rule controller will launch a welcome.jsp page.

Sample Input #2:
First Name: Mic
Last Name: Mouse
First Name should be minimum of length=4 but in this case First Name is of length=3. In this case validation will fail and an error message will be generated by controller for First Name field.

Sample Input #3:
First Name: Mickey
Last Name: Mo
Last Name should be minimum of length=3 but in this case Last Name is of length=2. In this case validation will fail and an error message will be generated by controller for Last Name field.
