| Wiki Markup |
|---|
{scrollbar} |
This tutorial walks you through configuring, developing and deploying an enterprise application with Eclipse and Geronimo. To run this tutorial, as a minimum you will be required to have installed the following prerequisite software.
- Sun JDK 5.0+ (J2SE 1.5)
- Eclipse 3.3.1.1 (Eclipse Classic package of Europa distribution), which is platform specific
- Web Tools Platform (WTP) 2.0.1
- Data Tools Platform (DTP) 1.5.1
- Eclipse Modeling Framework (EMF) 2.3.1
- Graphical Editing Framework (GEF) 3.3.1
Details on installing eclipse are provided in the Development environment section. This tutorial is organized in the following sections:
| Table of Contents |
|---|
Let us briefly understand this application. This application will take you through creating a simple Stateless Session EJB. Later we will develop a Java Application client to access this EJB. EJB development will make use of annotations which are introduced in Java EE5.
Setting up Eclipse IDE for EJB application development.
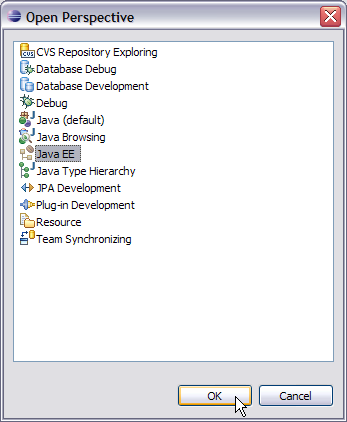
- Launch Eclipse and select Window->Open Perspective->Other->JavaEE and select Ok
- Right Click under Project Explorer and create a new EJB project. Mention the fields as shown in the figure. For all the other windows give default values and select Finish.

- Under Project Explorer, Right click on SimpleEJB and create a new package ejb. Mention the fields as shown in the figure. Select Finish.

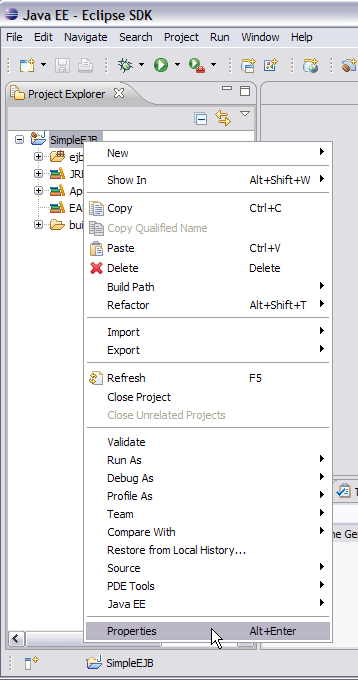
- Right click on SimpleEJB project under project explorer and select properties.
- Select Java Build Path and select Add External JARs.

- Browse to the directory <GERONIMO_HOME>\repository\org\apache\geronimo\specs\geronimo-ejb_3.0_spec\1.0.1 and select geronimo-ejb_3.0_spec-1.0.1.jar.

- Once done select Ok. You can see the geronimo-ejb_3.0_spec-1.0.1.jar added to the build path. This jar provides the essential classes required for the EJB development.

This completes the setting of Eclispe IDE for EJB application development.
Developing EJB Local interface, EJB Remote Interface and Bean Class
- Right Click on the ejb package and create a new Remote interface CountryCapital as shown in the figure

- Enter the fields as shown in the figure and select Finish.

- Add the following code as shown below
Here @Remote is an annotation used to declare the interface as a Remote Interface.Code Block title CountryCapital.java borderStyle solid package ejb; import javax.ejb.Remote; @Remote public interface CountryCapital { public String capitalName(String countryName); } - Similarly create a Local interface CountryCapitalLocal. Add the following code to the interface
Code Block title CountryCapitalLocal.java borderStyle solid package ejb; import javax.ejb.Local; @Local public interface CountryCapitalLocal { public String capitalName(String countryName); }
Similarly in this code we have @Local annotation which declares this interface as local.
In remote as well as local interface we have the declaration for only one Business method. So only this method will be visible to the application client. Methods other than capitalName if implemented in the Bean class will be private to Bean class and will not be visible to application client. - Next step is to create a Bean Class which will implement the Business method to be executed. Right Click on the jsf package and create a new class.

- Enter the class name as CountryCapitalBean.

- Populate the bean class with the code as follows
Code Block title CountryCapitalBean.java borderStyle solid package ejb; import javax.ejb.Stateless; @Stateless public class CountryCapitalBean implements CountryCapital,CountryCapitalLocal{ public String capitalName(String countryName) { String capital=new String("No such country"); if (countryName.equalsIgnoreCase("India")) { capital="New Delhi"; } if (countryName.equalsIgnoreCase("United States Of America")) { capital="Washington DC"; } if (countryName.equalsIgnoreCase("China")) { capital="Bejing"; } return capital; } }
This completes the development of EJB application.
| Warning | ||
|---|---|---|
| ||
Due to some limitations in Geronimo Eclipse Plugin the generated deployment plan(openejb-jar.xml) does not have the correct namespace. Replace the existing namespace as shown in the figure with the following |

Developing a Java Client
- Select File->New->Project->Java->Java Project. Select Next.

- In the New Project Window give the Project name ss ApplicationClient and select Next.

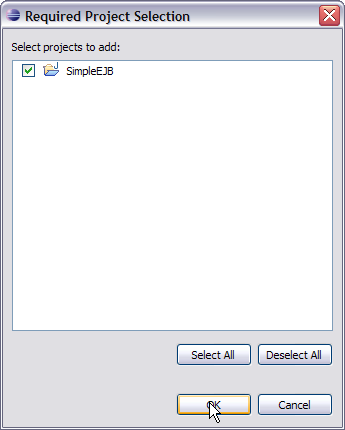
- On the Java Settings window. Select the Projects tab and click add.

- Check the box for SimpleEJB and Select OK.
 !
! - This will add the SimpleEJB project to the build path of the Application Client as shown in the figure. Select Finish.
 !
! Tip title Why to add EJB project to build path :( This is because the build path is used to find the classes referenced by your Client source code. These classes will be required for compilation of Client source code.
- Right click on package appclient and create a new Java Class.
! - Give the class name as ApplicationClient as shown in the figure. Select Finish.
 !
! - Populate the ApplicationClient.java with the following code
Code Block title ApplicationClient.java borderStyle solid package appclient; import java.io.BufferedReader; import java.io.InputStreamReader; import java.util.Properties; import ejb.CountryCapital; import javax.naming.Context; import javax.naming.InitialContext; public class ApplicationClient { public static void main(String [] args) { String capital=new String(); try{ Properties prop=new Properties(); prop.put(Context.INITIAL_CONTEXT_FACTORY, "org.apache.openejb.client.RemoteInitialContextFactory"); prop.put("java.naming.provider.url", "ejbd://localhost:4201"); Context context = new InitialContext(prop); CountryCapital myejb = (CountryCapital)context.lookup("CountryCapitalBeanRemote"); System.out.println("Give the name of a country"); BufferedReader in= new BufferedReader(new InputStreamReader(System.in)); String str=""; str=in.readLine(); capital=myejb.capitalName(str); System.out.println(capital); } catch(Exception e) { e.printStackTrace(); } } }
Let us try to understand following code snippetCode Block title CodeSnippet borderStyle solid Properties prop=new Properties(); prop.put(Context.INITIAL_CONTEXT_FACTORY, "org.apache.openejb.client.RemoteInitialContextFactory"); prop.put("java.naming.provider.url", "ejbd://localhost:4201"); Context context = new InitialContext(prop); CountryCapital myejb =(CountryCapital)context.lookup("CountryCapitalBeanRemote");Info title Useful Information The above code suggests that which InitialContextFactory to be used to create the InitialContext. Here we are using org.apache.openejb.client.RemoteInitialContextFactory to create the InitialContext.
In this case as the EJB server is the naming service provider and has naming service runnning at Port 4201.
So we need to specify the location of the EJB server. In this case it is ejbd://localhost:4201.
Once this is done we have the context that provides us the ability to lookup and get objects.Tip title Why is the lookup name CountryCapitalBeanRemote?? :( This will be discussed in deploy and run section.
- Next step is to add org.apache.openejb.client.RemoteInitialContextFactory Class to the build path. This is because the application client needs this Class to create the InitialContext as explained above.
- Right click on ApplicationClient project under project explorer. Select Properties.

- Select Java Build Path. Under Java Build Path select Libraries-> Add External JARs.
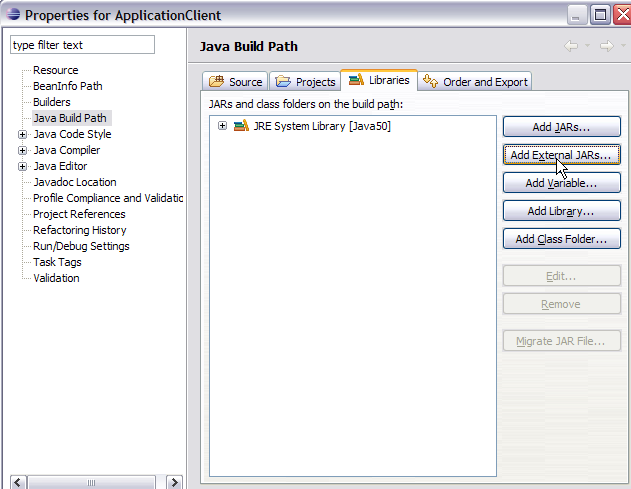
- Browse to <GERONIMO_HOME>\repository\org\apache\openejb\openejb-client\3.0-beta-2 and Select the jar openejb-client-3.0-beta-2.jar. Select Ok.
This completes the Application Client Development.
Deploy and Run
This section will take you through the deployment of the EJB application. Later we will run the application client with some sample inputs.
- To deploy the EJB application on to server Export the EJB application as a jar file. Right Click on SimpleEJB application and Select Export->EJB JAR File as shown in the figure.

- Browse to the Destination of your choice and Select Finish. This will export the SimpleEJB application as a jar file. This jar will be later deployed on to Geronimo server
Warning title Why to Export EJB? Why cannot I use Eclipse for deploying the EJB application on the server? Due to some limitation Eclipse is not able to deploy the EJB application on to server. This issue will be fixed very soon.
- Start the server and Launch the Administrative Console. Under Applications, Select Deploy New and Deploy the SimpleEJB.jar on the server.
- Once the Deployment is successful. Open <GERONIMO_HOME>/var/log/server.log. Find the following in server.log
As can be seen openEJB container after deployment suggests the Remote as well as Local lookup names.Code Block title Snippet from server.log after deployment of SimpleEJB borderStyle solid 18:16:39,750 INFO [startup] Jndi(name=CountryCapitalBeanLocal) --> Ejb(deployment-id=SimpleEJB/CountryCapitalBean) 18:16:39,750 INFO [startup] Jndi(name=CountryCapitalBeanRemote) --> Ejb(deployment-id=SimpleEJB/CountryCapitalBean)
In this case since the SimpleEJB application and Java Application Client are running on different instances of JVM. We need to have the CountryCapitalBeanRemote as the lookup name. - Under Eclipse Right Click on the Application Client project and Run as a Java application.
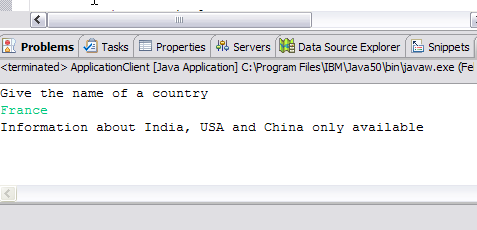
Sample Input1: India

Sample Input2: China

Sample Input3: United States Of America

Sample Input4: France