The Java Persistence API is a new programming model under EJB3.0 specification (JSR220) for the management of persistence and object/relational mapping with Java EE and Java SE. With JPA, developers can easily develop java applications that perform operations on relational database management systems using java objects and mapping. In that way, java applications developed using JPA are not only portable across different platforms, but also applications can be easily developed using simple yet powerful programming model provided by JPA. This greatly improves application maintainability against ever changing database world. JPA insulates applications from all the complexity and non-portable boilerplate code involved in database connectivity and operations.
Apache geronimo uses OpenJPA for providing Java Persistence API to Java EE applications deployed in the server. Even though JPA is a part of EJB3.0 spec, it is independent of it. Hence, JPA can be used in JavaSE, web and ejb applications in the same uniform way.
Below tutorial illustrates the use of container managed entity manager object. When @PersistenceContext annotation is used, container injects EntityManager object to the reference. The persistence context of the entity manager is propagated along with any transaction that is currently active. If the transaction spans across components, all the entity manager object references that point to same persistence unit will have the same persistence context through out the transaction. Thus, any changes made to the entities through any entity manager reference, are seen through other entity manager references. The persistence scope of the container managed entity manager is Transaction by default. The transaction-type is always JTA. That is, entity manager object is always registered with the transaction which is active when entity manager is invoked. In summary, the life cycle of the entity manager and the associated persistence context is managed automatically by the container.
The tutorial creates an enterprise application that has an ejb module and a web module. The ejb module uses Account entity with AccountNumber as primary key along with OwnerName and Balance attributes to create accounts in the AccountDB database. The AccountDB is created in the embedded derby database. The AccountBean in the ejb module has the methods to create the Account entities, deposit amount into an account, withdraw amount from an account and retrieve the available balance in a account. The wed module has a servlet that retrieves source account number, destination account number and the amount from user, and performs transfer of the amount from source account to destination account.
The web module uses container injected EntityManager object to check whether the source account has enough available balance to perform the transfer. If yes, it invokes ejb to withdraw the amount from the source account and deposits the same amount in the destination account. Finally, the servlet uses the injected EntityManager object to print the balances in the source and destination accounts. All the above mentioned operations are performed within a JTA transaction. So, persistence context of the entity manager is propagated across web and ejb modules. Hence, any changes made to the entities in ejb module are seen in the web modules when the available balance values are printed.
In order to develop, deploy and run the application, the following environment is required.
- Sun JDK 5.0+ (J2SE 1.5)
- Eclipse 3.3.1.1 (Eclipse Classic package of Europa distribution), which is platform specific
- Web Tools Platform (WTP) 2.0.1
- Data Tools Platform (DTP) 1.5.1
- Eclipse Modeling Framework (EMF) 2.3.1
- Graphical Editing Framework (GEF) 3.3.1
The tutorial is divided into the following sections.
The entire application can be downloaded from this link.
Setting the Eclipse environment
1. Download Apache Geronimo2.1 and install it on the server. Look into the geronimo documentation for
instructions.
2. Install the eclipse IDE and download geronimo eclipse plugin and install it on top of eclipse. Look into the
geronimo eclipse plugin documentation for instructions.
3. Create a runtime environment for Apache Geronimo2.1 in the eclipse. Look into the geronimo eclipse plugin
documentation for instructions to install a runtime for Apache Geronimo2.1.
Creating ejb application with entities
1. Open the eclipse tool and change the perspective to Java EE by clicking on
Windows => Open Perspective => Other. It will open up Open Perspective wizard.
Select Java EE from the list and click OK button.

2. Right click on the Package Explorer and select EJB Project.

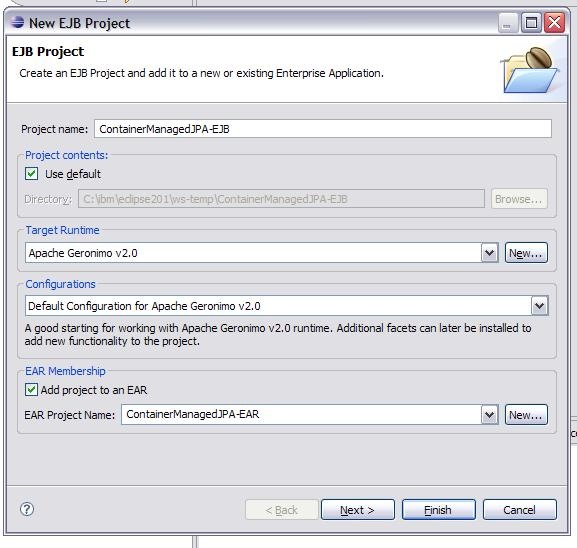
3. This will open up the New EJB Project wizard. Provide the values for Project Name, Target Runtime as given in the screen shot below. Click on Next button.
If target runtime is not setup, create a new target runtime pointing to geronimo installation directory. For more information, look at the geronimo documentation that explains setting up eclipse plugin for geronimo and setting up runtime environment. This setup is required to resolve class dependencies during compilation.
4. Select the check boxes as given in the screen shot below and click on the Next button.

5. Select the checkboxes as given in the below screen shot and click on the Next button.

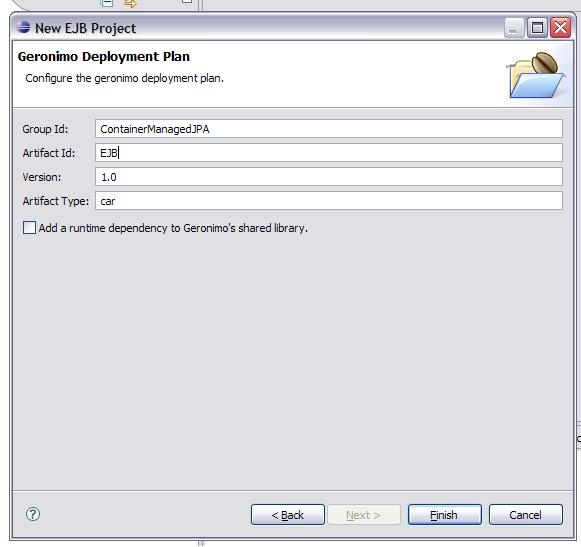
6. Provide the following values in textboxes and click on the Finish button.
7. Right click on the ContainerManagedJPA-EJB project and navigate to New => Class option. Provide the
following values in the New Java Class wizard and click on Finish button.

8. Copy the following contents into Account.java.
package sample.jpa;

import java.io.Serializable;
import javax.persistence.Entity;
import javax.persistence.Id;
import javax.persistence.PostLoad;
import javax.persistence.PostUpdate;
import javax.persistence.PrePersist;
import javax.persistence.PreUpdate;
import javax.persistence.Table;


@Entity
@Table(name = "ACCOUNTCME")
public class Account implements Serializable {

 @Id
 public int accountNumber;
 public String ownerName;
 public double balance;


 public Account() {
  accountNumber = (int) System.nanoTime();
 }

 public String toString() {
 return "Acc.# " + accountNumber + ", owner" + ownerName
        + ", balance: " + balance
        + " $";
 }

 @PrePersist
 public void prepersist() {
  System.out.println("pre persist!!");
 }

 @PreUpdate
 public void preupdate() {
  System.out.println("pre update!!");
 }

 @PostUpdate
 public void postupdate() {
  System.out.println("post update!!");
 }

 @PostLoad
 public void postload() {
  System.out.println("post load!!");
 }

 public int getAccountNumber() {
  return accountNumber;
 }

 public void setAccountNumber(int accountNumber) {
  this.accountNumber = accountNumber;
 }

 public String getOwnerName() {
  return ownerName;
 }

 public void setOwnerName(String ownerName) {
  this.ownerName = ownerName;
 }

 public void setBalance(double balance) {
  this.balance = balance;
 }

 public double getBalance() {
 return balance;
 }
}
9. Similarly, create AccountInterface.java and copy the following contents.
package sample.jpa;

public interface AccountInterface {

 public Account open(int accountNumber) ;
 public double getBalance(int accountNumber);
 public void deposit(int accountNumber,double amount) ;
 public double withdraw(int accountNumber,double amount) ;
}
10. Similarly, create AccountBean.java.java and copy the following contents.
package sample.jpa;


import javax.ejb.EJBException;
import javax.ejb.Remote;
import javax.ejb.Stateless;
import javax.ejb.TransactionAttribute;
import javax.ejb.TransactionAttributeType;
import javax.persistence.EntityManager;
import javax.persistence.PersistenceContext;
import javax.persistence.PersistenceContextType;


@Stateless
@Remote(AccountInterface.class)
public class AccountBean implements AccountInterface {

 @PersistenceContext(type=PersistenceContextType.TRANSACTION)
 private EntityManager manager;


 @TransactionAttribute(TransactionAttributeType.REQUIRED)
 public Account open(int accountNumber) {
  Account account = manager.find(Account.class, accountNumber);
  if(account == null){
   account = new Account();
   account.ownerName = "anonymous";
   account.accountNumber = accountNumber;
   manager.persist(account);
   return account;
  }else{
   throw new EJBException("Account already exists..!!. Account Number = "+accountNumber);
  }
 }

 @TransactionAttribute(TransactionAttributeType.REQUIRED)
 public double getBalance(int accountNumber) {
  Account account = manager.find(Account.class, accountNumber);
  if(account==null)
   throw new EJBException("Account not found..!!. Account Number = "+accountNumber);
  return account.balance;
 }

 @TransactionAttribute(TransactionAttributeType.REQUIRED)
 public void deposit(int accountNumber, double amount) {
  Account account = manager.find(Account.class, accountNumber);
  if(account==null)
   throw new EJBException("Account not found..!!. Account Number = "+accountNumber);
  double new_balance = account.getBalance() + amount;
  account.setBalance(new_balance);
 }

 @TransactionAttribute(TransactionAttributeType.REQUIRED)
 public double withdraw(int accountNumber, double  amount) {
  Account account = manager.find(Account.class, accountNumber);
  if(account==null)
   throw new EJBException("Account not found..!!. Account Number = "+accountNumber);
  if (amount > account.getBalance()) {
   return 0;
  }else {
   double new_balance = account.getBalance() - amount;
   account.setBalance(new_balance);
   return amount;
  }
 }
}
11. As outlined above, right click on the META_INF directory of ContainerManagedJPA-EJB project and
create persistence.xml. Copy the following contents into persistence.xml.
<?xml version="1.0" encoding="UTF-8"?>
<persistence xmlns="http://java.sun.com/xml/ns/persistence"
 xmlns:xsi="http://www.w3.org/2001/XMLSchema-instance" version="1.0"
 xsi:schemaLocation="http://java.sun.com/xml/ns/persistence
 http://java.sun.com/xml/ns/persistence/persistence_1_0.xsd">

 <persistence-unit name="AccountUnit" transaction-type="JTA">
  <description>ContainerManagedJPA</description>
  <provider>org.apache.openjpa.persistence.PersistenceProviderImpl</provider>
  <jta-data-source>AccountDS</jta-data-source>
  <class>sample.jpa.Account</class>
 </persistence-unit>
</persistence>
12. Since we are going to use EJB annotations, the META-INF/ejb-jar.xml will not have any declarations. The contents of the META-INF/openejb-jar.xml file should be as below. Otherwise, modify it accordingly.
<?xml version="1.0" encoding="UTF-8"?>
<openejb-jar xmlns="http://openejb.apache.org/xml/ns/openejb-jar-2.2"
 xmlns:naming="http://geronimo.apache.org/xml/ns/naming-1.2"
 xmlns:sec="http://geronimo.apache.org/xml/ns/security-2.0"
 xmlns:sys="http://geronimo.apache.org/xml/ns/deployment-1.2">

 <sys:environment>
  <sys:moduleId>
   <sys:groupId>ContainerManagedJPA</sys:groupId>
   <sys:artifactId>EJB</sys:artifactId>
   <sys:version>1.0</sys:version>
   <sys:type>car</sys:type>
  </sys:moduleId>

  <dependencies>
   <dependency>
    <groupId>console.dbpool</groupId>
    <artifactId>AccountDS</artifactId>
   </dependency>
  </dependencies>

 </sys:environment>
 <enterprise-beans/>
 </openejb-jar>
13. Finally the project ContainerManagedJPA-EJB should like as below.

Creating web application
1. Right click on the Project Explorer and select New => Project. This will popup New Project wizard.
Select Dynamic Web Project under option Web. Click on the Next button.

2. Provide the values as given in the screen shot below on the New Dynamic Web Project wizard. Please note that Add project to an EAR checkbox is check to add this web project to ContainerManagedJPA-EAR created during the creation of ContainerManagedJPA-EJB project.

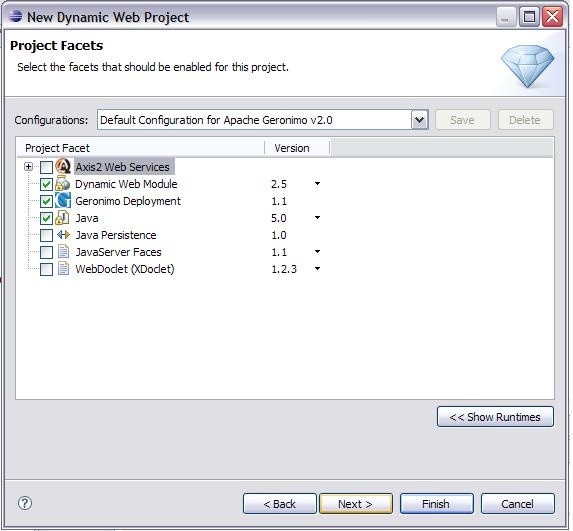
3. In the next screen, select the Version values as given in the below figure and click on the Next button.
4. Check on the Generate Deployment Descriptor checkbox and click on the Next button. On the next screen, configure the deployment plan as follows. After this, click on the Finish button to complete creating web project

5. Right click on the WebContent folder of the web project and navigate to New => HTML to create the index.html file as given in the screen shot. Click on the Next button and on the next screen click on the Finish button. The content of the index.html is provided below the screen shot.
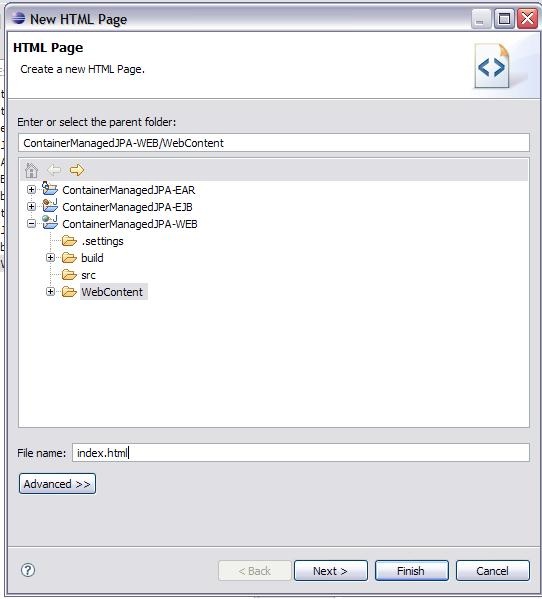
<!DOCTYPE html PUBLIC "-//W3C//DTD HTML 4.01 Transitional//EN" "http://www.w3.org/TR/html4/loose.dtd">
<html>
<head>
<meta http-equiv="Content-Type" content="text/html; charset=ISO-8859-1">
<title>Input Account Numbers and Amount</title>
</head>
<body>
<form name="input" action="/ContainerManagedJPA-WEB/Test"method="get">
<table border="0">
<tr>
<td align="right"><font color="black" size="5"> Debit Account Number</font></td>
<td align="left"><input type="text" name="account1"></td>
</tr>
<tr>
<td align="right"><font color="black" size="5"> Credit Account Number</font></td>
<td align="left"><input type="text" name="account2"></td>
</tr>
<tr>
<td align="right"><font color="black" size="5"> Amount to be Transfered </font></td>
<td align="left"><input type="text" name="amount"></td>
</tr>
<tr>
<td align="right"><input type="submit" value="Submit"></td>
<td></td>
</tr>
</table>
</form>
</body>
</html>
6. Right click on the web project and navigate to New => Servlet and click on it.

7. On the Create Servlet wizard, provide the values as given in the below screen shot and click on the Next button.

8. Select the defaults in the next screens and finally click on the Finish button.
9. Copy the below content into the servlet Test.java
package sample.jpa;

import java.io.IOException;
import java.io.PrintWriter;

import javax.ejb.EJB;
import javax.naming.Context;
import javax.naming.InitialContext;
import javax.persistence.EntityManager;
import javax.persistence.PersistenceContext;
import javax.servlet.ServletException;
import javax.servlet.http.HttpServletRequest;
import javax.servlet.http.HttpServletResponse;
import javax.transaction.UserTransaction;

public class Test extends javax.servlet.http.HttpServlet
 implements javax.servlet.Servlet {

 static final long serialVersionUID = 1L;

 @PersistenceContext(unitName="AccountUnit")
 private EntityManager em;

 @EJB AccountInterface accountBean;

 public Test() {
  super();
 }

 protected void doGet(HttpServletRequest request,
                      HttpServletResponse response)
                      throws ServletException,
                      IOException {


 PrintWriter out = response.getWriter();

 int accNo1 = Integer.parseInt(
              request.getParameter("account1"));
 int  accNo2 = Integer.parseInt(
              request.getParameter("account2"));
 double amount = Double.parseDouble(
                 request.getParameter("amount"));

 try{
  Context ctx = new InitialContext();
  UserTransaction ut = (UserTransaction)
                        ctx.lookup("java:comp/UserTransaction");
  ut.begin();

  Account account = em.find(Account.class, accNo1);
  if(account.getBalance() < amount){
   throw new Exception("<font size=5>Account "+accNo1+
         " does not have enough balance "+amount+"</font>");
  }else{
   outputText(out, "2", "green",
              "Message : Getting the balance amount available in Account Number "
              +accNo1+" in the Test Servlet");

   outputText(out, "5", "black","Account ="+
              accNo1+" : Current balance "+account.getBalance());
   out.println("<br/>");

   outputText(out, "2", "green","Message : Withdrawing amount ("+
              amount+") using AccountBean from the Account Number "+accNo1);

   accountBean.withdraw(accNo1, amount);

   outputText(out, "2", "green",
     "Message : Getting the balance amount available in Account Number "+accNo1+
     " in the Test Servlet after withdrawing");

   double balance = account.getBalance();
   outputText(out, "5", "black","Account ="+accNo1+
   " : After withdrawing the balance is "+balance);
   out.println("<br/>");

   outputText(out, "2", "green",
    "Message : Getting the balance amount available in Account Number "+
    accNo2+" in the Test Servlet");

   Account account2 = em.find(Account.class, accNo2);
   outputText(out, "5", "black","Account ="+
    accNo2+" : Current balance "+account2.getBalance());

   out.println("<br/>");

   outputText(out, "2", "green",
    "Message : depositing amount ("+amount+
    ") using AccountBean to the Account Number "+accNo2);

   accountBean.deposit(accNo2, amount);
   outputText(out, "2", "green",
   "Message : Getting the balance amount available in Account Number "+
   accNo2+" in the Test Servlet after depositing");

   outputText(out, "5", "black","Account ="+
              accNo2+" : After depositing the balance is "+
              account2.getBalance());

   out.println("<br/>");
   }
  ut.commit();
  }catch(Exception e){
  throw new ServletException(e);
 }
}

 protected void doPost(HttpServletRequest request,
                       HttpServletResponse response)
                       throws ServletException, IOException {
 }

 private void outputText(PrintWriter out,
                         String fontsize,
                         String color,
                         String text){
  out.println("<font size="+fontsize+" color="+
                color+">"+text+"</font>"+"<br/>");
 }
}
10. Right click on the ContainerManagedJPA-WEB project and click on Properties to open Properties for ContainerManagedJPA-WEB wizard. Click on the Java Build Path and Projects tab. Click on the Add button and add ContainerManagedJPA-EJB project. Finally, click on the OK button on Properties for ContainerManagedJPA-WEB wizard. This is required because, ContainerManagedJPA-WEB projects looks up AccountInterface ejb in the ContainerManagedJPA-EJB project. To resolve the dependency during compilation, the EJB project has to be added to the build path of the WEB project.

Setting up the database tables and the Datasource
1. Start the geronimo server and open the admin console on a browser window with the url
http://localhost:8080/console.
2. Click on the Embedded DB => DB Manager on the Console Navigation portlet.
3. On the Run SQL portlet on the right side, enter AccountDB in the Create DB textbox and click on the
Create button.

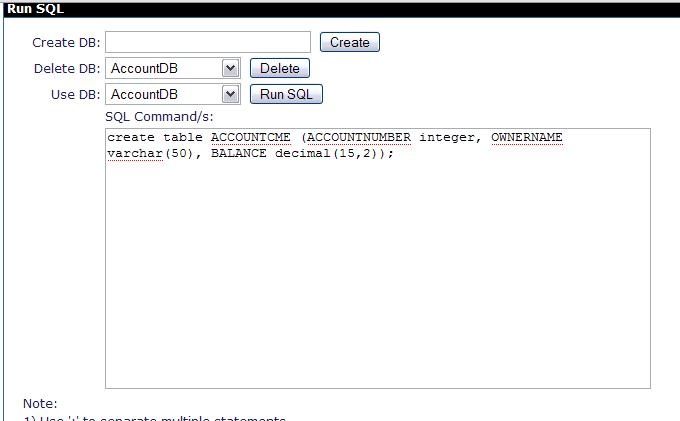
4. The above step will create AccountDB database. On the same screen, enter the below SQL command on the SQL Command/s textarea and select AccountDB in the Use DB combo box and click on the Run SQL button. This will create ACCOUNTCME table in the AccountDB database.
create table ACCOUNTCME (ACCOUNTNUMBER integer, OWNERNAME varchar(100), BALANCE decimal(15,2));
5. Also insert two rows using the below SQL command.
insert into ACCOUNTCME values (1, 'Phani',2000);
insert into ACCOUNTCME values (2, 'Nag',2000);
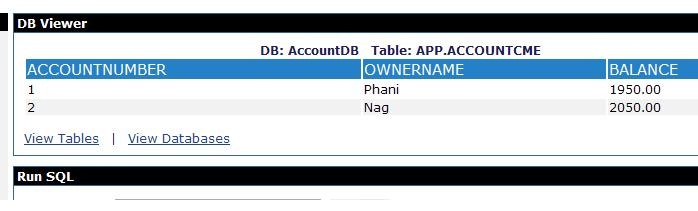
After inserting the rows, table will look like the below screen shot.

6. We need to deploy datasource over AccountDB database for JPA. This datasource will be used by JPA to connect to database and perform DML operations. Admin console can be used to deploy a datasource over AccountDB. Click on the services => Database Pools in the Console => Navigation portlet. This will display the list of database pools currently running in the server.

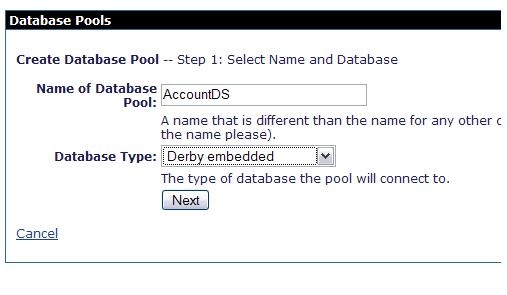
7. Click on the Using the Geronimo database pool wizard link. This will open up the Database pools portlet as follows. Provide the value for Name of the Database pool as AccountDS and select Derby embedded as below and click on the Next button.
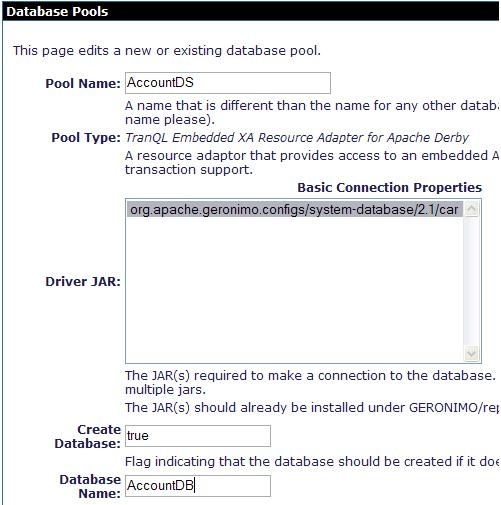
8. On the next screen, select the JAR file listed in the Driver JAR select box and provide AccountDB as the value for Database Name and click on the Deploy button at the bottom. This will deploy the data source and display the list of datasources currently deployed on the server.
9. In the eclipse, open the openejb-jar.xml and provide the dependency to the AccountDS. Finally, the openejb-jar.xml should be as below. This configuration is already done in the step-12 of Creating ejb application with entities above
Deploying the (ear) application
1. Deploy the EAR file as follows
C:\Geronimo-2.1\bin>deploy.bat --user system --password manager deploy c:\temp\ContainerManagedJPA-EAR.ear
Using GERONIMO_BASE:   C:\Geronimo-2.1
Using GERONIMO_HOME:   C:\Geronimo-2.1
Using GERONIMO_TMPDIR: var\temp
Using JRE_HOME:        C:\SDK-May-31-2007\jre
    Deployed default/ContainerManagedJPA-EAR/1.0/car
      `-> ContainerManagedJPA-WEB.war @ /ContainerManagedJPA-WEB
      `-> ContainerManagedJPA-EJB.jar
22. Running the application
1. Open a browser window and hit the URL as http://localhost:8080/ContainerManagedJPA-WEB/
This page displays a html form with input fields for Debit Account Number, Credit Account Number and Amount to be Transferred. Enter the values as given in the below screen shot and click on the Submit button.

2. On the next page, several messages are displayed as below. From the messages, it can seen that the persistence context is propagated along with the transaction and hence the changes made to Account balance in the ejb is observed in the servlet when account.getBalance(accountNumber) is called.

3. The values of the balance fields in the ACCOUNTCME table after the transaction are as follows.