EARLY MASHUP DRAFT: NOT READY FOR USE!
Purpose and Target Audience
This attempts to provide a conceptual description of the release process, for anyone who wants or needs to know how the pieces all fit.
Overview
The release process compiles source code, archives the binaries into jars, collects the jars and associated resources, and assigns a unique identifier to the collection. It also runs tests and reports coverage. The diagram below provides a high-level view.
Goals
- Ensure correct and repeatable results
- Deploy quickly and easily
- Identify changes and their source
- Facilitate communication between stakeholders
- Minimize overhead, in resources and knowledge
Basic Concepts
CVS Repository
Collection of versioned files: primarily source, tests, scripts, resources, and docs
Ivy Repository
Set of modules
Module
Collection of files that work together to provide a service: primarily jars and resources
Identified by module name
Has a set of artifacts, and a collection of instances, called releases
Release
Instance of a module
Identified by release name and number (for humans), release version (for scripts), release date/time, release tag (for CVS)
Has a builder (account name), a report, and a set of install-instances
Install-instance
Instance of a release
Identified by install environment (test, uat, prod), install host-machine, and install date/time
Has an installer (account name)
Flow
This is an overview of the steps to release. Details are at Steps to Release to Testing.
1. Determine the name of the module to be released, the name of the release, and the name of the branch (if not releasing from the main codeline).
For example:
- the Plum release of the module workgroup_regis
or:
- the Shadow release of the module regadmin from the Branch-Silver-b39 branch
2. Login to build machine and execute script to create a release (the Release Builder bubble in the diagram above).
This will:
- send mail announcing that the release is coming to TEST
- tag source
- checkout source from tag
- build from checked out source and store results and a report in Ivy repository
3. Once a release has been created, an instance of it can be created in any environment: test, UAT, or prod.
To install an instance of a release (called an Install Instance in the diagram above), login to the target machine and execute the install script for that module. This will checkout scripts, retrieve the release artifacts from the Ivy repository, and record data about the install instance in the Ivy repository.
Update releases
In the standard release process we rebuild the module to be released, along with each dependent module that has changed since that module was last released. All rebuilds use the latest code checked in on the specified codeline.
In some cases, it's useful to only update the module to be released, while keeping the dependent modules unchanged. For example if a problem is found late in testing, and the fix and its effect are limited to the module to be released, then to minimize retesting we would like to be sure that the fix is the only change we introduce. An update release is created in the same way as the standard release, with the same of flow of events, but dependencies are statically bound rather than dynamically set to the latest version available. Details are in the section Creating an Update Release at Steps to Release to Testing.
Preparation: The integration process
To smooth the transition from the development environment to the testing and production environments, developers use an integration process that is very similar to the release process: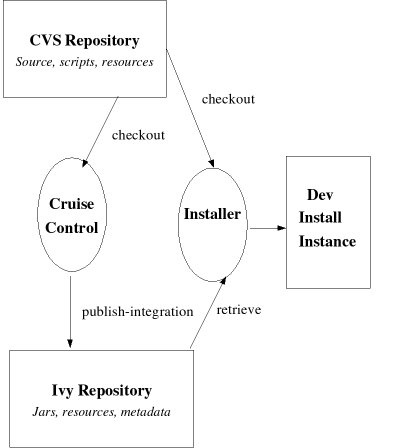
In this process an instance of a module is called an integration. In the development process, integrations play the same role that releases play in the release process but integrations are lightweight. They are designed for quick deployment, not traceability. Integrations lack name, number, report, and tag. Also, they do not retain information on builder, date/time built (although that is encoded in version), or installed instances.
CruiseControl software creates integrations continuously, as files are checked in.
For More Information
If you must actually create a release, then you will need to follow the instructions given in Steps to Release to Testing.
If you need greater detail than that guide provides, then you must read the scripts.
Purpose and Scope
The release process compiles source code, archives the binaries into jars, collects the jars and associated resources, and assigns a unique identifier to the collection. It also runs tests and reports coverage. The release process aims to help:
- Ensure correct and repeatable results
- Deploy quickly and easily
- Identify changes and their source
- Facilitate communication between stakeholders
- Minimize overhead, in resources and knowledge
This page provides an overview of the steps performed by the build system when a person performs the Steps to Release to Testing. If you need to modify those steps, then this is the place to start to find your way around. This also can serve as an intermediate level tutorial, providing a look "under the hood" for persons performing the Steps to Release to Testing, or adding details for interested readers of Introduction to the Release Process. For more detail, read the scripts.
Stages of the Release Process
1. Setup: Prepare environment and build system
2. Recursive Release: Release main module and all the modules it depends on
3. Install
1. Setup: Prepare environment and build system
This step ensures that:
Build pre-conditions are satisfied
1. Build initiated under designated JDK, on designated build server (currently JDK 1.5.0 on dev-tools2)
2. Build has required inputs: name of release, and name of existing module to be released
3. Build workspace is empty
Scripts used by build system are up-to-date (for correctness) and labeled (for repeatability):
1. Release is assigned a version, independent of the release name: a timestamp, suffixed by -release (e.g. 20070604134307-release)
2. Build system is tagged with the same timestamp, prefixed by Release- (e.g. Release-20070604134307), then checked out of CVS repository using the tag
Tools and properties used by build system are set up
1. Ivy settings are declared
2. Module properties are set: category, name, cvs location
3. Build number calculated
Build started
4. Module source is tagged, then checked out of CVS repository using the tag
5. Invoke publish-release target
2. Recursive Release: Release main module and all the modules it depends on
Resolve main module dependencies
Download from ivy repository all jars and other artifacts declared (in Ivy file) as dependencies needed to compile, test, or deploy main module. Put them in the ivy cache.
Deliver a resolved ivy file of the current module, and possibly do recursive delivery of dependencies
1. Generate a resolved ivy file, with dynamic revisions replaced by the static ones that have been found during the resolve step, so the ivy file can be used later to obtain the same versions of artifacts it depends on.
2. Trigger the recursive release process, using the resolved ivy file, because the module may have dependencies which need to be released.
Install
Checkout bootstrap script for install and invoke it, passing it the module name, version, branch, and instance (if instance=test). Upon completion of install, copy release metadata to Ivy repository.
These files are generated by build.
Bootstrap: Check install host, set CVS options, load release metadata, start install of module
Install module:
1. Checkout module
2. Note: 2a, 2b, and 2c are interleaved (not sequential)
2a. Perform steps common to all installs
- Start logging install activity
- Get instance (uat or prod)
- Use Ivy to download zip containing resources necessary for the installation: install properties, configurations files, jsps, htmls, ... depending on the application type
- Extract the zip in the module directory
- Load install properties: since properties are immutable, loading in order of increasing scope allows specific cases to override general defaults.
Some properties are set dynamically during the install, using Ant's token filtering mechanism. For details, see Install Tokens. - Use Ivy to download jars required by module (including the jar published by the module itself) directly in destination jar dir
- Stop logging
2b. Perform install steps specific to this category
Files shared by modules in the category are collected in a shared module. That shared module, declared as an Ivy install dependency, is installed in this step.
Category |
Shared module |
|---|---|
regis |
regis_admin |
slog |
slog_admin |
web |
web_configuration_tomcat6 |
xmldoc |
web_configuration_tomcat6 |
2c. Perform install steps specific to this module