The guide can be found below in wiki form, or downloaded as a file: (DOC) (PDF)
Introduction
General Test Configuration & Startup
Server configuration
Console configuration
SSL configuration
JMXMP configuration
Console Startup
Server Management Connections
ConfigurationManagement MBean
LoggingManagement MBean
ServerInformation MBean
UserManagement MBean
VirtualHostManager MBean
Queue Management
Notifications
Exchange Management
Connection Management
Introduction
The Qpid JMX Management Console is a standalone Eclipse RCP application for managing and monitoring the Qpid Java server utilising its JMX management interfaces.
This guide details procedures and expected outcomes for performing functional testing of the console.
General Test Configuration & Startup
Server configuration
For the purposes of the console testing, the server should initially be configured as detailed below. To assist, example server configuration files are provided (these serve as example and may need updated when testing a different version of server). The can be downloaded along with a message sending utility here
VirtualHosts: 'localhost', 'development', and 'test'
minimumAlertRepeatGap = 30sec, maximumMessageCount = 89, & maximumMessageAge = 10sec in 'test' VirtualHost
Queues in 'test' VirtualHost, bound to 'amq.direct' Exchange: ping, queue, ping_1
Username & Passwords: admin:admin
Management access rights: admin=admin
Console configuration
When the console is started for the first time on a machine, it creates the file qpidmc_navigation.ini in the .qpidmc subfolder of the current 'home' directory. This file stores the Qpid server addresses and MBean Favourites which are added to the consoles connection tree, in order that they may be persisted between sessions.
When Queue attributes are selected in the Queues selection screen these are also saved in this folder, in the file qpidmc_queue_attributes.ini. Ideally, these files and the containing folder should be removed before testing begins to ensure this functionality still works fully.
Typical 'home' directories are C:\Documents and Settings\<userid> for Windows XP, C:\Users\<userid> for Windows Vista + 7, and /home/<userid>/on Linux.
SSL configuration
Newer Qpid Java servers can protect their JMX connections with SSL, and this is enabled by default. When attempting to connect to a server with this enabled, the console must be able to verify the SSL certificate presented to it by the server or the connection will fail.
If the server makes use of an SSL certificate signed by a known Signing CA (Certification Authority) then the console needs no extra configuration, and will make use of Java's default system-wide CA TrustStore for certificate verification (you may however have to update the system-wide default CA TrustStore if your certified is signed by a less common CA that is not already present in it).
If however the server is equipped with a self-signed SSL certificate, then the management console must be provided with an appropriate SSL TrustStore containing the public key for the SSL certificate, so that it is able to validate it when presented by the server. The server ships with a script to create an example self-signed SSL certificate, and store the relevant entries in a KeyStore and matching TrustStore. This script can serve as a guide on how to use the Java Keytool security utility to manipulate your own stores, and more information can be found in the JSSE Reference Guide: http://java.sun.com/javase/6/docs/technotes/guides/security/jsse/JSSERefGuide.html#CustomizingStores
Supplying the necessary details to the console is performed by setting the javax.net.ssl.trustStore and javax.net.ssl.trustStorePassword environment variables when starting it. This can be done at the command line, but the preferred option is to set the configuration within the qpidmc.ini launcher configuration file for repeated usage. This file is equipped with a template to ease configuration, this should be uncommented and edited to suit your needs. It can be found in the root of the console releases for Windows, and Linux. For Mac OS X the file is located within the consoles .app application bundle, and to locate and edit it you must select 'Show Package Contents' when accessing the context menu of the application, then browse to the Contents/MacOS sub folder to locate the file.
JMXMP configuration
Older releases of the Qpid Java server can make use of the Java Management Extensions Messaging Protocol (JMXMP) to provide protection for their JMX connections. This occurs when the server has its main configuration set with the management 'security-enabled' property set to true. In order to connect to this configuration of server, the console needs an additional library that is not included within the Java SE platform and cannot be distributed with the console due to licensing restrictions.
You can download the JMX Remote API 1.0.1_04 Reference Implementation from the Sun website here. The included jmxremote-1_0_1-bin/lib/jmxremote_optional.jar file must be added to the plugins/jmxremote.sasl_1.0.1 folder of the console release (again, in Mac OS X you will need to select 'Show package contents' from the context menu whilst selecting the management console bundle in order to reveal the inner file tree). Following this the console will automatically load the JMX Remote Optional classes and negotiate the SASL authentication profile type when encountering a JMXMP enabled Qpid Java server.
Console Startup
The console can be started in the following way, depending on platform:
- Windows: by running the qpidmc.exe executable file.
- Linux: by running the qpidmc executable.
- Mac OS X: by launching the Qpid Management Console.app application bundle.
Server Management Connections

Test ID |
Test Steps |
Expected Result |
LOGIN-0 |
Start the console (described above) |
The GUI opens |
LOGIN-1 |
Click the New Connection icon |
The New Connection dialog opens |
LOGIN-1.1 |
Enter hostname=<hostname>, port= 8999, Username=admin, Password=admin and then click Connect. |
The node <hostname>:8999 will be added in the Qpid Connections pane at the left-hand side of the console window, and expanded to show the ConfigurationManagement, UserManagement, ServerInformation, and LoggingManagement MBeans as well as a VirtualHosts folder containing child folders development, localhost, and test. |
LOGIN-2 |
Select the <hostname>:8999 node in the Qpid Connections tree and then click the Disconnect button in the toolbar |
The connection is closed and the <hostname>:8999 tree node collapses to a single entry. |
LOGIN-3 |
Select the <hostname>:8999 node in the Qpid Connections tree and then click the "Reconnect" icon |
The Reconnect dialog opens |
LOGIN-3.1 |
Enter Username=admin, Password=admin and then click Connect. |
The server node will be expanded to show the ConfigurationManagement, UserManagement, ServerInformation, and LoggingManagement MBeans as well as a VirtualHosts folder containing child folders development, localhost, and test. |
ConfigurationManagement MBean
Pre-Requisite: Connect to a server as described in test LOGIN -0 or LOGIN -3 above.
Test ID |
Test Steps |
Expected Result |
CONF-0 |
Select the ConfigurationManagement node for the server in the Qpid Connections tree. |
The ConfigurationManagement MBean is opened in the MBean view, showing the reloadSecurityConfiguration operation. |
CONF-1 |
Modify the server configuration file, updating a VirtualHost security sub-section, adding a firewall configuration entry to deny AMQP access from a certain IP address. |
N/A |
CONF-1.1 |
Press the Execute button and confirm the prompt to carry out the reloadSecurityConfiguration operation |
The updated security behaviour is applied and an Operation Successful dialog is shown. |
CONF-1.2 |
Attempt an AMQP connection from the blocked IP address |
The connection fails. |

LoggingManagement MBean
Pre-Requisite: Connect to a server as described in test LOGIN -0 or LOGIN -3 above.

Test ID |
Test Steps |
Expected Result |
LOG-0 |
Select the LoggingManagement node for the server in the Qpid Connections tree. |
The LoggingManagement MBean is opened in the MBean view, showing the Runtime Options tab. |
LOG-1 |
Double click the org.apache.qpid LoggerName |
The Set Runtime Logger Level dialog opens. |
LOG-1.1 |
Select a Level of ERROR from the combo box and click ok. |
The org.apache.qpid Logger and all those below it beginning with org.apache.qpid (except org.apache.qpid.server.queue.AMQQueueMBean) are now shown at ERROR Level in the table. |
LOG-2 |
Press the Edit button in the Runtime RootLogger Level area. |
The Set Runtime RootLogger Level dialog opens. |
LOG-2.1 |
Select a Level of WARN from the combo box and click ok. |
The Level is updated to WARN, plus any Logger (except qpid.message) without a highlighted blue Logger as a prefix inherits from the RootLogger and will also change to WARN Level in the table. |
LOG-3 |
Select the org.apache.qpid.server.Main LoggerName and press the Edit Selected Logger button. |
The Set Runtime Logger Level dialog opens. |
LOG-3.1 |
Select a Level of WARN from the combo box and click ok. |
The org.apache.qpid.server.Main Logger is now shown at WARN Level in the table, all others remain unchanged. |

LOG-4 |
Select the ConfigurationFile Options tab in the LoggingManagement MBean view. |
The ConfigurationFile Options tab opens to show the Loggers defined in the configuration file and their Level |
LOG-5 |
Double click the org.apache.qpid LoggerName |
The Set ConfigFile Logger Level dialog opens. |
LOG-5.1 |
Select a Level of INFO from the combo box and click ok. |
The org.apache.qpid Logger is now shown at INFO Level in the table |
The following tests are not supported by the original version of the LoggingManagement MBean.
Test ID |
Test Steps |
Expected Result |
LOG-6 |
Press the Reload Config File button and confirm the prompt to carry out the action. |
The configuration file should be reloaded (success is indicated by lack of error prompts, and a note in the status bar at lower left). |
LOG-6.1 |
Select the Runtime Options tab in the LoggingManagement MBean view. |
The Runtime Options tab opens to show the effective Levels of all active Loggers. |
LOG-7 |
Select the org.apache.qpid.server.Main LoggerName and press the Edit Selected Logger button. |
The Set Runtime Logger Level dialog opens. |
LOG-7.1 |
Select a Level of INHERITED from the combo box and click ok. |
The org.apache.qpid.server.Main Logger is now shown at INFO Level in the table like its parent org.apache.qpid as it once again inherits its Level instead of having its own defined. |
ServerInformation MBean
Pre-Requisite: Connect to a server as described in test LOGIN -0 or LOGIN -3 above.
Test ID |
Test Steps |
Expected Result |
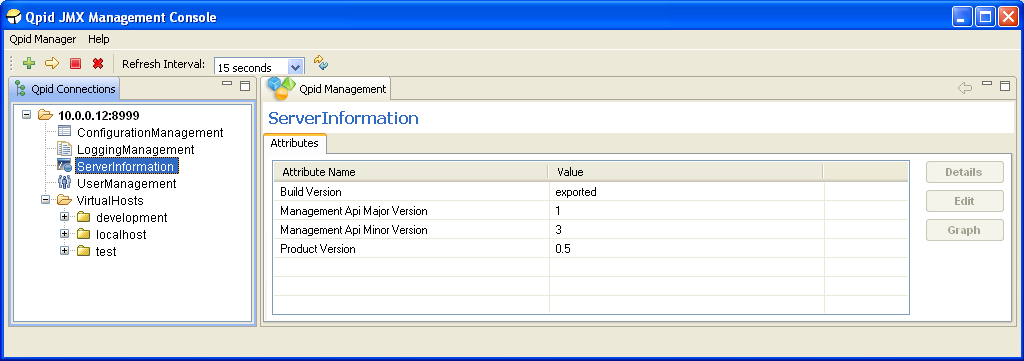
INFO-0 |
Select the ServerInformation node for the server in the Qpid Connections tree. |
The ServerInformation MBean is opened in the MBean view, showing the Attributes tab, displaying version information about the server |
UserManagement MBean
Pre-Requisite: Connect to a server as described in test LOGIN -0 or LOGIN -3 above.

Test ID |
Test Steps |
Expected Result |
USER-0 |
Select the UserManagement node in the Qpid Connections tree. |
The LoggingManagement MBean is opened in the MBean view |
USER-1 |
Click the Add New User button |
The Add New User dialog opens |
USER-1.1 |
Enter Username=guest1, Password=guest1 and select Read Only access rights, then click ok. |
guest1 will be added to the password and management rights files with indicated password and rights, and be added to the table with Read Only access rights. |
USER-2 |
Select guest1 in the Users table and click the Set Rights button, |
The Set Rights dialog opens |
USER-2.1 |
Select Admin rights and press ok. |
guest1 rights in the management rights files will be changed to admin, and it will be displayed in the table with Admin rights. |
USER-3 |
Select guest1 in the Users table and click the Set Password button, |
The Set Password dialog opens |
USER-3.1 |
Enter Password=newpass and press ok. |
guest1 will altered to have password newpass in the password file. There will be no visible change in the table. |
USER-4 |
Select guest1 in the Users table and click the Delete Users(S) button, then validate the operation when prompted for confirmation. |
guest1 will be removed from the password file and rights file and disappear from the table. |
USER-5 |
Repeat USER-1 &1.1 |
As USER-1.1 |
USER-6 |
Repeat USER-1 & 1.1 with Username=client1, Password=client1 and select No Access rights. |
As USER-1.1 but with the new credentials, and the rights file will not be modified. |
USER-7 |
Alter the password file on disk to add user1:user1, and alter the access rights file on disk to add user1=readwrite. |
No change. The password and rights files are only read once at startup by the server, until instructed to reload them via JMX. |
USER-8.1 |
Press the Reload User Data button |
user1 will be added to the server and shown in the table with Read & Write access rights. |
USER-8 |
Select the <hostname>:8999 node in the Qpid Connections tree and then click the Disconnect button in the toolbar |
The connection is closed and the <hostname>:8999 tree node collapses to a single entry. |
USER-8.1 |
Select the <hostname>:8999 node in the Qpid Connections tree and then click the "Reconnect" icon |
The Reconnect dialog opens |
USER-8.2 |
Enter Username=user1, Password=user1 and then click Connect. |
The server node will be expanded to show the ServerInformation MBean as well as a VirtualHosts folder containing child folders development, localhost, and test. |
USER-9 |
Select the <hostname>:8999 node in the Qpid Connections tree and then click the Disconnect button in the toolbar |
The connection is closed and the <hostname>:8999 tree node collapses to a single entry. |
USER-9.1 |
Select the <hostname>:8999 node in the Qpid Connections tree and then click the "Reconnect" icon |
The Reconnect dialog opens |
USER-9.2 |
Enter Username=client1, Password=client1 and click Connect. |
The connection attempt fails, as user client1 has no management access rights. |
VirtualHostManager MBean
Pre-Requisite: Connect to a server as described in test LOGIN -0 or LOGIN -3 above.
Test ID |
Test Steps |
Expected Result |
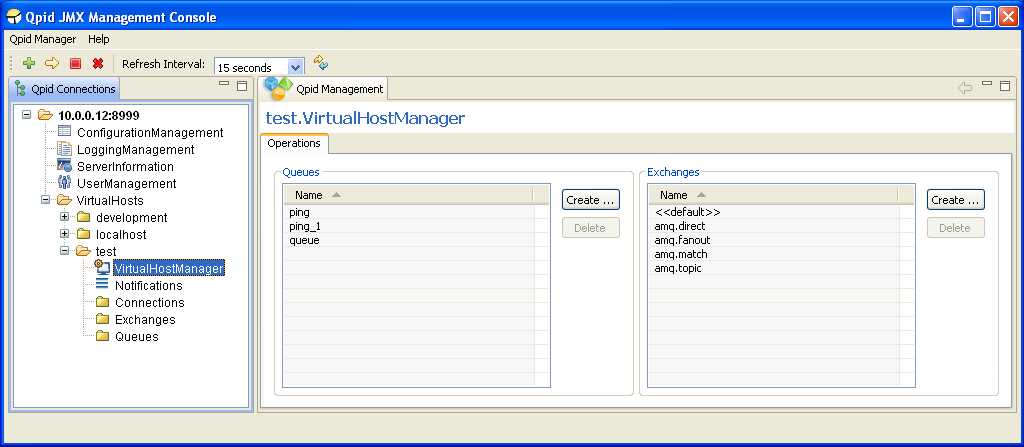
VHOST-0 |
Select the VirtualHostManager node for the test VirtualHost in the Qpid Connections tree. |
The VirtualHostManager MBean is opened in the MBean view |
VHOST-1 |
Double-click ping_1 in the Queues table. |
The ping_1 mbean is opened in the MBean view. |
VHOST-1.1 |
Press the back arrow button at the top right corner of the view. |
The VirtualHostManager MBean is opened in the MBean view |
The following tests are based on the use of user with Admin or Read & Write management access rights. Read Only level management rights do not permit a user to perform actions that modify the server state, such as creating or deleting Queues and Exchanges. Attempting such operations will be met by an Access Denied security warning at the point of remote execution.
VHOST-2 |
Press the Create button in the Queues group |
The Create Queue dialog opens |
VHOST-2.1 |
Enter Name=newQueue and then press OK. |
newQueue is created and shown in the Queues table. |
VHOST-3 |
Select newQueue in the Queues table and press the Delete button in the Queues group. |
The Delete Queue(s) dialog opens, listing newQueue to be deleted. |
VHOST-3.1 |
Press the OK button. |
newQueue is removed from the server and disappears from the Queues table. |
VHOST-4 |
Press the Create button in the Exchange group |
The Create Exchange dialog opens |
VHOST-4.1 |
Enter Name=newExchange and select type=directthen press OK. |
newExchange is created and shown in the Exchanges table. |
VHOST-5 |
Select newExchange in the Exchange table and press the Delete button in the Exchanges group. |
The Delete Exchange(s) dialog opens, listing newExchange to be deleted. |
VHOST-5.1 |
Press the OK button. |
newExchange is removed from the server and disappears from the Exchanges table_._ |
Queue Management
Pre-Requisite: Connect to a server as described in test LOGIN -0 or LOGIN -3 above. Delete the console qpidmc_queue_attributes.ini settings file as directed in the initial Console Configuration sub-section.
Test ID |
Test Steps |
Expected Result |
QUEUE-0 |
Select the Queues node for the test VirtualHost in the Qpid Connections tree. |
The Queue selection screen is opened in the MBean view, listing Queues ping,ping_1, and queue in the table. |
QUEUE-1 |
Press the SelectAttributes button. |
The Select Attributes dialog opens. |
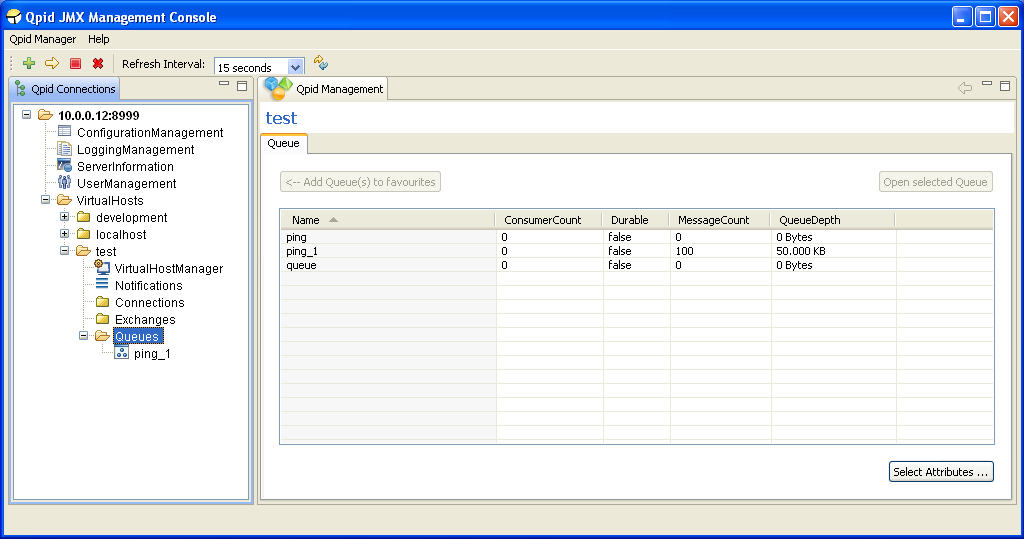
QUEUE-1.1 |
Ensure the following attributes re ConsumerCount, Durable, MessageCount, QueueDepth and then press OK. |
The table updates to show additional columns for the new Attributes. All queues have additional attribute values of 0, false, 0, and 0bytes. |
QUEUE-2 |
Run the ping_sender.sh utility script, but do not press a key to exit the script when the sending is complete. |
100 messages of size 512bytes are sent to the ping_1 queue. After a refresh interval elapses, the table updates to show ping_1 having 100 messages and a queue depth of 50.000 KB, as well as a new queue named TempQueue<etc>. |
QUEUE-2.1 |
Press a key in the script shell to make it exit. |
After another refresh interval elapses, the table will update to show the TempQueue has been deleted. |
QUEUE-3 |
Select queue ping_1 in the table and click the Add Queue(s) to favourites button, then click the + icon at the Queues node to expand the Queues node. |
ping_1 has been added as a child node of Queues. |
QUEUE-3.1 |
Select the new ping_1 node in the Qpid Connections tree. |
The ping_1 queue MBean opens in the MBean View, showing the Attributes tab. |
QUEUE-3.2 |
Select the Operations tab in the ping_1 MBean view. |
The Operations tab opens, with the details of the first 50 messages on ping_1 visible in the table. |
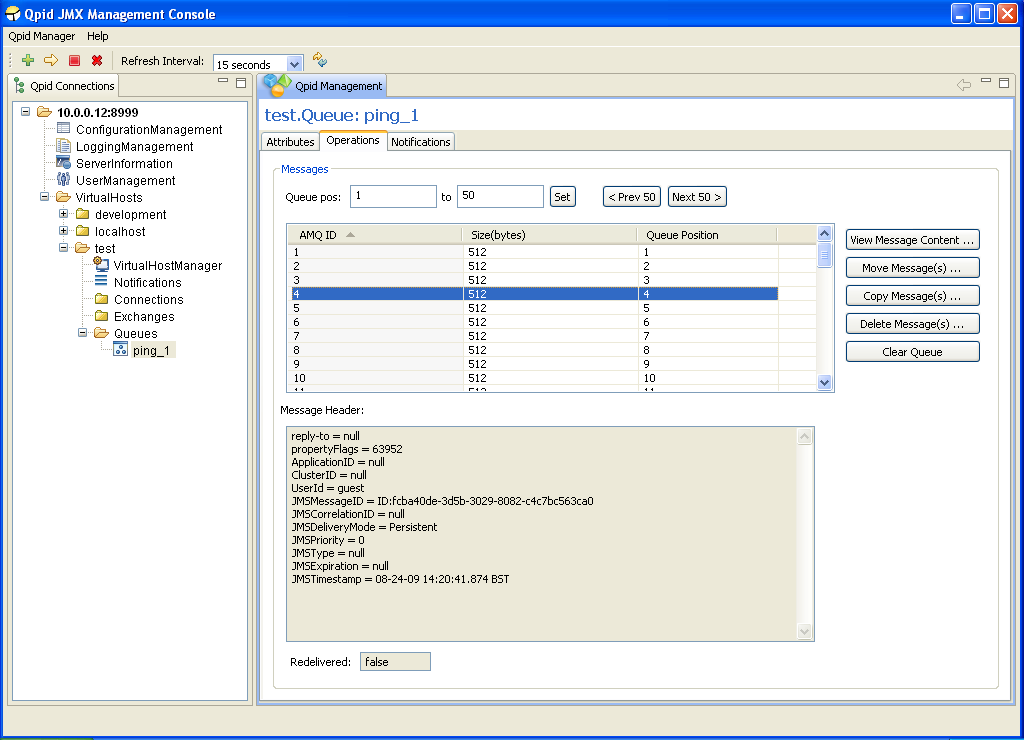
QUEUE-4 |
Select the message with AMQ ID 4 in the table. |
The message will be highlighted, and its Header details and Redelivered status shown in the lower sections. |
QUEUE-4.1 |
Press the View Message Content button (or double-click the entry in the table) |
The result window opens, showing the AMQ Message ID, Content (repeated -message payload statements), Encoding, and MimeType. |
QUEUE-4.2 |
Close the result dialog. |
The result window closes. |
QUEUE-5 |
Press the Next 50 > button to advance the viewed message positions. |
The range will change to 51 - 100 and the table will update to show messages in positions 51-100 (which at this time possess AMQ IDs 51-100) |
QUEUE-5.1 |
Press the Next 50 > button to advance the viewed message positions. |
The range will change to 101 - 150 and the table will update to show messages in positions 101 - 150, which do not exist at this time (only 100 messages were placed on the queue) and so the table is now empty. |
QUEUE-6 |
Enter 11 in the left Queue Pos box, and 20 in the right Queue Pos box, then press the Set button |
The table will update to show messages in positions 11-20 (which at this time possess AMQ IDs 11-20). The < Prev 50 and Next 50 > buttons have updated to have 10 as their step size. |
QUEUE-7 |
Select the Notifications tab in the ping_1 MBean view. |
The Notifications tab opens. |
QUEUE-7.1 |
Press the Subscribe button |
The Subscribe button becomes disabled, and the Unsubscribe button becomes enabled. |
QUEUE-7.2 |
Select the Operations tab in the ping_1 MBean view. |
The Operations tab opens, with the details of message positions 11-20 on ping_1 in the table. |
The following tests are based on the use of user with Admin or Read & Write management access rights. Read Only level management rights do not permit a user to perform actions that modify the server state, such as moving, deleting, or copying messages and clearing the queue. Attempting such operations will be met by an Access Denied security warning at the point of remote execution. NOTE: Copying and deleting messages is only supported on newer servers. If testing older servers, substitute the Copy test (QUEUE-9) with another Move and then skip the Delete test (QUEUE-10).
Test ID |
Test Steps |
Expected Result |
QUEUE-8 |
Select the messages with AMQ IDs 11,13-14,19-20 (Note that since 0.6 the IDs now start at 2 and so the IDs here will be n+1.)and press the Move Message(s) button_._ |
The Move Messages dialog opens, requesting destination queue and confirmation of moving messages with AMQ ID 11,13-14,19-20. |
QUEUE-8.1 |
Press OK (using the ping destination already selected). |
The messages with AMQ IDs 11,13-14,19-20 are moved and disappear from the table, which now shows messages AMQ ID 12,15-18, and 21-25. |
QUEUE-9 |
Select the messages with AMQ IDs 12,15-18 and press the Copy Message(s) button_._ |
The Copy Messages dialog opens, requesting destination queue and confirmation of moving messages with AMQ IDs 12,15-18. |
QUEUE-9.1 |
Select the queue as the destination queue Press OK. |
The messages are copied, as indicated in the status bar at the bottom left of the application, and they continue to be present on the ping_1 queue. |
QUEUE-10 |
The messages with AMQ IDs 12,15-18 are still selected. Press the Delete Message(s) button and confirm the prompt_._ |
The messages with AMQ IDs 12,15-18 are deleted and disappear from the table, which now shows messages with AMQ ID 21-30 in positions 11-20. |
QUEUE-11 |
Press the Clear Queue button and confirm the prompt. |
The queue is cleared of the 90 remaining (and unacquired) messages and the table becomes empty. |
The following test sequence can be undertaken with a user of any level of management access rights, but depend on completing the previous tests that required Admin or Read & Write management access rights.
QUEUE-12 |
Select the Queues node for the test VirtualHost in the Qpid Connections tree. |
The Queue selection screen is opened in the MBean view, listing Queues ping, ping_1, and queue in the table with the attributes ConsumerCount, Durable, MessageCount,_and _QueueDepth. |
QUEUE-12.1 |
Double-click the entry in the table for the ping queue |
The ping queue MBean opens in the MBean View, showing the Attributes tab. |
QUEUE-12.2 |
Select the Operations tab in the ping MBean view. |
The Operations tab opens, the table shows the 5 messages on the queue that we moved across in QUEUE-8, AMQ IDs 11,13-14,19-20 |
QUEUE-12.3 |
Press the back arrow button at the top right corner of the view. |
The Queue selection screen is opened in the MBean view. |
QUEUE-13 |
Double-click the entry in the table for the queue queue |
The queue queue MBean opens in the MBean View, showing the Attributes tab. |
QUEUE-13.1 |
Select the Operations tab in the queue MBean view. |
The Operations tab opens, the table shows the 5 messages on the queue that we copied across in QUEUE-9, AMQ IDs 12,15-18. |
QUEUE-14 |
Select the Notifications tab in the queue MBean view. |
The Notifications tab opens. |
QUEUE-14.1 |
Press the Subscribe button |
The Subscribe button becomes disabled, and the Unsubscribe button becomes enabled. |
Notifications
Pre-Requisites: Connect to a server as described in test LOGIN -0 or LOGIN -3 above. Complete the Queue Management testing.
The following test sequence can be undertaken with a user of any level of management access rights, but depend on completing the previous Queue Management tests that at certain points required Admin or Read & Write management access rights.

Test ID |
Test Steps |
Expected Result |
NOTIF-0 |
Select the Notifications node for the test VirtualHost in the Qpid Connections tree. |
The VirtualHost Notifications screen is opened. |
NOTIF-1 |
Select a group (any, but not all) of the Notifications and press the Clear button. |
The selected Notifications are removed from the table and no further Notifications are selected in the table. |
NOTIF-2 |
Ensuring no notifications are selected in the table, press the Clear button, then validate the confirmation to proceed with clearing all Notifications from MBeans in the VirtualHost |
All remaining Notifications from MBeans in the VirtualHost are removed from the table. |
NOTIF-3 |
Wait at most 30 seconds |
Additional Notifications should be recieved for queue, indicating it has messages over the MaximumMessageAge of 10 seconds. |
Exchange Management
Pre-Requisites: Connect to a server as described in test LOGIN -0 or LOGIN -3 above.

Test ID |
Test Steps |
Expected Result |
EXCH-0 |
Select the Exchanges node for the test VirtualHost in the Qpid Connections tree. |
The Exchanges selection screen is opened in the MBean view, listing Exchanges <<default>>, amq.direct, amq.fanout, amq.match, and amq.topic in the table. |
EXCH-0.1 |
Select exchanges amq.direct and amq.match in the table and click the Add Exchanges(s) to favourites button, then click the + icon at the Exchanges node to expand the Exchanges node. |
amq.direct and amq.match have been added as a child nodes of Exchanges. |
EXCH-1 |
Select the new amq.direct node in the Qpid Connections tree. |
The amq.direct exchange MBean opens in the MBean View, showing the Attributes tab. |
EXCH-1.1 |
Select the Operations tab in the amq.direct MBean view. |
The Operations tab opens |
EXCH-2 |
Select the ping entry in the Binding Key table. |
The Queue Names table updates and shows the ping queue is associated with the selected binding. |
The following tests are based on the use of user with Admin or Read & Write management access rights. Read Only level management rights do not permit a user to perform actions that modify the server state, such as creating bindings. Attempting such operations will be met by an Access Denied security warning at the point of remote execution.
EXCH-3 |
Press the Create button at the right hand side of the Bindings group. |
The Create New Binding dialog opens. |
EXCH-3.1 |
enter Binding=newKey and press OK. |
The new binding is created and newKey appears in the Binding Key table. |
EXCH-3.2 |
Select the new newKey entry in the Binding Key table. |
The Queue Names table updates and shows the ping queue is associated with the newKey binding. |
EXCH-3.3 |
Press the Create button at the right hand side of the Bindings group. When the dialog loads, enter Binding=newKey and select queue ping_1 then press OK. |
The new binding is created, and the selection in the table is cleared. |
EXCH-3.4 |
Select the newKey entry in the Binding Key table. |
The Queue Names table updates and shows the ping and ping_1 queues are now both associated with the newKey binding. |
EXCH-4 |
Select the amq.match node in the Qpid Connections tree. |
The amq.match exchange MBean opens in the MBean View, showing the Attributes tab. |
EXCH-4.1 |
Select the Operations tab in the amq.match MBean view. |
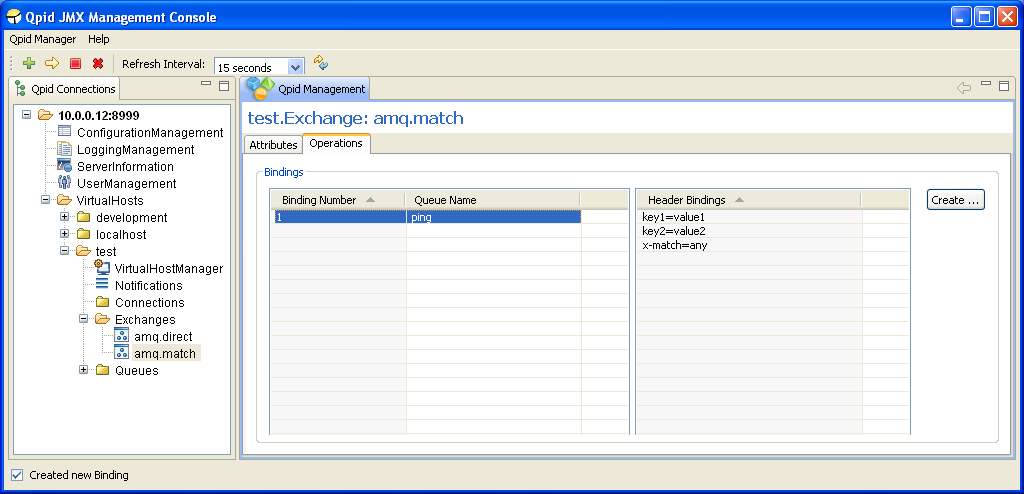
The Operations tab opens. The Binding Number and QueueName table is empty. |
EXCH -5 |
Press the Create button at the right hand side of the Bindings group. |
The Create New Binding dialog opens. |
EXCH-5.1 |
Select a value of 'all' for the x-match key. Then enter a new key called key1, with a value of value1, and a new key called key2 with a value of value2. Press the Add additional field button, and a new empty row should be added at the bottom, giving 3 empty rows. Press OK. |
The binding is created and an entry added to the table with Binding Number 1 and Queue Name ping. |
EXCH-5.2 |
Select the binding entry in the table. |
The Header Bindings table should update to list the keys and values entered in the dialog: |
Connection Management
Pre-Requisites: Connect to a server as described in test LOGIN-0 or LOGIN -3 above.

Test ID |
Test Steps |
Expected Result |
CONN-0 |
Select the Connections node for the test VirtualHost in the Qpid Connections tree. |
The Connections selection screen is opened in the MBean view, with no entries in the table. |
CONN-0.1 |
Run the ping_sender.sh utility script, but do not press a key to exit the script when the sending is complete. |
After a refresh interval, two connections from the IP address of the machine ping_sender.sh was run will appear in the table |
CONN-1 |
Double-click the first connection entry in the table. |
The connection MBean opens in the MBean View, showing the Attributes tab. |
CONN-1.1 |
Select the Operations tab in the connection MBean view. |
The Operations tab opens, listing channel 1 in the table, which is Transactional, has 0 unacked messages, and no (null) default queue. |
CONN-2 |
Select the channel entry in the table. |
The Commit and Rollback Transactions buttons activate as the selected channel is transactional. |
CONN-3 |
Press the Close Connection button and confirm the action. |
The connection is closed, the main view is cleared and a dialog opens to inform the user that the open MBean was unregistered from the server. |