This application will take you through the basics of Stateless Session Bean. This application will demonstrate how annotations like @Stateless, @Resource, @PostConstruct, @PreDestroy are used in an EJB3 application.
The application walks through a authentication page, where the user has to authenticate to move to the home page of Apache Geronimo. In case a new user, the user has to go through the registration process. Later the user will be directed to login page again once the registration is done. In the login page the bean class will check for the username and password entered by the user against a database.
To run this tutorial, as a minimum you will be required to have installed the following prerequisite software.
- Sun JDK 5.0+ (J2SE 1.5)
- Eclipse 3.3.1.1 (Eclipse Classic package of Europa distribution), which is platform specific
- Web Tools Platform (WTP) 2.0.1
- Data Tools Platform (DTP) 1.5.1
- Eclipse Modeling Framework (EMF) 2.3.1
- Graphical Editing Framework (GEF) 3.3.1
Details on installing eclipse are provided in the Development environment section.
This tutorial is organized in the following sections:
Creating a Stateless Session EJB project
- Right Click under the Project Explorer and Create a EJB project as shown.

- On the next screen give the project name as StatelessSessionEJB.

- Right Click on ejbModule and create a new Interface RegisterBeanRemote

- On the New Java Interface window give the package name as statelessejb and Interface name as RegisterBeanRemote

- Populate the RegisterBeanRemote interface with the following code.
RegisterBeanRemote.java
package statelessejb; import javax.ejb.Remote; @Remote public interface RegisterBeanRemote { public void register(String FirstName, String LastName, String Sex, String UserName, String Password); public boolean verify(String username, String password); } - Right Click on StatelessSessionEJB project and create a new class RegisterBean as shown in the figure

- Populate the class RegisterBean with the following data
RegisterBean.java
package statelessejb;
import java.sql.Connection;
import java.sql.PreparedStatement;
import java.sql.ResultSet;
import javax.annotation.PostConstruct;
import javax.annotation.PreDestroy;
import javax.annotation.Resource;
import javax.ejb.Stateless;
import javax.sql.DataSource;
@Stateless
public class RegisterBean implements RegisterBeanRemote{
	@Resource(name="jdbc/userds")
	private DataSource dbsource;
	private Connection dbconnect;
	@PostConstruct
	public void initialize()
	{
		try{
			dbconnect= dbsource.getConnection();
		}
		catch(Exception e)
		{
			e.printStackTrace();
		}
	}
	public void register(String FirstName, String LastName, String Sex, String UserName, String Password)
	{
		try
		{
			String insert="INSERT INTO USERINFO (" + "FIRSTNAME," + "LASTNAME," + "SEX," + "USERNAME," + "PASSWORD)" + " VALUES(?,?,?,?,?)";
			PreparedStatement ps=dbconnect.prepareStatement(insert);
			ps.setString(1, FirstName);
			ps.setString(2, LastName);
			ps.setString(3, Sex);
			ps.setString(4, UserName);
			ps.setString(5, Password);
			int rs =ps.executeUpdate();
		}
		catch(Exception e)
		{
			e.printStackTrace();
		}
	}
	public boolean verify(String username, String password)
	{
		boolean ret=false;
		String select="SELECT * FROM USERINFO";
		try{
		PreparedStatement ps=dbconnect.prepareStatement(select);
		ResultSet rs= ps.executeQuery();
		while(rs.next())
		{
			String str=rs.getString("USERNAME");
			String str1=rs.getString("PASSWORD");
			if (str.compareTo(username)==0)
			{
			if(str1.compareTo(password)==0)
				ret=true;
			else
			    ret=false;
			}
			else
				ret=false;
		}
		}
		catch(Exception e)
		{
			e.printStackTrace();
		}
		return ret;
	}
	@PreDestroy
	public void destroy(){
		try
		{
		dbconnect.close();
		dbconnect=null;
		}
		catch(Exception e)
		{
			e.printStackTrace();
		}

	}
}
Warning
Due to some limitations in Geronimo Eclipse Plugin the generated deployment plan(openejb-jar.xml) does not have the correct namespace. Replace the existing namespace as shown in the figure with the following
<openejb-jar xmlns="http://www.openejb.org/xml/ns/openejb-jar-2.2" xmlns:nam="http://geronimo.apache.org/xml/ns/naming-1.2" xmlns:pkgen="http://www.openejb.org/xml/ns/pkgen-2.0" xmlns:sec="http://geronimo.apache.org/xml/ns/security-1.2" xmlns:sys="http://geronimo.apache.org/xml/ns/deployment-1.2">

Next we will try to understand the code
This completes the development of EJB project.
Creating a database using Administrative Console
- Start the server and Launch the Administrative Console using the URL http://localhost:8080/console.
- Enter default username and password.
- In the welcome page, Under Embedded DB, Select DB Manager.

- On the next page create a database userdbs and Select create.

- Once done you can see the userdbs database listed in DB Viewer portlet under Databases. This confirms that the database has been successfully created.

- As shown in the figure under Use DB, select userdbs from the dropdown box.

- Run the query as shown in the figure. This query will create table USERINFO with the columns FIRSTNAME, LASTNAME, SEX, USERNAME, PASSWORD.
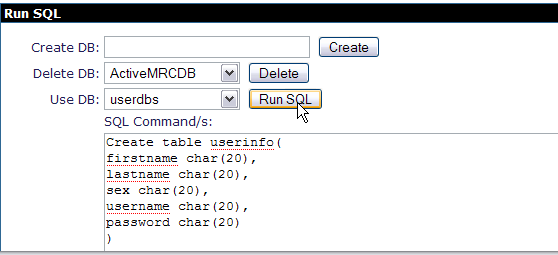
CreateTable.sqlCREATE TABLE USERINFO ( FIRSTNAME char(20), LASTNAME char(20), SEX char(7), USERNAME char(20), PASSWORD char(20) )
- To verify the table creation is successful. Under View Tables for userdbs Database, Select Application.

- The next window will show the table USERINFO associated with userdbs Database.

Creating a datasource using Administrative Console
- Start the server and Launch the Administrative Console using the URL http://localhost:8080/console.
- Enter default username and password.
- Once in the welcome page. In console navigation, Under Services, Select Database Pools.

- On the next screen, Create a new database pool using Geronimo database pool wizard.

- On the next screen give the name as suggested in the figure. This will initiate the process to create a Derby Embedded XA datasource.
- Select the Driver jar and give the database name as userdbs(Remember this is the database we created in the previous step). Rest all fields can be set to default.
- Select Deploy to deploy the connector plan.

- Once done you can see the Database Pool jdbc/userds listed in the available database pools.

Creating application client
- Create a new dynamic Web Project with the name Application Client.
- Right click on WEB-INF and create the following jsp
login.jsp
<%@ page language="java" contentType="text/html; charset=ISO-8859-1" pageEncoding="ISO-8859-1"%> <!DOCTYPE html PUBLIC "-//W3C//DTD HTML 4.01 Transitional//EN" "http://www.w3.org/TR/html4/loose.dtd"> <html> <head> <meta http-equiv="Content-Type" content="text/html; charset=ISO-8859-1"> <title>Welcome to Apache Geronimo</title> </head> <body bgcolor="white"> <form method="post" action="passCredentials.jsp"> <h2 align="center"><font color="blue">Welcome to Apache Geronimo</font></h2> <h2 align="center"><font color="blue">Enter your credentials</font></h2> Enter your Username <input type="text" name="username" size=20><br> Enter your Password <input type="password" name="password" size=20><br> <input type="submit" value="Login"> <a href="http://localhost:8080/ApplicationClient/register.jsp">NewUser</a> </form> </body> </html>passCredentials.jsp<%@ page import="java.util.Properties,javax.naming.Context,javax.naming.InitialContext,statelessejb.RegisterBeanRemote" %> <html> <head> <meta http-equiv="Content-Type" content="text/html; charset=ISO-8859-1"> <title>Insert title here</title> </head> <body bgcolor="white"> <%!boolean i; %> <% Properties prop=new Properties(); prop.put(Context.INITIAL_CONTEXT_FACTORY, "org.apache.openejb.client.RemoteInitialContextFactory"); prop.put("java.naming.provider.url", "ejbd://localhost:4201"); Context context = new InitialContext(prop); RegisterBeanRemote myejb=(RegisterBeanRemote)context.lookup("RegisterBeanRemote"); String s= request.getParameter("username"); String s1= request.getParameter("password"); i=myejb.verify(s,s1); %> <% if (i==true){ %> <jsp:forward page="/resources.jsp"></jsp:forward> <% } else { %> <jsp:forward page="/login.jsp"></jsp:forward> <% } %> </body> </html>resources.jsp<%@ page language="java" contentType="text/html; charset=ISO-8859-1" pageEncoding="ISO-8859-1"%> <!DOCTYPE html PUBLIC "-//W3C//DTD HTML 4.01 Transitional//EN" "http://www.w3.org/TR/html4/loose.dtd"> <html> <head> <meta http-equiv="Content-Type" content="text/html; charset=ISO-8859-1"> <title>Welcome to Apache Geronimo</title> </head> <body bgcolor="white"> <h3><font color="blue">Welcome to Apache Geronimo Resource Center</font></h3> Apache Geronimo Home Page <a href="http://geronimo.apache.org">Apache Geronimo Home page</a><br> Join our mailing list <a href="http://geronimo.apache.org/mailing-lists.html">Apache Geronimo Mailing List</a><br> Come and Contribute to Apache Geronimo V2.1 Documentation <a href="http://cwiki.apache.org/GMOxDOC21/">Apache Geronimo V2.1 Documentation</a> </body> </html>register.jsp<%@ page language="java" contentType="text/html; charset=ISO-8859-1" pageEncoding="ISO-8859-1"%> <!DOCTYPE html PUBLIC "-//W3C//DTD HTML 4.01 Transitional//EN" "http://www.w3.org/TR/html4/loose.dtd"> <html> <head> <meta http-equiv="Content-Type" content="text/html; charset=ISO-8859-1"> <title>Welcome to Apache Geronimo</title> </head> <body bgcolor="white"> <script type="text/javascript"> function valForm() { if (this.document.form1.username.value=="" || this.document.form1.username.value=="") { alert("You cannot leave the field blank"); this.document.form1.firstname.focus(); return false; } else { return true; } } </script> <h2 align="center"><font color="blue">Welcome to Apache Geronimo User Registration</font></h2> <form method="post" name="form1" action="passVariables.jsp" onSubmit=" return valForm();"> FirstName <INPUT type="text" name="firstname" SIZE=20><br> LastName <INPUT type="text" name="lastname" SIZE=20 ><br> Sex<br> <input type="radio" name="sex" value="male"> Male <br> <input type="radio" name="sex" value="female"> Female <br> Select a UserName<br> <input type="text" name="username" size=20><br> Select a Password<br> <input type="password" name="password" size=20><br> <br> <input type="submit" value="Submit"> </form> </body> </html>passVariables.jsp<%@ page import="java.util.Properties,javax.naming.Context,javax.naming.InitialContext,statelessejb.RegisterBeanRemote" %> <html> <head> <meta http-equiv="Refresh" content="5;URL=http://localhost:8080/ApplicationClient/login.jsp"> <title>Welcome to Apache Geronimo</title> </head> <% Properties prop=new Properties(); prop.put(Context.INITIAL_CONTEXT_FACTORY, "org.apache.openejb.client.RemoteInitialContextFactory"); prop.put("java.naming.provider.url", "ejbd://localhost:4201"); Context context = new InitialContext(prop); RegisterBeanRemote myejb=(RegisterBeanRemote)context.lookup("RegisterBeanRemote"); String s= request.getParameter("firstname"); String s1= request.getParameter("lastname"); String s2= request.getParameter("sex"); String s3= request.getParameter("username"); String s4= request.getParameter("password"); myejb.register(s,s1,s2,s3,s4); %> <h3 align="center"><font color="blue">Thank you for registering with Apache Geronimo</font></h3> <h3 align="center"><font color="blue">Redirecting to Login Page</font></h3> </html>index.jsp<%@ page language="java" contentType="text/html; charset=ISO-8859-1" pageEncoding="ISO-8859-1"%> <!DOCTYPE html PUBLIC "-//W3C//DTD HTML 4.01 Transitional//EN" "http://www.w3.org/TR/html4/loose.dtd"> <html> <body> <jsp:forward page="/login.jsp" /> </body> </html>Few more configurations
- In the EJB Project. Under META-INF, Edit openejb-jar.xml and add the following
datasource dependency
<sys:dependencies>
            <sys:dependency>
                <sys:groupId>console.dbpool</sys:groupId>
                <sys:artifactId>jdbc%2Fuserds</sys:artifactId>
            </sys:dependency>
</sys:dependencies>
Where did the above dependencies come from??
To make the datasource visible to EJB we need to add a dependency to the EJB deployment plan that is openejb-jar.xml. The above element can be obtained automatically from Geronimo Database Pool wizard. Select usage against the database pool jdbc/userds
- In the WEB Project. Under WEB-INF, Edit geronimo-web.xml and add the following
EJB dependency
<sys:dependencies>
       <sys:dependency>
            <sys:groupId>default</sys:groupId>
      		<sys:artifactId>StatelessSessionEJB</sys:artifactId>
      		<sys:version>1.0</sys:version>
      		<sys:type>car</sys:type>
       </sys:dependency>
</sys:dependencies>
Deploy and Run
warning
Due to limitation with Geronimo Eclipse Plugin, you will have to export the Stateless Session EJB project and Web Application project as a jar and war respectively.
- Export the projects to your local disk as StatelessSessionEJB.jar and ApplicationClient.war.
- Start the server and launch the Administrative console using http://localhost:8080/console/. Enter default username and password.
- In the welcome page, under Applications. Select Deploy New.

- Browse and Select StatelessSessionEJB.jar. Once done Select Install. This will deploy the EJB application on to server.
- Browse and Select ApplicationClient.war. Once done select Install. This will deploy the Web application on to server.
- Under Applications, Select Web App WARs and Run ApplicationClient project as show in the figure.

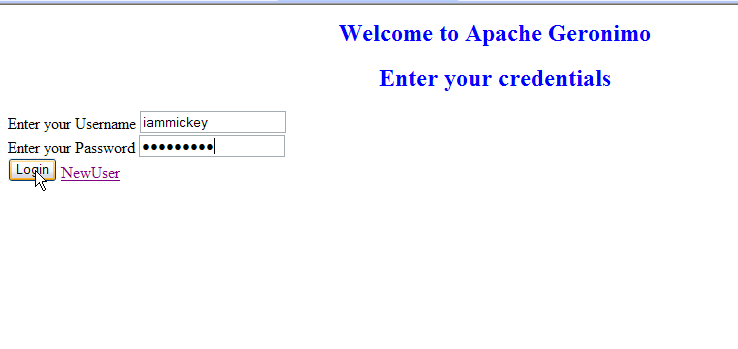
- Once done a welcome page will be launched.

- If you are New User. Select New User as shown in the figure

- This will display a new registration form. If you leave the mandatory username or password filed empty. You will get the following error message.

- Fill the fields as shown in the figure and Select Submit.

- Once done a page will be displayed from where you will be automatically redirected to login page to relogin.

- Enter the username and password as chosen by you during registration and select Login.
- The next page is the Apache Geronimo Resource Center.

- In case you give wrong username and password combination you will be redirected to login page.
