
Introduction
DevCloud is a virtual appliance shipped as an OVA image which runs on VirtualBox (an opensource type-2 or desktop hypervisor) and can be used for CloudStack’s development and testing. The original DevCloud required 2G of RAM, and ran Ubuntu Precise as dom0 over xen.org’s Xen server which runs as a VM on VirtualBox.
A developer would build and deploy CloudStack artifacts (jars, wars) and files to DevCloud, deploy database and start the management server inside DevCloud. The developer may then use CloudStack running inside DevCloud to add DevCloud as a host and whatnot. DevCloud is now used by a lot of people, especially during the first release of Apache CloudStack, the 4.0.0-incubating, DevCloud was used for the release testing.
Note: kindly consider a more modern appliance based CloudStack development with MonkeyBox.
VirtualBox or KVM or Fusion?
DevCloud is now capable of using either the VirtualBox (and XenServer) or KVM hypervisors. You only need to choose one of these, and then following either the VirtualBox or Linux KVM "setting up" sections, below.
If you want to run XenServer as a nested hypervisor, see XenServer Hypervisor for CloudStack Development using Fusion
Setting up (VirtualBox)
1. Get the new DevCloud 2.0 virtual appliance. The new image was created using this process. Note: it could take some time as the image is about 900MB. For the 4.3 release, get the updated DevCloud 2.0 appliance.
2. Install VirtualBox 4.2 or latest.
3. Create and config a "host-only" network in VirtualBox, if you don't have one (or have just installed VirtualBox).
3.1 To create a network, go to File -> Preferences -> Network -> "Add host only network", it would usually have a name like vboxnet0 etc. (Windows Only: You don't have to perform the Add host only network" step, move on to step 3.2)
3.2 To config the network created in step 3.1, right click and select "Edit host-only network", then uncheck "Enable server" in the "DHCP server" tab
3.3 (Windows only) Start Administrative Tools > Windows Firewall with Advanced Security. Click on the "Windows Firewall Properties" (central panel, possibly quite small print) and for each of the profiles (Domain, Private, Public) click on the Protected Network Connections "Customize..." button and uncheck the "Virtual Box Host only Network" so that the Windows Firewall does not block communications on that network.
4. Import the DevCloud ova image into VirtualBox.
4.1 Verify PAE mode is active. Under the VM settings, System > Processor Tab, make sure 'Enable PAE/NX' mode is checked.
5. Start the DevCloud VM. (Windows: It will complain that the virtual machine doesn't have vboxnet0. Click on Edit Network to match it up with the default host only network.)
6. After VM boots up, login into VM with username: root, password: password
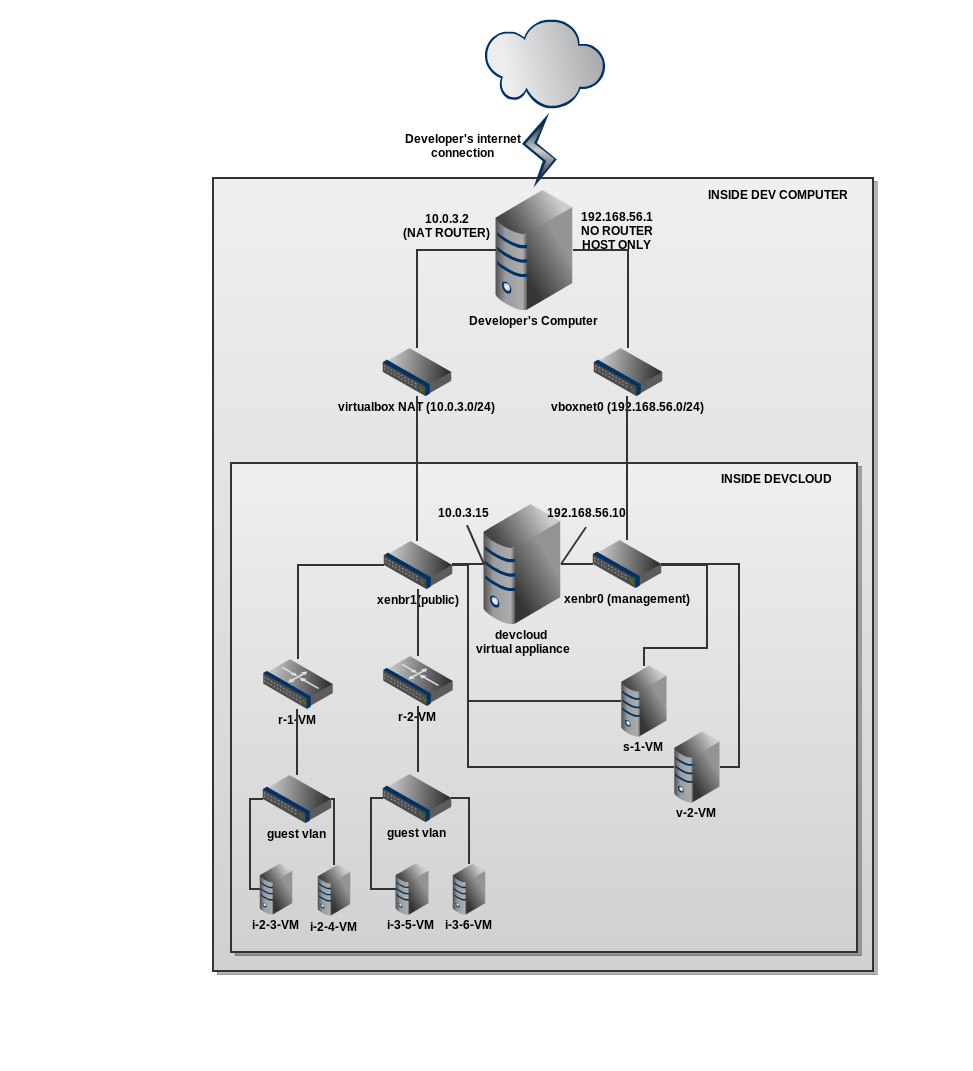
Network
The default IP of DevCloud is 192.168.56.10, if you want a different IP (say you want to work with multiple DevClouds), change in /etc/network/interfaces and reboot.
7. To run the management server on your laptop:
7.1. If required, Setup a CloudStack Development Envrionment
7.2. Checkout the latest master code
7.3. Start management server on your laptop:
    mvn -P developer,systemvm clean install

    mvn -P developer -pl developer,tools/devcloud -Ddeploydb

    mvn -pl :cloud-client-ui jetty:run
Then wait until management server is up.
8. Deploy DevCloud (make sure mysql-connector-python is installed and that the management server is running)
$ pip install mysql-connector-python (#marvin dependancy)
$ pip install requests (#reqd for marvin deploying the zone)
$ mvn -P developer -pl tools/devcloud -Ddeploysvr
# Or, if the above does not work, maybe you're running mvn in debug mode using some MAVEN_OPTS, try marvin:
$ cd tools/devcloud; python ../marvin/marvin/deployDataCenter.py -i devcloud.cfg
The above will deploy a zone with settings defined in tools/devcloud/devcloud.cfg which sets some global settings and will take some time. After this, you should restart management server and destroy any system vms which may have started for the global settings to take effect.
9. You can also run your setup inside of DevCloud as a all in one box solution, "ssh root@192.168.56.10". All the build tools (git, java, maven, mkisofs, etc.), mysql and nfs is preinstalled and setup. The recommended way is to run the mgmt server on your host os, work with the code and debug using an IDE like IntelliJ or Eclipse and use DevCloud as a replacement/alternative to your hypervisor host, storage and network infra.
Setting up (Linux KVM)
1. Prerequisites: You should have Linux with the KVM modules and libvirt utilities (virsh) installed.
2. Download devcloud KVM package from here
3. Extract devcloud.tar to the location you want to install it to, cd into devcloud directory
4. Define networks that devcloud will use (run as root or libvirt privileged account)
virsh net-define devcloud-nat-0.xml
virsh net-define devcloud-nat-1.xml
virsh net-start devcloud-nat-0
virsh net-start devcloud-nat-1
virsh net-autostart devcloud-nat-0
virsh net-autostart devcloud-nat-1
5. Open devcloud.xml, change location of qcow2 file to point to the location on your system. You may also need to modify a few definitions, depending on your version of libvirt.
6. Define, start virtual machine
virsh define devcloud.xml
virsh start devcloud
7. Continue with the VirtualBox setup instructions, starting at step 6
Optional: Advanced Network Zone
You can skip step 7 above and use one of the advanced network marvin configurations. For full functionality, these require that you set up a DNS resolver on your devcloud so that the management network can resolve names:
$ apt-get install dnsmasq
$ python tools/marvin/marvin/deployDataCenter.py -i tools/devcloud/devcloud-advanced.cfg
or, if you want to run the management server in the devcloud:
$ apt-get install dnsmasq
$ python tools/marvin/marvin/deployDataCenter.py -i tools/devcloud/devcloud-advanced_internal-mgt.cfg
Then restart your management server as mentioned in the basic setup.
Console proxy doesn't work in this configuration on the VirtualBox install (but does in KVM), due to VirtualBox's implementation of NAT networking model. While VMs can use the NAT to get out, your computer has no interface on the internal NAT network and cannot access it (that 10.0.3.2 is in the VirtualBox stack, not on your host). You can still connect to VNC manually on the devcloud,(e.g. 192.168.56.10:0) if you know which port the VM is listening on. We can get around this by utilizing a host-only network as public, but then the VMs won't have real public access, so it boils down to what you're wanting to test.
Interactive Debugging with DevCloud
It's possible to run the management console in debug mode for interactive debugging with Eclipse or similar. Instead of running the jetty:run command in the previous section, run...
export MAVEN_OPTS="-Xdebug -Xnoagent -Djava.compiler=NONE -Xrunjdwp:transport=dt_socket,address=4000,server=y,suspend=n"
mvn -pl :cloud-client-ui jetty:run

export MAVEN_OPTS=""
Troubleshooting
- Check these settings in Global Settings: host (is mgmt server IP), system.vm.use.local.storage (is true) and appropriate management.network.cidr and secstorage.allowed.internal.sites.
The issue above may appear as if the "tiny Linux" template isn't available to select.
If the global "host" setting is wrong, you will see errors like this in your system VM's /var/log/cloud/systemvm.log file:
01-22 18:45:07,987 DEBUG [agent.transport.Request] (StatsCollector-2:null) Seq 1-1613496410: Receive
2013-01-22 18:45:11,996 INFO  [utils.nio.NioClient] (Agent-Selector:) Connecting to 10.0.3.15:8250
- Developing on Windows machine: MUST install following dependencies: python, mysql connector for python, Bash, tar (using cygwin or msysgit). Or you can skip using the profile -P developer,systemvm, just use: -P systemvm.
- If devcloud fails to come up or shows blank screen, then you may have to enable VT / VT-d (Virtualization Technology) in BIOS. When you boot your system, press Delete to enter the BIOS.
- There are some bugs sometimes appear on random Windows machine such as:
com.cloud.api.doc.ApiXmlDocWriter ClassNotFound: modify build-apidoc.sh and edit line
java -cp $CP com.cloud.api.doc.ApiXmlDocWriter -d "$DISTDIR" $*
to:
java -cp .$CP com.cloud.api.doc.ApiXmlDocWriter -d "$DISTDIR" $*
- Devcloud node always show Alert state: checkout that git global config do not set autocrlf to true.
- Use '-pl' as in 'pappa', 'lima', and not '-p1' as in 'pappa', one'.
- Make sure you're using Maven3 and not any of the previous versions. Instructions to install Maven 3 on Ubuntu can be found here http://superuser.com/a/298063
If Jetty is not present by default, you can include the following lines in pom.xml under <plugins> to instruct maven to obtain it:
<plugin> <groupId>org.mortbay.jetty</groupId> <artifactId>maven-jetty-plugin</artifactId> <version>6.1.12</version> </plugin>- You may need to set your mysql database password to NULL. E.g. http://stackoverflow.com/questions/3032054/how-to-remove-mysql-root-password. If this does not work, try providing a non-null password for the root user and provide this password by creating the file incubator-cloudstack/utils/db.properties.override and updating db.root.password
if the build fails because maven can't find python,
mvn -P developer,systemvm clean install
with error msg like this:
 [INFO] Apache CloudStack apidoc Tools .................... SUCCESS [41.071s]
[INFO] Apache CloudStack Developer Tools ................. SUCCESS [0.125s]
[INFO] Apache CloudStack Developer Tools: marvin ......... FAILURE [0.158s]
[INFO] Apache CloudStack Developer Tools: cloudmonkey cli  SKIPPED
[INFO] ------------------------------------------------------------------------
[INFO] BUILD FAILURE
[INFO] ------------------------------------------------------------------------
[INFO] Total time: 10:28.807s
[INFO] Finished at: Tue Dec 04 17:16:54 PST 2012
[INFO] Final Memory: 34M/145M
[INFO] ------------------------------------------------------------------------
[ERROR] Failed to execute goal org.codehaus.mojo:exec-maven-plugin:1.2.1:exec (compile) on project cloud-marvin: Command execution failed. Cannot run program "python" (in directory "C:\src\asf-acl\incubator-cloudstack\tools\marvin\marvin"): CreateProcess error=2, The system cannot find the file specified -> [Help 1]
,
Do the build this way:mvn -P systemvm clean install
Overview
Content Tools
Apps
2 Comments
senthilnathan sivashanmugam
after downloading the image file while extract it last i get read error, may my download error u also check it you's backup.
while sating i have look for the "host only network" it was there with an IP address of 192.168.56.1, dis-enable the check box "ENABLE SERVER " in tab "DHCP SERVER"
so i proceed with the next step of importing and run it while running it i get the network have not allocated. after allocating it started to run.
after some i send some critical error that have happen can't proceed the process
main thing while staring we have to install the mysql, or all ready installed and config with the this pack..
where to put the source code of the cloud ? dir ?
we have to set the "DBROOTPW=" in the file build/replace.properties.
help me over this .. i am new to the cloud computing ... as this is final year project in my post graduation( master of computer applications) .. i am going to monitoring the cloud-stack with nagios this is my proposed project ...
waiting for you reply.... regards
senthilnathan
mail address
senthilnathankec@gmail.com
senthilnathanmca06@gmail.com
+919952517441
senthilnathan sivashanmugam
i have started the image that have been made...
thanks, but have some barriers while starting it.
now i have run it enter into the linux,
here my problem , i don't know the path where to put the code that have clone from the git repository,
and another we have to set the MY-SQL (version-6) separately in windows with phyton connector, is it necessary ???
how to deploy the server.
you did't tell clearly about how to process with the source code that have been with the starting of cloudstack with devcloud.
so make the step clearly regarding the clone the code and where to place then (the path) and how to deploy...
since i am new i can't just follow the outline...so help me....