This page will guide you through the process of setting up CLion for MXNet C++ development on Mac. It covers two different setups: a local one, where both the coding and building are done in your laptop, and a remote setup. This second option is based on a new feature in CLion v2018.3 which enables remote project support.
A. Local setup
Step 1. Install prerequisites
These are not required, but they are recommended practices. The next steps assume that Homebrew, the package manager manager for macOS, is installed in your device. Otherwise, it can easily be installed by running the following command:
/usr/bin/ruby -e "$(curl -fsSL https://raw.githubusercontent.com/Homebrew/install/master/install)"
1.1. Install and configure git
brew install git
git config --global user.name "<USERNAME>"
1.2. Configure SSH for GitHub
Using SSH, you can connect to GitHub without having to input your credentials every time yo do so. This is not necessary, but it is convenient and time saving in the long run. The steps to configure SSH for this task can be found on GitHub's FAQ.
1.3. Install git-secrets
Git-secrets is a tool that prevents you from committing passwords or sensitive information to your repository. More information can be found on git-secrets' GitHub repo.
brew install git-secrets
After installing git-secrets, you must install the hooks for every repo that you wish to use with git secrets install.
1.4. Install Xcode
Download and install Xcode, which contains a suite of software development tools by Apple. It also includes the Xcode IDE, although here we will use CLion as IDE instead. Newer versions of Xcode might not be compatible with your macOS version, you can check the requirements here.
To download an older version of Xcode, scroll down in the downloads page and click the See more downloads link.
Next, you will need to accept Xcode's license. It can be done from the command line:
sudo xcodebuild -license accept
Step 2. Get the MXNet codebase
Once you have installed the required tools, it is time to get the project's code.
2.1. Fork the Apache MXNet repository
MXNet is hosted in a GitHub repository, incubator-mxnet. The best practice for development is to fork this repository and work on your local copy.
- Go to https://github.com/apache/incubator-mxnet
- Click the fork button on the top right.
2.2. Clone your fork on your machine
git clone --recursive https://github.com/<YOUR GITHUB USERNAME>/incubator-mxnet
Next, set git secrets to track the repository with git secrets install.
cd incubator-mxnet
git secrets install
Once the repo is being tracked, you can add different prohibited patterns for git-secrets to control. Check the documentation for further instructions on how to add patterns, exceptions and other utilities.
Step 3. Install additional tools
Before installing CLion, there is a set of tools for compiling C++ projects which we need to install.
3.1. Install CMake
CMake is an application to manage builds in a compiler independent way. Installing it with Homebrew is straightforward:
brew install cmake
3.2. Install a compiler
MXNet uses OpenMP, an API for high level parallelism in C++ programs, which is not built in the default C++ compiler in recent versions of macOS. The simplest workaround is to install either LLVM or GCC as compilers.
Option 1. Install LLVM
LLVM is a collection of compiler and toolchain technologies. It contains Clang, a C++ compiler which delivers fast compiles, as well as other useful tools such as clang-format. It can be installed via Homebrew (be aware that the build might take a long time).
brew install --with-toolchain llvm
Option 2. Install gcc
An alternative to LLVM is GCC, GNU's Compiler Collection. Although slower than Clang, it can also be used to compile MXNet. It can easily be installed with Homebrew.
brew install gcc
3.3. Install ccache
Quoting the documentation, ccache is a compiler cache which speeds up recompilation by caching previous compilations and detecting when the same compilation is being done again.
brew install ccache
3.4. Install jemalloc
MXNet can use jemalloc for memory allocation, which is a general purpose malloc implementation that emphasizes fragmentation avoidance and scalable concurrency support.
brew install jemalloc
Step 4. CLion setup
Start by downloading CLion from JetBrains' website and installing it.
Once the installation process is finished, a welcome dialog will pop up. Choose Open > select the file incubator-mxnet/CMakeLists.txt > Open as Project.


Next, we will modify the preferences to use the C++ compiler we previously downloaded, as well as CMake and ccache. Open up the preferences window from CLion > Preferences (or ⌘ + ,) and proceed to the next step.
4.1. Select toolchain
- In the preferences window (⌘ + ,), search for toolchains.
- Click on the + sign to add a toolchain, name it and set the paths of the C and C++ compilers. These paths will depend on the compiler you chose on step 3.2. If you followed the steps above, they should be:
| LLVM | GCC | |
|---|---|---|
| C | /usr/local/Cellar/llvm/7.0.0/bin/clang | /usr/local/bin/gcc-8 |
| C++ | /usr/local/Cellar/llvm/7.0.0/bin/clang++ | /usr/local/bin/g++-8 |

If you use Finder to browse for the compiler paths, use ⇧ + ⌘ + . to show hidden folders.
4.2. Build configuration
- In the preferences window, search for CMake, under the Build, Execution, Deployment section.
- Add a new profile using the + button on the bottom and give it a name of your choice.
- Set the toolchain to the one we defined in 4.1.
- Define the CMake options (explained in the next step, 4.3).
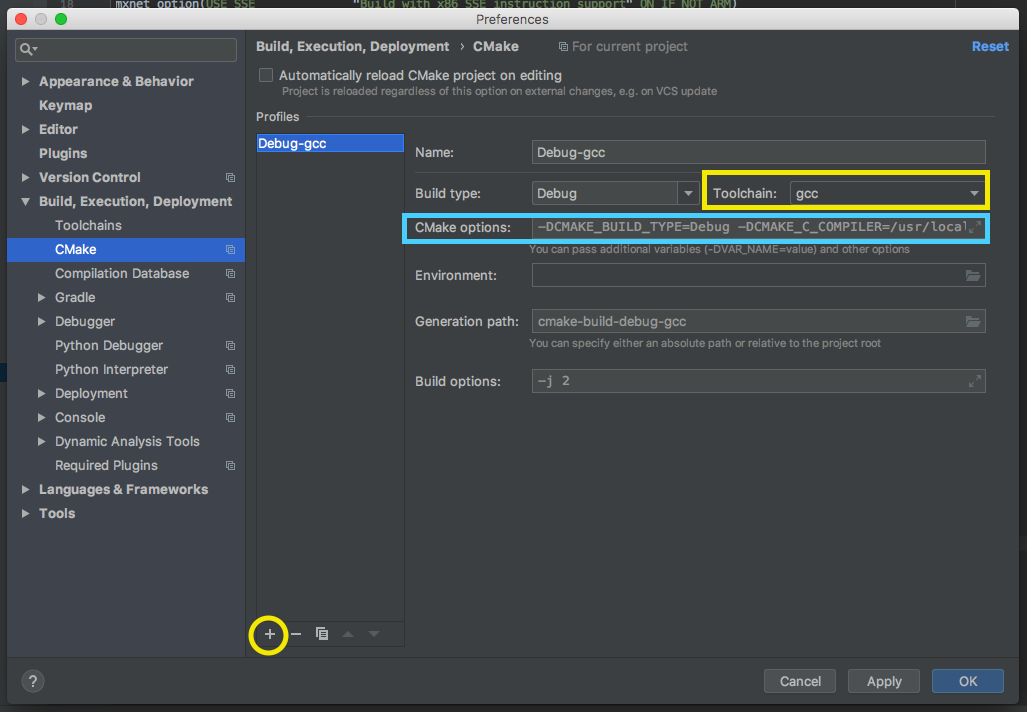
If changing the preferences does not have any effect, you may need to reset CMake's cache. To do so, go to Tools > CMake > Reset Cache and Reload Project.
4.3. Set CMake options
The following options are used in order to be able to compile in a Mac:
| Option | Effect |
|---|---|
| -DUSE_CUDA=OFF | Disables CUDA. Unless your Mac has a GPU and CUDA installed, this option should be turned off. |
| -DBLAS=apple | Choose a BLAS (Basic Linear Algebra Subprograms) library. Setting it to 'apple' will select Apple's Accelerate. |
| -DUSE_OPENCV=OFF | Disable OpenCV, which is not installed on macOS by default. |
| -DCMAKE_CXX_COMPILER_LAUNCHER=/usr/local/opt/ccache/bin/ccache | Set the C, C++ and CUDA compilers to use ccache. |
| -DCMAKE_C_COMPILER_LAUNCHER=/usr/local/opt/ccache/bin/ccache | |
| -DCMAKE_CUDA_COMPILER_LAUNCHER=/usr/local/opt/ccache/bin/ccache |

For linux without CUDA you can use the following options:
-DUSE_CUDA=OFF
-DUSE_OPENMP=ON
-DUSE_OPENCV=ON
-DUSE_MKL_IF_AVAILABLE=OFF
-DCMAKE_VERBOSE_MAKEFILE=OFF
-DCMAKE_CXX_COMPILER_LAUNCHER=ccache
-DCMAKE_C_COMPILER_LAUNCHER=ccache
-DCMAKE_CUDA_COMPILER_LAUNCHER=ccache
4.4. Run tests
To make sure everything is working properly, select mxnet_unit_tests as run configuration and run it.

To select specific unit tests, you can click Run → "edit configurations" and add "–gtest_filter=" And a pattern like "SUITE.Test" such as --gtest_filter="inv_khatri_rao.OneInputMatrixTransposed"

Step 5. Select a style file (optional)
CLion provides code generation and formatting tools which can come in handy when developing. Coding style can be defined in the preferences dialogue to have CLion stick to certain coding guidelines. These can be loaded from an external style file, and they can be applied at project level or globally, at IDE level.
5.1. Loading a style file
As a reference, you can use the following style file: mxnet-style.xml.
To load the style file, go to Preferences > search for code style > change Scheme to Project (so the coding style will apply only to this project).
Next, click the settings icon (![]() ) on the right > Import scheme > Intellij IDEA code style XML and browse for the style file.
) on the right > Import scheme > Intellij IDEA code style XML and browse for the style file.

.
You can use Google C++ coding style as the default since it's the one we use in MXNet:

B. Remote host development
Since version 2018.3 (it is an experimental version as of the writing of this page), CLion will support remote projects. Using this feature, it is possible to code locally in CLion and build, run and test on your remote machine. In order for this feature to work, you need:
- A local client machine, which can be either macOS, Windows or Linux, with CLion 2018.3 or newer.
- A Linux host, with rsync installed (unless your local machine is running Windows, in which case tar is needed)
To setup remote host development, simply:
- Install the required tools (described in A.Step 3 of this guide - specific installation commands will vary, as the remote has to run Linux) on your remote machine.
- Follow this tutorial from Jetbrains' website to setup a remote toolchain and configure the SSH connection, as well as the mappings (where your project will be located on the remote host).
- Set the appropriate CMake options. Section A.4.3 of this guide can be used s reference, although your options will depend on your remote host setup.
The first time you build remotely, CLion will sync your local files with the remote host. Depending on your connection, this process might take some time. If you have previously built your project locally, make sure to run make clean before the sync takes place, so there are less files to be copied.