This document describes how to make a release of Sqoop. It is a work in progress and should be refined by the Release Manager![]() (RM) as they come across aspects of the release process not yet documented here.
(RM) as they come across aspects of the release process not yet documented here.
NOTE: For the purpose of illustration, this document assumes that the version being released is 1.4.3, and the following development version will become 1.4.4.
Prerequisites
Policy documents
Frequently asked questions for making Apache releases are available on Releases FAQ![]() page.
page.
The Release Manager (RM) must go through the policy document to understand all the tasks and responsibilities of running a release.
Give a heads up
The RM should first create an umbrella issue and then setup a timeline for release branch point. The time for the day the umbrella issue is created to the release branch point must be at least two weeks in order to give the community a chance to prioritize and commit any last minute features and issues they would like to see in the upcoming release.
The RM should then send the pointer to the umbrella issue along with the tentative timeline for branch point to the user and developer lists. Any work identified as release related that needs to be completed should be added as a subtask of the umbrella issue to allow users to see the overall release progress in one place.
To: dev@sqoop.apache.org
Subject: Work on $release release has started


We are starting the process to prepare for Sqoop $release release. I have opened JIRA $jira to cover the tasks under this release.

If you have any JIRA in progress and would like to include it in this release, please follow the process to do so.

Feel free to comment on the JIRA if you have any comments/suggestions.

Thanks,
$RM
Sanitize JIRA
Before a release is done, make sure that any issues that are fixed have their fix version setup correctly. Run the following JIRA query to see which resolved issues do not have their fix version set up correctly:
project = sqoop and resolution = fixed and fixVersion is empty
The result of the above query should be empty. If some issues do show up in this query that have been fixed since the last release, please bulk-edit them to set the fix version to '1.4.3'.
You can also run the following query to make sure that the issues fixed for the to-be-released version look accurate:
project = sqoop and resolution = fixed and fixVersion = '1.4.3'
Monitor active issues
It is important that between the time that the umbrella issue is filed to the time when the release branch is created, no experimental or potentially destabilizing work is checked into the trunk. While it is acceptable to introduce major changes, they must be thoroughly reviewed and have good test coverage to ensure that the release branch does not start of being unstable.
If necessary the RM can discuss if certain issues should be fixed on the trunk in this time, and if so what is the gating criteria for accepting them.
Creating Release Artifacts
Communicate with the community
1. Send an email to dev@sqoop.apache.org to
- Notify that you are about to branch.
- Ask to hold off any commits until this is finished.
To: dev@sqoop.apache.org
Subject: Branching release $release


I'm about to branch Sqoop for $release release in couple of minutes.  Another email will
be sent out once the branching is done.  Please hold off any commit until
branching is finished.

Just let me know if you have any questions.

Thanks,
$RM
2. Send another email after branching is done.
To: dev@sqoop.apache.org
Subject: Re: Branching release $release


I am done branching for $release release.  The trunk is open for commit
business again.

$RM
Create a release branch
1. Checkout the trunk.
svn co https://svn.apache.org/repos/asf/sqoop/trunk
2. Update CHANGELOG.txt in the trunk.
- For example,
Apache Sqoop Change Log

Release 1.4.3

  NEW FEATURES

    SQOOP-305 Support export from Avro Data Files

    ...
3. Build source release and check that all included libraries are mentioned in the LICENSE.txt file. If not then update this file and commit your changes.
ant srctar                                      # Create source tarbal
find build/sqoop-1.4.3-SNAPSHOT -iname "*.jar"  # All those jars must be included in LICENSE.txt file
vim LICENSE.txt                                 # Make necessary changes
svn commit -m "Fixing LICENSE.txt file"         # Commit your changes to trunk
4. Update the "version" value of build.xml in trunk to "1.4.3".
5. Commit back to the trunk.
svn commit -m "Preparing for release 1.4.3"
6. Create a branch.
svn copy https://svn.apache.org/repos/asf/sqoop/trunk \
  https://svn.apache.org/repos/asf/sqoop/branches/branch-1.4.3 \
  -m "Branching for 1.4.3 release"
7. Update the "oldversion" value of build.xml in the trunk to "1.4.3".
8. Update the "version" value of build.xml in the trunk to "1.4.4-SNAPSHOT".
9. Commit back to the trunk.
svn commit -m "Preparing for release 1.4.3 development"
10. Tag a candidate, where R (starting from 0) is the iteration number for this candidate:
svn copy https://svn.apache.org/repos/asf/sqoop/branches/branch-1.4.3 \
  https://svn.apache.org/repos/asf/sqoop/tags/release-1.4.3-rcX \
  -m "Sqoop 1.4.3-rcX release."
Create release tarballs
1. Check out the candidate.
svn co https://svn.apache.org/repos/asf/sqoop/tags/release-1.4.3-rcX
2. Make sure that LICENSE.txt contains license information for all third-party libraries and codes to be included in source tarball. You can overwrite with LICENSE.txt from source tarball of previous release if there is no change.
3. Generate the source tarball
ant srctar
4. Copy generated tarball to some temporary location
export tmp="../"; cp build/sqoop*.tar.gz $tmp/
5. Make sure that LICENSE.txt contains license information for all third-party libraries and codes to be included in binary tarball. You can overwrite with LICENSE.txt from binary tarball of previous release if there is no change.
6. Execute steps 7-8 for each supported binary version (20, 23, 100, 200)
7. Generate the binary tarball
ant clean && ant -Dhadoopversion=$binaryVersion tar
8. Copy generated tarball to some temporary location
cp build/sqoop*.tar.gz $tmp/
9. Alternatively instead of steps 6-8 you can execute following shell command
export tmp="../"; for i in 20 23 100; do ant clean ; ant -Dhadoopversion=$i tar; cp build/sqoop*.tar.gz $tmp/; done
Perform sanity check
1. Unpack the source tarball
tar xvf sqoop-1.4.3.tar.gz
2. Run tests![]() .
.
3. Check license header
ant releaseaudit
4. Do the same for the binary tarball.
Sign the release artifacts
Update KEYS file
If your PGP key is not yet in the project's KEYS file, you need to first add that in. To do this, checkout the KEYS file and update it using the following commands:
$ svn co https://dist.apache.org/repos/dist/release/sqoop sqoop-release
...
$ cd sqoop-release
$ (gpg --list-sigs <KEY-ID> && gpg --armor --export <KEY-ID> ) >> KEYS
$ svn commit -m "Adding PGP public key to KEYS file" KEYS
...
Once this file has been updated, you need to publish it in the appropriate dist directory for the project on http://www.apache.org/dist/sqoop/KEYS. To do this, you must copy the file as follows:![]()
$ scp KEYS people.apache.org:/www/www.apache.org/dist/sqoop/KEYS
This will take some time to propagate in which you can continue with the other steps of the release process.
Create signatures
For every release artifact, there should be a corresponding signature file (*.asc) that can be generated using PGP as follows:
$ gpg --armor --output sqoop-1.4.3.tar.gz.asc --detach-sig sqoop-1.4.3.tar.gz
The above command will generate the new file sqoop-1.4.2.tar.gz.asc which contains the signature that can be verified using the following command:
$ gpg --verify sqoop-1.4.3.tar.gz.asc sqoop-1.4.3.tar.gz
Create md5 checksum
The md5sum allows a user to ensure that the bits they have downloaded are consistent and same as what were produced during the release. You must create md5sum for every artifact that is being released. Use the following command to generate the md5sum:
$ md5 sqoop-1.4.3.tar.gz > sqoop-1.4.3.tar.gz.md5
Stage the release artifacts
In order to allow other developers and contributors to verify the release artifacts, you need to stage them in a place that is accessible to them to download it from. It is preferred if you post these artifacts on your own web-space on people.apache.org. Please make sure that you post all the release artifacts, their signature files (.asc) and their md5 (.md5) files.
Running the vote
Call for sqoop dev list votes
Send an email to dev@ list. For example,
To: dev@sqoop.apache.org
Subject: [VOTE] Release Sqoop version 1.4.3

This is the first incubator release for Apache Sqoop, version 1.4.3

*** Please cast your vote by [3 working days after sending] ***

The list of fixed issues:
http://svn.apache.org/repos/asf/sqoop/branches/branch-1.4.3/CHANGES.txt

The tarball (*.tar.gz), signature (*.asc), checksum (*.md5),
and test result (log/*.ant_test.log):
http://people.apache.org/~blee/sqoop-1.4.2-rc0/

The tag to be voted upon:
http://svn.apache.org/repos/asf/sqoop/tags/release-1.4.3-rc0

The KEYS file:
http://www.apache.org/dist/incubator/sqoop/KEYS
Need 3 +1 votes from PMC members![]() .
.
Rolling out the Release
Close JIRA version
You need to close the release in JIRA so that everyone knows that your version should not be used as "fixVersion" for new bugs. Go to JIRA "Administer project" page and follow "Versions" in left menu. Table with list of all releases should appear, click on additional menu on the right of your release and choose "Release" option. Submit release date and you're done.
Upload the artifacts
Sqoop is using SVN based release procedure. In order to release you have to checkout release repository located on https://dist.apache.org/repos/dist/release/sqoop![]() and add release artifacts there.
and add release artifacts there.
svn co https://dist.apache.org/repos/dist/release/sqoop sqoop-release
cd sqoop-release
mkdir 1.4.3
cp $source_to_your_artifacts 1.4.3
svn add 1.4.2
# Optionally change KEYS file in case that you've added your key for the first time
svn commit
Wait for 24 Hours
It may take up to 24 hours for all mirrors to sync up.
Remove old releases from dist area
Don't worry, they will be archived on archive.apache.org. We need to release the pressure on all Apache mirrors so only most recent releases are allowed to be in the distribution area.
Announce the release
Send an email to announce@apache.org (the from: address must be @apache.org). For example,
To: announce@apache.org, user@sqoop.apache.org, dev@sqoop.apache.org
Subject: [ANNOUNCE] Apache Sqoop 1.4.3 released

The Apache Sqoop team is pleased to announce the release of Sqoop 1.4.3.

This is the second release of Apache Sqoop as a TLP project. Sqoop is a tool designed
for efficiently transferring bulk data between Apache Hadoop and structured datastores,
such as relational databases.

The release is available here:
http://www.apache.org/dyn/closer.cgi/sqoop/

The full change log is available here:
https://issues.apache.org/jira/secure/ReleaseNote.jspa?projectId=12311320&version=12317345

Your help and feedback is more than welcome. For more information on how to report problems
and to get involved, visit the project website at http://sqoop.apache.org/.

The Apache Sqoop Team
Publish binary artifacts in Maven Repository
These instructions will change when Sqoop moves to maven builds
Currently Sqoop is built using ant and thus the process necessary for publishing its binary artifacts in Maven repository is manual. Once Sqoop migrates to using Maven build (which is the default in Sqoop 2), these steps will need to be updated accordingly.
Sqoop already has a Nexus repository setup, thanks to INFRA-4310![]() . The following steps outline how you can publish Sqoop binaries to this repository.
. The following steps outline how you can publish Sqoop binaries to this repository.
NEW PROCEDURE:
As we now need to deploy artifacts compiled against various hadoop distributions, we've moved the classifier from "test" to "hadoop
". You will need to set up the maven as is instructed in official guide![]() .
.
export VERSION=1.4.2
for version in 20 23 100 200; do ant clean mvn-prep jar -Dhadoopversion=$version; mvn gpg:sign-and-deploy-file -Dfile=build/sqoop-$VERSION.jar -DpomFile=build/m2/sqoop.pom -Durl=https://repository.apache.org/service/local/staging/deploy/maven2/ -X -DrepositoryId=apache.releases.https -DgeneratePom=false -Dclassifier=hadoop$version -DartifactId=sqoop -Dversion=$VERSION -Dpackaging=jar -DgroupId=org.apache.sqoop; done
OLD PROCEDURE:
Setup Maven settings
Follow the details provided in Maven Password Encryption Guide![]() to set up a master password for your system.
to set up a master password for your system.
Once the master password has been created, update your maven settings file (~/.m2/settings.xml) to have the following server entries:
<settings>
  ...
  <servers>
    <server>
      <id>apache.snapshots.https</id>
      <username>your-asf-user-name</username>
      <password>your-encrypted-asf-password</password>
    </server>
    <server>
      <id>apache.releases.https</id>
      <username>your-asf-user-name</username>
      <password>your-encrypted-asf-password</password>
    </server>
    <server>
      <id>apache.staging.https</id>
      <username>your-asf-user-name</username>
      <password>your-encrypted-asf-password</password>
    </server>
  </servers>
  ...
</settings>
Prepare artifacts to publish
In a newly created directory, checkout the sources from the appropriate release tag location. For example, for the release 1.4.0-incubating the sources will need to be checked out from https://svn.apache.org/repos/asf/incubator/sqoop/tags/release-1.4.0-rc1/. Once you have the sources, build them to generate the binaries. For example:![]()
$ svn co https://svn.apache.org/repos/asf/incubator/sqoop/tags/release-1.4.0-rc1/
...
$ cd release-1.4.0-rc1

$  ant jar-all
...
BUILD SUCCESSFUL
Total time: 11 seconds
$
Install to local maven cache
Before you do this step, remove any previously installed Sqoop artifacts from your local maven cache. You can do this by running the following command:
$ rm -rf ~/.m2/repository/com/cloudera/sqoop ~/.m2/repository/org/apache/sqoop
Now run the following command to install the newly checked-out and built artifacts of Sqoop from the previous step to your local maven cache.
$ ant mvn-install
...
BUILD SUCCESSFUL
Total time: 6 seconds
$
This will result in copying of the built artifacts and generated POM file into your local maven cache.
Deploy main artifact to staging repo
Once the artifacts are in your local cache, you can now deploy them to Nexus staging repository.
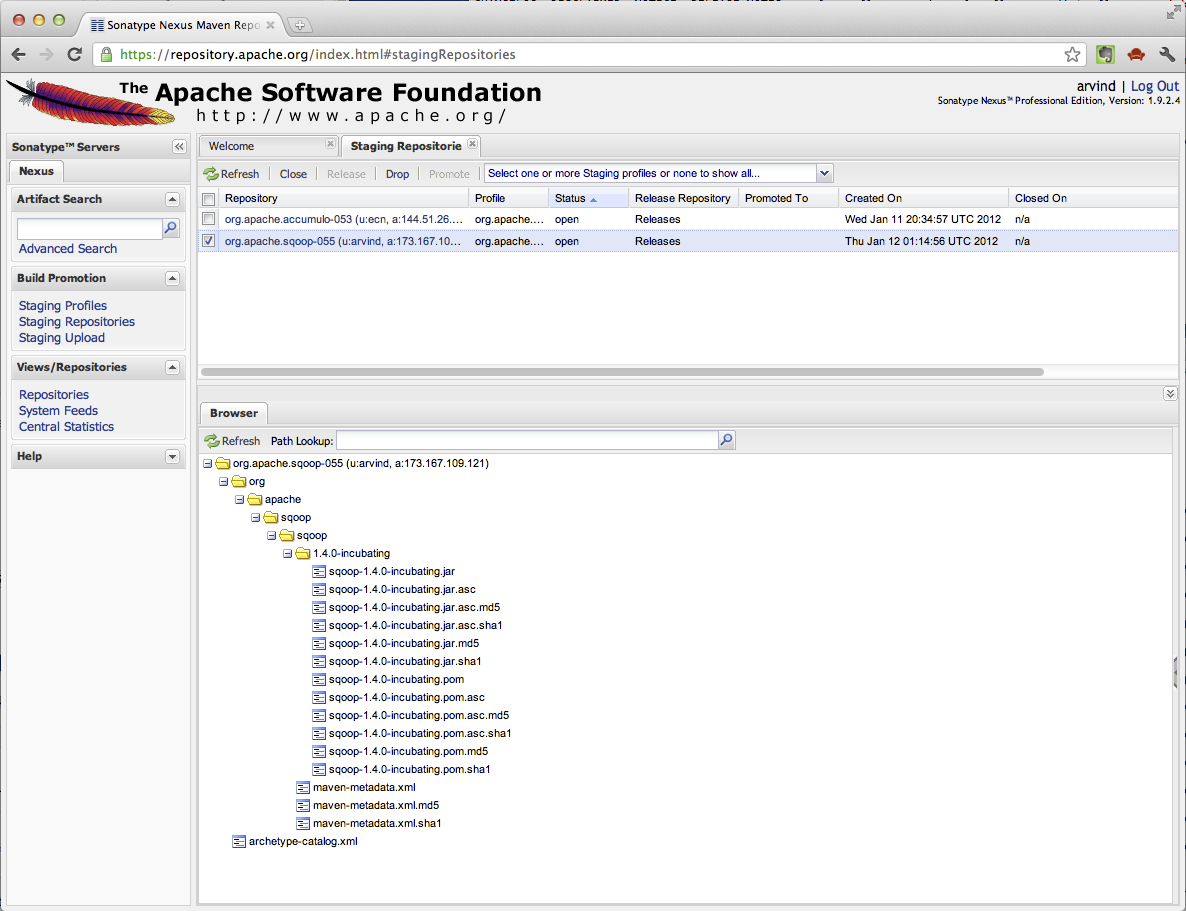
Start out by going into the directory where the main artifact is generated. Once there, make sure that the generated POM file looks accurate and if not, fix it manually. Then run the following commands to deploy the main artifact.
$ cd ~/.m2/repository/org/apache/sqoop/sqoop/1.4.0-incubating

$ ls -l
total 1108
-rw-r--r-- 1 arvind staff 532981 Jan 11 16:32 sqoop-1.4.0-incubating-sources.jar
-rw-r--r-- 1 arvind staff 590086 Jan 11 16:32 sqoop-1.4.0-incubating.jar
-rw-r--r-- 1 arvind staff   1670 Jan 11 16:32 sqoop-1.4.0-incubating.pom
$ mvn gpg:sign-and-deploy-file -Dfile=./sqoop-1.4.0-incubating.jar -DrepositoryId=apache.staging.https -Durl=https://repository.apache.org/service/local/staging/deploy/maven2/ -DpomFile=./sqoop-1.4.0-incubating.pom -Dgpg.keyname=<your-gpg-keyname>
...
[INFO] Metadata[project org.apache.sqoop:sqoop].filename = sqoop-1.4.0-incubating.pom
[INFO] ------------------------------------------------------------------------
[INFO] BUILD SUCCESS
[INFO] ------------------------------------------------------------------------
[INFO] Total time: 9.169s
[INFO] Finished at: Wed Jan 11 16:58:35 PST 2012
[INFO] Final Memory: 6M/81M
[INFO] ------------------------------------------------------------------------
This will result in the signing and deployment of the main artifact sqoop-1.4.0-incubating.jar in this case, to the staging repository. If all goes well you should be able to point your browser to Apache Nexus Repository![]() and clicking on the Staging Repository link on the left navigation column. When you select the staging repository in the right pane, the pane will split into a content pane below that shows how the content of the staging repository created by the above command. The following screenshot illustrates what this looks like.
and clicking on the Staging Repository link on the left navigation column. When you select the staging repository in the right pane, the pane will split into a content pane below that shows how the content of the staging repository created by the above command. The following screenshot illustrates what this looks like.
Deploy test artifact to staging repo
To deploy the test artifact to the staging repo, you must copy the generated test artifact to the same directory as that of the main directory so that you can use the main artifact POM and specify a classifier. Here are the commands to do that:
$ ls -l
total 1116
-rw-r--r-- 1 arvind staff 532981 Jan 11 16:32 sqoop-1.4.0-incubating-sources.jar
-rw-r--r-- 1 arvind staff 590086 Jan 11 16:32 sqoop-1.4.0-incubating.jar
-rw-r--r-- 1 arvind staff    833 Jan 11 16:58 sqoop-1.4.0-incubating.jar.asc
-rw-r--r-- 1 arvind staff   1668 Jan 11 16:58 sqoop-1.4.0-incubating.pom
-rw-r--r-- 1 arvind staff    833 Jan 11 16:58 sqoop-1.4.0-incubating.pom.asc

$ cp ../../sqoop-test/1.4.0-incubating/sqoop-test-1.4.0-incubating.jar .

$ ls -l
total 1392
-rw-r--r-- 1 arvind staff 532981 Jan 11 16:32 sqoop-1.4.0-incubating-sources.jar
-rw-r--r-- 1 arvind staff 590086 Jan 11 16:32 sqoop-1.4.0-incubating.jar
-rw-r--r-- 1 arvind staff    833 Jan 11 16:58 sqoop-1.4.0-incubating.jar.asc
-rw-r--r-- 1 arvind staff   1668 Jan 11 16:58 sqoop-1.4.0-incubating.pom
-rw-r--r-- 1 arvind staff    833 Jan 11 16:58 sqoop-1.4.0-incubating.pom.asc
-rw-r--r-- 1 arvind staff 278892 Jan 11 17:06 sqoop-test-1.4.0-incubating.jar

$ mvn gpg:sign-and-deploy-file -Dfile=./sqoop-test-1.4.0-incubating.jar -DrepositoryId=apache.staging.https -Durl=https://repository.apache.org/service/local/staging/deploy/maven2/ -DpomFile=./sqoop-1.4.0-incubating.pom -Dgpg.keyname=<your-gpg-keyname> -Dclassifier=tests
...
[INFO] Metadata[project org.apache.sqoop:sqoop].filename = sqoop-1.4.0-incubating.pom
[INFO] ------------------------------------------------------------------------
[INFO] BUILD SUCCESS
[INFO] ------------------------------------------------------------------------
[INFO] Total time: 11.160s
[INFO] Finished at: Wed Jan 11 17:10:01 PST 2012
[INFO] Final Memory: 6M/81M
[INFO] ------------------------------------------------------------------------
$
If this command succeeds, you can now see the test artifacts deployed in the staging repository as well. Go the the browser and click on the refresh button on the content area to reload the contents of the staging repository. The following screen shot is an example of how the staging repository may look like after these steps.

Close and Release staging repository
In the Nexus main content pane, make sure the staging repository you are working with is selected with a check mark, and click the "Close" button on top. This causes Nexus to verify the signatures and if everything is valid, it will result in successful closing of the repository. If there are any failures due to invalid signatures, you will have to drop the repository and redo the steps outlined in this section again.
Once the repository is closed, you can promote it to release status by clicking on the "Release" button on top. This allows the artifacts in this staging repository to be published to release repository immediately. Once the release has propagated, you should receive a confirmation email from Nexus stating that the artifacts are now available in the release repository.
Updating the website and the wiki with the new Sqoop bits:
https://cwiki.apache.org/confluence/display/SQOOP/How+to+Update+Project+Website![]()