Tutorials
There now follows the documentation on camel tutorials
Notice
These tutorials listed below, is hosted at Apache. We offer the Articles page where we have a link collection for 3rd party Camel material, such as tutorials, blog posts, published articles, videos, pod casts, presentations, and so forth.
If you have written a Camel related article, then we are happy to provide a link to it. You can contact the Camel Team, for example using the Mailing Lists, (or post a tweet with the word Apache Camel).
- OAuth Tutorial
This tutorial demonstrates how to implement OAuth for a web application with Camel's gauth component. The sample application of this tutorial is also online at http://gauthcloud.appspot.com/
- Tutorial for Camel on Google App Engine
This tutorial demonstrates the usage of the Camel Components for Google App Engine. The sample application of this tutorial is also online at http://camelcloud.appspot.com/
- Tutorial on Spring Remoting with JMS
This tutorial is focused on different techniques with Camel for Client-Server communication.
- Report Incident - This tutorial introduces Camel steadily and is based on a real life integration problem
This is a very long tutorial beginning from the start; its for entry level to Camel. Its based on a real life integration, showing how Camel can be introduced in an existing solution. We do this in baby steps. The tutorial is currently work in progress, so check it out from time to time. The tutorial explains some of the inner building blocks Camel uses under the covers. This is good knowledge to have when you start using Camel on a higher abstract level where it can do wonders in a few lines of routing DSL.
- Using Camel with ServiceMix a tutorial on using Camel inside Apache ServiceMix.
- Better JMS Transport for CXF Webservice using Apache Camel Describes how to use the Camel Transport for CXF to attach a CXF Webservice to a JMS Queue
- Tutorial how to use good old Axis 1.4 with Camel
This tutorial shows that Camel does work with the good old frameworks such as AXIS that is/was widely used for WebService.
- Tutorial on using Camel in a Web Application
This tutorial gives an overview of how to use Camel inside Tomcat, Jetty or any other servlet engine
- Tutorial on Camel 1.4 for Integration
Another real-life scenario. The company sells widgets, with a somewhat unique business process (their customers periodically report what they've purchased in order to get billed). However every customer uses a different data format and protocol. This tutorial goes through the process of integrating (and testing!) several customers and their electronic reporting of the widgets they've bought, along with the company's response.
- Tutorial how to build a Service Oriented Architecture using Camel with OSGI - Updated 20/11/2009
The tutorial has been designed in two parts. The first part introduces basic concept to create a simple SOA solution using Camel and OSGI and deploy it in a OSGI Server like Apache Felix Karaf and Spring DM Server while the second extends the ReportIncident tutorial part 4 to show How we can separate the different layers (domain, service, ...) of an application and deploy them in separate bundles. The Web Application has also be modified in order to communicate to the OSGI bundles.
- Several of the vendors on the Commercial Camel Offerings page also offer various tutorials, webinars, examples, etc.... that may be useful.
Tutorial on Spring Remoting with JMS
This tutorial was kindly donated to Apache Camel by Martin Gilday.
Preface
This tutorial aims to guide the reader through the stages of creating a project which uses Camel to facilitate the routing of messages from a JMS queue to a Spring service. The route works in a synchronous fashion returning a response to the client.
Prerequisites
This tutorial uses Maven to setup the Camel project and for dependencies for artifacts.
Distribution
This sample is distributed with the Camel distribution as examples/camel-example-spring-jms.
About
This tutorial is a simple example that demonstrates more the fact how well Camel is seamless integrated with Spring to leverage the best of both worlds. This sample is client server solution using JMS messaging as the transport. The sample has two flavors of servers and also for clients demonstrating different techniques for easy communication.
The Server is a JMS message broker that routes incoming messages to a business service that does computations on the received message and returns a response.
The EIP patterns used in this sample are:
Pattern | Description |
|---|---|
We need a channel so the Clients can communicate with the server. | |
The information is exchanged using the Camel Message interface. | |
This is where Camel shines as the message exchange between the Server and the Clients are text based strings with numbers. However our business service uses int for numbers. So Camel can do the message translation automatically. | |
It should be easy to send messages to the Server from the the clients. This is achieved with Camel's powerful Endpoint pattern that even can be more powerful combined with Spring remoting. The tutorial has clients using each kind of technique for this. | |
The client and server exchange data using point to point using a JMS queue. | |
The JMS broker is event driven and is invoked when the client sends a message to the server. |
We use the following Camel components:
Component | Description |
|---|---|
We use Apache ActiveMQ as the JMS broker on the Server side | |
We use the bean binding to easily route the messages to our business service. This is a very powerful component in Camel. | |
In the AOP enabled Server we store audit trails as files. | |
Used for the JMS messaging |
Create the Camel Project
For the purposes of the tutorial a single Maven project will be used for both the client and server. Ideally you would break your application down into the appropriate components.
Update the POM with Dependencies
First we need to have dependencies for the core Camel jars, spring, jms components, and finally ActiveMQ as the message broker.
Writing the Server
Create the Spring Service
For this example the Spring service (our business service) on the server will be a simple multiplier which trebles in the received value.
Define the Camel Routes
Configure Spring
The Spring config file is placed under META-INF/spring as this is the default location used by the Camel Maven Plugin, which we will later use to run our server.
First we need to do the standard scheme declarations in the top. In the camel-server.xml we are using spring beans as the default bean: namespace and springs context:. For configuring ActiveMQ we use broker: and for Camel we of course have camel:. Notice that we don't use version numbers for the camel-spring schema. At runtime the schema is resolved in the Camel bundle. If we use a specific version number such as 1.4 then its IDE friendly as it would be able to import it and provide smart completion etc. See Xml Reference for further details.
Notice that we also have enabled the JMXAgent so we will be able to introspect the Camel Server with a JMX Console.from="jmsbroker:queue:numbers).to("multiplier");
We use the vm protocol to connect to the ActiveMQ server as its embedded in this application.
component-scan | Defines the package to be scanned for Spring stereotype annotations, in this case, to load the "multiplier" bean |
camel-context | Defines the package to be scanned for Camel routes. Will find the |
jms bean | Creates the Camel JMS component |
Run the Server
The Server is started using the org.apache.camel.spring.Main class that can start camel-spring application out-of-the-box. The Server can be started in several flavors:
- as a standard java main application - just start the
org.apache.camel.spring.Mainclass - using maven jave:exec
- using camel:run
In this sample as there are two servers (with and without AOP) we have prepared some profiles in maven to start the Server of your choice.
The server is started with:
mvn compile exec:java -PCamelServer
Writing The Clients
This sample has three clients demonstrating different Camel techniques for communication
- CamelClient using the ProducerTemplate for Spring template style coding
- CamelRemoting using Spring Remoting
- CamelEndpoint using the Message Endpoint EIP pattern using a neutral Camel API
Client Using The ProducerTemplate
We will initially create a client by directly using ProducerTemplate. We will later create a client which uses Spring remoting to hide the fact that messaging is being used.
camelContext | The Camel context is defined but does not contain any routes |
template | The |
jms bean | This initialises the Camel JMS component, allowing us to place messages onto the queue |
And the CamelClient source code:ProducerTemplate is retrieved from a Spring ApplicationContext and used to manually place a message on the "numbers" JMS queue. The requestBody method will use the exchange pattern InOut, which states that the call should be synchronous, and that the caller expects a response.
Before running the client be sure that both the ActiveMQ broker and the CamelServer are running.
Client Using Spring Remoting
Spring Remoting "eases the development of remote-enabled services". It does this by allowing you to invoke remote services through your regular Java interface, masking that a remote service is being called.
The proxy will create a proxy service bean for you to use to make the remote invocations. The serviceInterface property details which Java interface is to be implemented by the proxy. The serviceUrl defines where messages sent to this proxy bean will be directed. Here we define the JMS endpoint with the "numbers" queue we used when working with Camel template directly. The value of the id property is the name that will be the given to the bean when it is exposed through the Spring ApplicationContext. We will use this name to retrieve the service in our client. I have named the bean multiplierProxy simply to highlight that it is not the same multiplier bean as is being used by CamelServer. They are in completely independent contexts and have no knowledge of each other. As you are trying to mask the fact that remoting is being used in a real application you would generally not include proxy in the name.
And the Java client source code:
- The Spring context is created with the new camel-client-remoting.xml
- We retrieve the proxy bean instead of a
ProducerTemplate. In a non-trivial example you would have the bean injected as in the standard Spring manner. - The multiply method is then called directly. In the client we are now working to an interface. There is no mention of Camel or JMS inside our Java code.
Client Using Message Endpoint EIP Pattern
This client uses the Message Endpoint EIP pattern to hide the complexity to communicate to the Server. The Client uses the same simple API to get hold of the endpoint, create an exchange that holds the message, set the payload and create a producer that does the send and receive. All done using the same neutral Camel API for all the components in Camel. So if the communication was socket TCP based you just get hold of a different endpoint and all the java code stays the same. That is really powerful.
Okay enough talk, show me the code!"mina:tcp://localhost:61610" then its just a matter of getting hold of this endpoint instead of the JMS and all the rest of the java code is exactly the same.
Run the Clients
The Clients is started using their main class respectively.
- as a standard java main application - just start their main class
- using maven jave:exec
In this sample we start the clients using maven:
mvn compile exec:java -PCamelClient
mvn compile exec:java -PCamelClientRemoting
mvn compile exec:java -PCamelClientEndpoint
Also see the Maven pom.xml file how the profiles for the clients is defined.
Using the Camel Maven Plugin
The Camel Maven Plugin allows you to run your Camel routes directly from Maven. This negates the need to create a host application, as we did with Camel server, simply to start up the container. This can be very useful during development to get Camel routes running quickly.
All that is required is a new plugin definition in your Maven POM. As we have already placed our Camel config in the default location (camel-server.xml has been placed in META-INF/spring/) we do not need to tell the plugin where the route definitions are located. Simply run mvn camel:run.
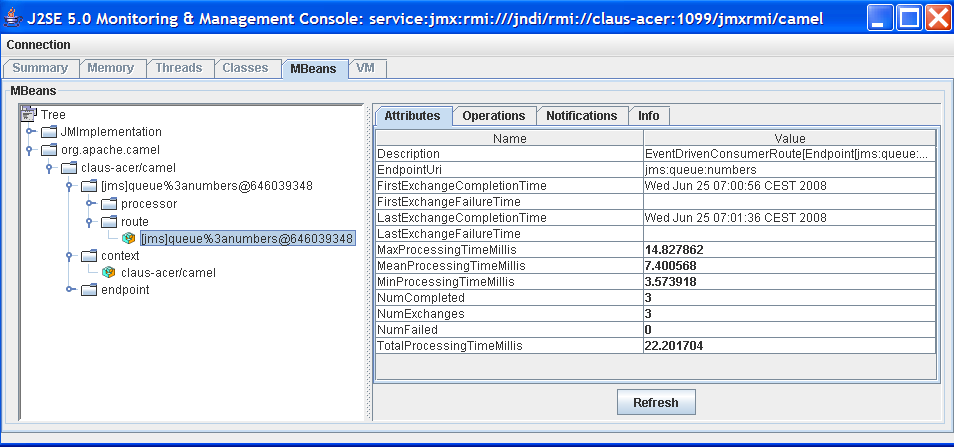
Using Camel JMX
Camel has extensive support for JMX and allows us to inspect the Camel Server at runtime. As we have enabled the JMXAgent in our tutorial we can fire up the jconsole and connect to the following service URI: service:jmx:rmi:///jndi/rmi://localhost:1099/jmxrmi/camel. Notice that Camel will log at INFO level the JMX Connector URI:
In the screenshot below we can see the route and its performance metrics:
See Also
Tutorial - camel-example-reportincident
Introduction
Creating this tutorial was inspired by a real life use-case I discussed over the phone with a colleague. He was working at a client whom uses a heavy-weight integration platform from a very large vendor. He was in talks with developer shops to implement a new integration on this platform. His trouble was the shop tripled the price when they realized the platform of choice. So I was wondering how we could do this integration with Camel. Can it be done, without tripling the cost ![]() .
.
This tutorial is written during the development of the integration. I have decided to start off with a sample that isn't Camel's but standard Java and then plugin Camel as we goes. Just as when people needed to learn Spring you could consume it piece by piece, the same goes with Camel.
The target reader is person whom hasn't experience or just started using Camel.
Motivation for this tutorial
I wrote this tutorial motivated as Camel lacked an example application that was based on the web application deployment model. The entire world hasn't moved to pure OSGi deployments yet.
The full source code for this tutorial as complete is part of the Apache Camel distribution in the examples/camel-example-reportincident directory
The use-case
The goal is to allow staff to report incidents into a central administration. For that they use client software where they report the incident and submit it to the central administration. As this is an integration in a transition phase the administration should get these incidents by email whereas they are manually added to the database. The client software should gather the incident and submit the information to the integration platform that in term will transform the report into an email and send it to the central administrator for manual processing.
The figure below illustrates this process. The end users reports the incidents using the client applications. The incident is sent to the central integration platform as webservice. The integration platform will process the incident and send an OK acknowledgment back to the client. Then the integration will transform the message to an email and send it to the administration mail server. The users in the administration will receive the emails and take it from there.

In EIP patterns
We distill the use case as EIP patterns:

Parts
This tutorial is divided into sections and parts:
Section A: Existing Solution, how to slowly use Camel
Part 1 - This first part explain how to setup the project and get a webservice exposed using Apache CXF. In fact we don't touch Camel yet.
Part 2 - Now we are ready to introduce Camel piece by piece (without using Spring or any XML configuration file) and create the full feature integration. This part will introduce different Camel's concepts and How we can build our solution using them like :
- CamelContext
- Endpoint, Exchange & Producer
- Components : Log, File
Part 3 - Continued from part 2 where we implement that last part of the solution with the event driven consumer and how to send the email through the Mail component.
Section B: The Camel Solution
Part 4 - We now turn into the path of Camel where it excels - the routing.
Part 5 - Is about how embed Camel with Spring and using CXF endpoints directly in Camel
Part 6 - Showing a alternative solution primarily using XML instead of Java code
Using Axis 2
See this blog entry by Sagara demonstrating how to use Apache Axis 2 instead of Apache CXF as the web service framework.
Links
Better JMS Transport for CXF Webservice using Apache Camel
Configuring JMS in Apache CXF before Version 2.1.3 is possible but not really easy or nice. This article shows how to use Apache Camel to provide a better JMS Transport for CXF.
Update: Since CXF 2.1.3 there is a new way of configuring JMS (Using the JMSConfigFeature). It makes JMS config for CXF as easy as with Camel. Using Camel for JMS is still a good idea if you want to use the rich feature of Camel for routing and other Integration Scenarios that CXF does not support.
So how to connect Apache Camel and CXF
The best way to connect Camel and CXF is using the Camel transport for CXF. This is a camel module that registers with cxf as a new transport. It is quite easy to configure.
<bean class="org.apache.camel.component.cxf.transport.CamelTransportFactory">
  <property name="bus" ref="cxf" />
  <property name="camelContext" ref="camelContext" />
  <property name="transportIds">
    <list>
      <value>http://cxf.apache.org/transports/camel</value>
    </list>
  </property>
</bean>
This bean registers with CXF and provides a new transport prefix camel:// that can be used in CXF address configurations. The bean references a bean cxf which will be already present in your config. The other refrenceis a camel context. We will later define this bean to provide the routing config.
How is JMS configured in Camel
In camel you need two things to configure JMS. A ConnectionFactory and a JMSComponent. As ConnectionFactory you can simply set up the normal Factory your JMS provider offers or bind a JNDI ConnectionFactory. In this example we use the ConnectionFactory provided by ActiveMQ.
<bean id="jmsConnectionFactory" class="org.apache.activemq.ActiveMQConnectionFactory">
  <property name="brokerURL" value="tcp://localhost:61616" />
</bean>
Then we set up the JMSComponent. It offers a new transport prefix to camel that we simply call jms. If we need several JMSComponents we can differentiate them by their name.
<bean id="jms" class="org.apache.camel.component.jms.JmsComponent">
  <property name="connectionFactory" ref="jmsConnectionFactory" />
  <property name="useMessageIDAsCorrelationID" value="true" />
</bean>
You can find more details about the JMSComponent at the Camel Wiki. For example you find the complete configuration options and a JNDI sample there.
Setting up the CXF client
We will configure a simple CXF webservice client. It will use stub code generated from a wsdl. The webservice client will be configured to use JMS directly. You can also use a direct: Endpoint and do the routing to JMS in the Camel Context.
<client id="CustomerService" xmlns="http://cxf.apache.org/jaxws" xmlns:customer="http://customerservice.example.com/"
  serviceName="customer:CustomerServiceService"
  endpointName="customer:CustomerServiceEndpoint"
  address="camel:jms:queue:CustomerService"
  serviceClass="com.example.customerservice.CustomerService">
</client>
We explicitly configure serviceName and endpointName so they are not read from the wsdl. The names we use are arbitrary and have no further function but we set them to look nice. The serviceclass points to the service interface that was generated from the wsdl. Now the important thing is address. Here we tell cxf to use the camel transport, use the JmsComponent who registered the prefix "jms" and use the queue "CustomerService".
Setting up the CamelContext
As we do not need additional routing an empty CamelContext bean will suffice.
<camelContext id="camelContext" xmlns="http://activemq.apache.org/camel/schema/spring">
</camelContext>
Running the Example
- Follow the readme.txt
Conclusion
As you have seen in this example you can use Camel to connect services to JMS easily while being able to also use the rich integration features of Apache Camel.
Tutorial using Axis 1.4 with Apache Camel
Removed from distribution
This example has been removed from Camel 2.9 onwards. Apache Axis 1.4 is a very old and unsupported framework. We encourage users to use CXF instead of Axis.
Prerequisites
This tutorial uses Maven 2 to setup the Camel project and for dependencies for artifacts.
Distribution
This sample is distributed with the Camel 1.5 distribution as examples/camel-example-axis.
Introduction
Apache Axis is/was widely used as a webservice framework. So in line with some of the other tutorials to demonstrate how Camel is not an invasive framework but is flexible and integrates well with existing solution.
We have an existing solution that exposes a webservice using Axis 1.4 deployed as web applications. This is a common solution. We use contract first so we have Axis generated source code from an existing wsdl file. Then we show how we introduce Spring and Camel to integrate with Axis.
This tutorial uses the following frameworks:
- Maven 2.0.9
- Apache Camel 1.5.0
- Apache Axis 1.4
- Spring 2.5.5
Setting up the project to run Axis
This first part is about getting the project up to speed with Axis. We are not touching Camel or Spring at this time.
Maven 2
Axis dependencies is available for maven 2 so we configure our pom.xml as:
        <dependency>
            <groupId>org.apache.axis</groupId>
            <artifactId>axis</artifactId>
            <version>1.4</version>
        </dependency>

        <dependency>
            <groupId>org.apache.axis</groupId>
            <artifactId>axis-jaxrpc</artifactId>
            <version>1.4</version>
        </dependency>

        <dependency>
            <groupId>org.apache.axis</groupId>
            <artifactId>axis-saaj</artifactId>
            <version>1.4</version>
        </dependency>

	<dependency>
	    <groupId>axis</groupId>
	    <artifactId>axis-wsdl4j</artifactId>
	    <version>1.5.1</version>
	</dependency>

	<dependency>
	    <groupId>commons-discovery</groupId>
	    <artifactId>commons-discovery</artifactId>
	    <version>0.4</version>
	</dependency>

        <dependency>
            <groupId>log4j</groupId>
            <artifactId>log4j</artifactId>
            <version>1.2.14</version>
        </dependency>
Then we need to configure maven to use Java 1.5 and the Axis maven plugin that generates the source code based on the wsdl file:
<!-- to compile with 1.5 -->
	<plugin>
		<groupId>org.apache.maven.plugins</groupId>
		<artifactId>maven-compiler-plugin</artifactId>
		<configuration>
			<source>1.5</source>
			<target>1.5</target>
		</configuration>
	</plugin>

            <plugin>
               <groupId>org.codehaus.mojo</groupId>
               <artifactId>axistools-maven-plugin</artifactId>
               <configuration>
	          <sourceDirectory>src/main/resources/</sourceDirectory>
                  <packageSpace>com.mycompany.myschema</packageSpace>
                  <testCases>false</testCases>
                  <serverSide>true</serverSide>
                  <subPackageByFileName>false</subPackageByFileName>
               </configuration>
               <executions>
                 <execution>
                   <goals>
                     <goal>wsdl2java</goal>
                   </goals>
                 </execution>
               </executions>
            </plugin>
wsdl
We use the same .wsdl file as the Tutorial-Example-ReportIncident and copy it to src/main/webapp/WEB-INF/wsdl
<?xml version="1.0" encoding="ISO-8859-1"?>
<wsdl:definitions xmlns:soap="http://schemas.xmlsoap.org/wsdl/soap/"
	xmlns:tns="http://reportincident.example.camel.apache.org"
	xmlns:xs="http://www.w3.org/2001/XMLSchema"
	xmlns:http="http://schemas.xmlsoap.org/wsdl/http/"
	xmlns:wsdl="http://schemas.xmlsoap.org/wsdl/"
	targetNamespace="http://reportincident.example.camel.apache.org">

	<!-- Type definitions for input- and output parameters for webservice -->
	<wsdl:types>
	<xs:schema targetNamespace="http://reportincident.example.camel.apache.org">
			<xs:element name="inputReportIncident">
				<xs:complexType>
					<xs:sequence>
						<xs:element type="xs:string"  name="incidentId"/>
						<xs:element type="xs:string"  name="incidentDate"/>
						<xs:element type="xs:string"  name="givenName"/>
						<xs:element type="xs:string"  name="familyName"/>
						<xs:element type="xs:string"  name="summary"/>
						<xs:element type="xs:string"  name="details"/>
						<xs:element type="xs:string"  name="email"/>
						<xs:element type="xs:string"  name="phone"/>
					</xs:sequence>
				</xs:complexType>
			</xs:element>
			<xs:element name="outputReportIncident">
				<xs:complexType>
					<xs:sequence>
						<xs:element type="xs:string" name="code"/>
					</xs:sequence>
				</xs:complexType>
			</xs:element>
		</xs:schema>
	</wsdl:types>

	<!-- Message definitions for input and output -->
	<wsdl:message name="inputReportIncident">
		<wsdl:part name="parameters" element="tns:inputReportIncident"/>
	</wsdl:message>
	<wsdl:message name="outputReportIncident">
		<wsdl:part name="parameters" element="tns:outputReportIncident"/>
	</wsdl:message>

	<!-- Port (interface) definitions -->
	<wsdl:portType name="ReportIncidentEndpoint">
		<wsdl:operation name="ReportIncident">
			<wsdl:input message="tns:inputReportIncident"/>
			<wsdl:output message="tns:outputReportIncident"/>
		</wsdl:operation>
	</wsdl:portType>

	<!-- Port bindings to transports and encoding - HTTP, document literal encoding is used -->
	<wsdl:binding name="ReportIncidentBinding" type="tns:ReportIncidentEndpoint">
		<soap:binding transport="http://schemas.xmlsoap.org/soap/http"/>
		<wsdl:operation name="ReportIncident">
			<soap:operation
				soapAction="http://reportincident.example.camel.apache.org/ReportIncident"
				style="document"/>
			<wsdl:input>
				<soap:body parts="parameters" use="literal"/>
			</wsdl:input>
			<wsdl:output>
				<soap:body parts="parameters" use="literal"/>
			</wsdl:output>
		</wsdl:operation>
	</wsdl:binding>

	<!-- Service definition -->
	<wsdl:service name="ReportIncidentService">
		<wsdl:port name="ReportIncidentPort" binding="tns:ReportIncidentBinding">
			<soap:address location="http://reportincident.example.camel.apache.org"/>
		</wsdl:port>
	</wsdl:service>

</wsdl:definitions>
Configuring Axis
Okay we are now setup for the contract first development and can generate the source file. For now we are still only using standard Axis and not Spring nor Camel. We still need to setup Axis as a web application so we configure the web.xml in src/main/webapp/WEB-INF/web.xml as:
    <servlet>
        <servlet-name>axis</servlet-name>
        <servlet-class>org.apache.axis.transport.http.AxisServlet</servlet-class>
    </servlet>

    <servlet-mapping>
        <servlet-name>axis</servlet-name>
        <url-pattern>/services/*</url-pattern>
    </servlet-mapping>
The web.xml just registers Axis servlet that is handling the incoming web requests to its servlet mapping. We still need to configure Axis itself and this is done using its special configuration file server-config.wsdd. We nearly get this file for free if we let Axis generate the source code so we run the maven goal:
mvn axistools:wsdl2java
The tool will generate the source code based on the wsdl and save the files to the following folder:
.\target\generated-sources\axistools\wsdl2java\org\apache\camel\example\reportincident
deploy.wsdd
InputReportIncident.java
OutputReportIncident.java
ReportIncidentBindingImpl.java
ReportIncidentBindingStub.java
ReportIncidentService_PortType.java
ReportIncidentService_Service.java
ReportIncidentService_ServiceLocator.java
undeploy.wsdd
This is standard Axis and so far no Camel or Spring has been touched. To implement our webservice we will add our code, so we create a new class AxisReportIncidentService that implements the port type interface where we can implement our code logic what happens when the webservice is invoked.
package org.apache.camel.example.axis;

import org.apache.camel.example.reportincident.InputReportIncident;
import org.apache.camel.example.reportincident.OutputReportIncident;
import org.apache.camel.example.reportincident.ReportIncidentService_PortType;

import java.rmi.RemoteException;

/**
 * Axis webservice
 */
public class AxisReportIncidentService implements ReportIncidentService_PortType {

    public OutputReportIncident reportIncident(InputReportIncident parameters) throws RemoteException {
        System.out.println("Hello AxisReportIncidentService is called from " + parameters.getGivenName());

        OutputReportIncident out = new OutputReportIncident();
        out.setCode("OK");
        return out;
    }

}
Now we need to configure Axis itself and this is done using its server-config.wsdd file. We nearly get this for for free from the auto generated code, we copy the stuff from deploy.wsdd and made a few modifications:
<?xml version="1.0" encoding="UTF-8"?>
<deployment xmlns="http://xml.apache.org/axis/wsdd/" xmlns:java="http://xml.apache.org/axis/wsdd/providers/java">
  <!-- global configuration -->
	<globalConfiguration>
		<parameter name="sendXsiTypes" value="true"/>
		<parameter name="sendMultiRefs" value="true"/>
		<parameter name="sendXMLDeclaration" value="true"/>
		<parameter name="axis.sendMinimizedElements" value="true"/>
	</globalConfiguration>
	<handler name="URLMapper" type="java:org.apache.axis.handlers.http.URLMapper"/>

  <!-- this service is from deploy.wsdd -->
  <service name="ReportIncidentPort" provider="java:RPC" style="document" use="literal">
      <parameter name="wsdlTargetNamespace" value="http://reportincident.example.camel.apache.org"/>
      <parameter name="wsdlServiceElement" value="ReportIncidentService"/>
      <parameter name="schemaUnqualified" value="http://reportincident.example.camel.apache.org"/>
      <parameter name="wsdlServicePort" value="ReportIncidentPort"/>
      <parameter name="className" value="org.apache.camel.example.reportincident.ReportIncidentBindingImpl"/>
      <parameter name="wsdlPortType" value="ReportIncidentService"/>
      <parameter name="typeMappingVersion" value="1.2"/>
      <operation name="reportIncident" qname="ReportIncident" returnQName="retNS:outputReportIncident" xmlns:retNS="http://reportincident.example.camel.apache.org"
                 returnType="rtns:>outputReportIncident" xmlns:rtns="http://reportincident.example.camel.apache.org"
                 soapAction="http://reportincident.example.camel.apache.org/ReportIncident" >
        <parameter qname="pns:inputReportIncident" xmlns:pns="http://reportincident.example.camel.apache.org"
                 type="tns:>inputReportIncident" xmlns:tns="http://reportincident.example.camel.apache.org"/>
      </operation>
      <parameter name="allowedMethods" value="reportIncident"/>

      <typeMapping
        xmlns:ns="http://reportincident.example.camel.apache.org"
        qname="ns:>outputReportIncident"
        type="java:org.apache.camel.example.reportincident.OutputReportIncident"
        serializer="org.apache.axis.encoding.ser.BeanSerializerFactory"
        deserializer="org.apache.axis.encoding.ser.BeanDeserializerFactory"
        encodingStyle=""
      />
      <typeMapping
        xmlns:ns="http://reportincident.example.camel.apache.org"
        qname="ns:>inputReportIncident"
        type="java:org.apache.camel.example.reportincident.InputReportIncident"
        serializer="org.apache.axis.encoding.ser.BeanSerializerFactory"
        deserializer="org.apache.axis.encoding.ser.BeanDeserializerFactory"
        encodingStyle=""
      />
  </service>

  <!-- part of Axis configuration -->
	<transport name="http">
		<requestFlow>
			<handler type="URLMapper"/>
			<handler type="java:org.apache.axis.handlers.http.HTTPAuthHandler"/>
		</requestFlow>
	</transport>
</deployment>
The globalConfiguration and transport is not in the deploy.wsdd file so you gotta write that yourself. The service is a 100% copy from deploy.wsdd. Axis has more configuration to it than shown here, but then you should check the Axis documentation.
What we need to do now is important, as we need to modify the above configuration to use our webservice class than the default one, so we change the classname parameter to our class AxisReportIncidentService:
<parameter name="className" value="org.apache.camel.example.axis.AxisReportIncidentService"/>
Running the Example
Now we are ready to run our example for the first time, so we use Jetty as the quick web container using its maven command:
mvn jetty:run
Then we can hit the web browser and enter this URL: http://localhost:8080/camel-example-axis/services and you should see the famous Axis start page with the text And now... Some Services.
Clicking on the .wsdl link shows the wsdl file, but what. It's an auto generated one and not our original .wsdl file. So we need to fix this ASAP and this is done by configuring Axis in the server-config.wsdd file:
  <service name="ReportIncidentPort" provider="java:RPC" style="document" use="literal">
    <wsdlFile>/WEB-INF/wsdl/report_incident.wsdl</wsdlFile>
    ...
We do this by adding the wsdlFile tag in the service element where we can point to the real .wsdl file.
Integrating Spring
First we need to add its dependencies to the pom.xml.
        <dependency>
            <groupId>org.springframework</groupId>
            <artifactId>spring-web</artifactId>
            <version>2.5.5</version>
        </dependency>
Spring is integrated just as it would like to, we add its listener to the web.xml and a context parameter to be able to configure precisely what spring xml files to use:
    <context-param>
        <param-name>contextConfigLocation</param-name>
        <param-value>
            classpath:axis-example-context.xml
        </param-value>
    </context-param>

    <listener>
        <listener-class>org.springframework.web.context.ContextLoaderListener</listener-class>
    </listener>
Next is to add a plain spring XML file named axis-example-context.xml in the src/main/resources folder.
<?xml version="1.0" encoding="UTF-8"?>
<beans xmlns="http://www.springframework.org/schema/beans"
       xmlns:xsi="http://www.w3.org/2001/XMLSchema-instance"
       xsi:schemaLocation="
         http://www.springframework.org/schema/beans http://www.springframework.org/schema/beans/spring-beans-2.5.xsd">

</beans>
The spring XML file is currently empty. We hit jetty again with mvn jetty:run just to make sure Spring was setup correctly.
Using Spring
We would like to be able to get hold of the Spring ApplicationContext from our webservice so we can get access to the glory spring, but how do we do this? And our webservice class AxisReportIncidentService is created and managed by Axis we want to let Spring do this. So we have two problems.
We solve these problems by creating a delegate class that Axis creates, and this delegate class gets hold on Spring and then gets our real webservice as a spring bean and invoke the service.
First we create a new class that is 100% independent from Axis and just a plain POJO. This is our real service.
package org.apache.camel.example.axis;

import org.apache.camel.example.reportincident.InputReportIncident;
import org.apache.camel.example.reportincident.OutputReportIncident;

/**
 * Our real service that is not tied to Axis
 */
public class ReportIncidentService  {

    public OutputReportIncident reportIncident(InputReportIncident parameters) {
        System.out.println("Hello ReportIncidentService is called from " + parameters.getGivenName());

        OutputReportIncident out = new OutputReportIncident();
        out.setCode("OK");
        return out;
    }

}
So now we need to get from AxisReportIncidentService to this one ReportIncidentService using Spring. Well first of all we add our real service to spring XML configuration file so Spring can handle its lifecycle:
<?xml version="1.0" encoding="UTF-8"?>
<beans xmlns="http://www.springframework.org/schema/beans"
       xmlns:xsi="http://www.w3.org/2001/XMLSchema-instance"
       xsi:schemaLocation="
         http://www.springframework.org/schema/beans http://www.springframework.org/schema/beans/spring-beans-2.5.xsd">

    <bean id="incidentservice" class="org.apache.camel.example.axis.ReportIncidentService"/>

</beans>
And then we need to modify AxisReportIncidentService to use Spring to lookup the spring bean id="incidentservice" and delegate the call. We do this by extending the spring class org.springframework.remoting.jaxrpc.ServletEndpointSupport so the refactored code is:
package org.apache.camel.example.axis;

import org.apache.camel.example.reportincident.InputReportIncident;
import org.apache.camel.example.reportincident.OutputReportIncident;
import org.apache.camel.example.reportincident.ReportIncidentService_PortType;
import org.springframework.remoting.jaxrpc.ServletEndpointSupport;

import java.rmi.RemoteException;

/**
 * Axis webservice
 */
public class AxisReportIncidentService extends ServletEndpointSupport implements ReportIncidentService_PortType {

    public OutputReportIncident reportIncident(InputReportIncident parameters) throws RemoteException {
        // get hold of the spring bean from the application context
        ReportIncidentService service = (ReportIncidentService) getApplicationContext().getBean("incidentservice");

        // delegate to the real service
        return service.reportIncident(parameters);
    }

}
To see if everything is okay we run mvn jetty:run.
In the code above we get hold of our service at each request by looking up in the application context. However Spring also supports an init method where we can do this once. So we change the code to:
public class AxisReportIncidentService extends ServletEndpointSupport implements ReportIncidentService_PortType {

    private ReportIncidentService service;

    @Override
    protected void onInit() throws ServiceException {
        // get hold of the spring bean from the application context
        service = (ReportIncidentService) getApplicationContext().getBean("incidentservice");
    }

    public OutputReportIncident reportIncident(InputReportIncident parameters) throws RemoteException {
        // delegate to the real service
        return service.reportIncident(parameters);
    }

}
So now we have integrated Axis with Spring and we are ready for Camel.
Integrating Camel
Again the first step is to add the dependencies to the maven pom.xml file:
        <dependency>
            <groupId>org.apache.camel</groupId>
            <artifactId>camel-core</artifactId>
            <version>1.5.0</version>
        </dependency>

        <dependency>
            <groupId>org.apache.camel</groupId>
            <artifactId>camel-spring</artifactId>
            <version>1.5.0</version>
        </dependency>
Now that we have integrated with Spring then we easily integrate with Camel as Camel works well with Spring.
Camel does not require Spring
Camel does not require Spring, we could easily have used Camel without Spring, but most users prefer to use Spring also.
We choose to integrate Camel in the Spring XML file so we add the camel namespace and the schema location:
xmlns:camel="http://activemq.apache.org/camel/schema/spring"
http://activemq.apache.org/camel/schema/spring http://activemq.apache.org/camel/schema/spring/camel-spring.xsd"
CamelContext
CamelContext is the heart of Camel its where all the routes, endpoints, components, etc. is registered. So we setup a CamelContext and the spring XML files looks like:
<?xml version="1.0" encoding="UTF-8"?>
<beans xmlns="http://www.springframework.org/schema/beans"
       xmlns:xsi="http://www.w3.org/2001/XMLSchema-instance"
       xmlns:camel="http://activemq.apache.org/camel/schema/spring"
       xsi:schemaLocation="
         http://www.springframework.org/schema/beans http://www.springframework.org/schema/beans/spring-beans-2.5.xsd
         http://activemq.apache.org/camel/schema/spring http://activemq.apache.org/camel/schema/spring/camel-spring.xsd">

    <bean id="incidentservice" class="org.apache.camel.example.axis.ReportIncidentService"/>

    <camel:camelContext id="camel">
        <!-- TODO: Here we can add Camel stuff -->
    </camel:camelContext>

</beans>
Store a file backup
We want to store the web service request as a file before we return a response. To do this we want to send the file content as a message to an endpoint that produces the file. So we need to do two steps:
- configure the file backup endpoint
- send the message to the endpoint
The endpoint is configured in spring XML so we just add it as:
    <camel:camelContext id="camelContext">
        <!-- endpoint named backup that is configued as a file component -->
        <camel:endpoint id="backup" uri="file://target?append=false"/>
    </camel:camelContext>
In the CamelContext we have defined our endpoint with the id backup and configured it use the URL notation that we know from the internet. Its a file scheme that accepts a context and some options. The contest is target and its the folder to store the file. The option is just as the internet with ? and & for subsequent options. We configure it to not append, meaning than any existing file will be overwritten. See the File component for options and how to use the camel file endpoint.
Next up is to be able to send a message to this endpoint. The easiest way is to use a ProducerTemplate. A ProducerTemplate is inspired by Spring template pattern with for instance JmsTemplate or JdbcTemplate in mind. The template that all the grunt work and exposes a simple interface to the end-user where he/she can set the payload to send. Then the template will do proper resource handling and all related issues in that regard. But how do we get hold of such a template? Well the CamelContext is able to provide one. This is done by configuring the template on the camel context in the spring XML as:
    <camel:camelContext id="camelContext">
        <!-- producer template exposed with this id -->
        <camel:template id="camelTemplate"/>

        <!-- endpoint named backup that is configued as a file component -->
        <camel:endpoint id="backup" uri="file://target?append=false"/>
    </camel:camelContext>
Then we can expose a ProducerTemplate property on our service with a setter in the Java code as:
public class ReportIncidentService {

    private ProducerTemplate template;

    public void setTemplate(ProducerTemplate template) {
        this.template = template;
    }
And then let Spring handle the dependency inject as below:
    <bean id="incidentservice" class="org.apache.camel.example.axis.ReportIncidentService">
        <!-- set the producer template to use from the camel context below -->
        <property name="template" ref="camelTemplate"/>
    </bean>
Now we are ready to use the producer template in our service to send the payload to the endpoint. The template has many sendXXX methods for this purpose. But before we send the payload to the file endpoint we must also specify what filename to store the file as. This is done by sending meta data with the payload. In Camel metadata is sent as headers. Headers is just a plain Map<String, Object>. So if we needed to send several metadata then we could construct an ordinary HashMap and put the values in there. But as we just need to send one header with the filename Camel has a convenient send method sendBodyAndHeader so we choose this one.
    public OutputReportIncident reportIncident(InputReportIncident parameters) {
        System.out.println("Hello ReportIncidentService is called from " + parameters.getGivenName());

        String data = parameters.getDetails();

        // store the data as a file
        String filename = parameters.getIncidentId() + ".txt";
        // send the data to the endpoint and the header contains what filename it should be stored as
        template.sendBodyAndHeader("backup", data, "org.apache.camel.file.name", filename);

        OutputReportIncident out = new OutputReportIncident();
        out.setCode("OK");
        return out;
    }
The template in the code above uses 4 parameters:
- the endpoint name, in this case the id referring to the endpoint defined in Spring XML in the camelContext element.
- the payload, can be any kind of object
- the key for the header, in this case a Camel keyword to set the filename
- and the value for the header
Running the example
We start our integration with maven using mvn jetty:run. Then we open a browser and hit http://localhost:8080. Jetty is so smart that it display a frontpage with links to the deployed application so just hit the link and you get our application. Now we hit append /services to the URL to access the Axis frontpage. The URL should be http://localhost:8080/camel-example-axis/services.
You can then test it using a web service test tools such as SoapUI.
Hitting the service will output to the console
2008-09-06 15:01:41.718::INFO:  Started SelectChannelConnector @ 0.0.0.0:8080
[INFO] Started Jetty Server
Hello ReportIncidentService is called from Ibsen
And there should be a file in the target subfolder.
dir target /b
123.txt
Unit Testing
We would like to be able to unit test our ReportIncidentService class. So we add junit to the maven dependency:
        <dependency>
            <groupId>junit</groupId>
            <artifactId>junit</artifactId>
            <version>3.8.2</version>
            <scope>test</scope>
        </dependency>
And then we create a plain junit testcase for our service class.
package org.apache.camel.example.axis;

import junit.framework.TestCase;
import org.apache.camel.example.reportincident.InputReportIncident;
import org.apache.camel.example.reportincident.OutputReportIncident;

/**
 * Unit test of service
 */
public class ReportIncidentServiceTest extends TestCase {

    public void testIncident() {
        ReportIncidentService service = new ReportIncidentService();

        InputReportIncident input = createDummyIncident();
        OutputReportIncident output = service.reportIncident(input);
        assertEquals("OK", output.getCode());
    }

   protected InputReportIncident createDummyIncident() {
        InputReportIncident input = new InputReportIncident();
        input.setEmail("davsclaus@apache.org");
        input.setIncidentId("12345678");
        input.setIncidentDate("2008-07-13");
        input.setPhone("+45 2962 7576");
        input.setSummary("Failed operation");
        input.setDetails("The wrong foot was operated.");
        input.setFamilyName("Ibsen");
        input.setGivenName("Claus");
        return input;
    }

}
Then we can run the test with maven using: mvn test. But we will get a failure:
Running org.apache.camel.example.axis.ReportIncidentServiceTest
Hello ReportIncidentService is called from Claus
Tests run: 1, Failures: 0, Errors: 1, Skipped: 0, Time elapsed: 0.235 sec <<< FAILURE!

Results :

Tests in error:
  testIncident(org.apache.camel.example.axis.ReportIncidentServiceTest)

Tests run: 1, Failures: 0, Errors: 1, Skipped: 0
What is the problem? Well our service uses a CamelProducer (the template) to send a message to the file endpoint so the message will be stored in a file. What we need is to get hold of such a producer and inject it on our service, by calling the setter.
Since Camel is very light weight and embedable we are able to create a CamelContext and add the endpoint in our unit test code directly. We do this to show how this is possible:
    private CamelContext context;

    @Override
    protected void setUp() throws Exception {
        super.setUp();
        // CamelContext is just created like this
        context = new DefaultCamelContext();

        // then we can create our endpoint and set the options
        FileEndpoint endpoint = new FileEndpoint();
        // the endpoint must have the camel context set also
        endpoint.setCamelContext(context);
        // our output folder
        endpoint.setFile(new File("target"));
        // and the option not to append
        endpoint.setAppend(false);

        // then we add the endpoint just in java code just as the spring XML, we register it with the "backup" id.
        context.addSingletonEndpoint("backup", endpoint);

        // finally we need to start the context so Camel is ready to rock
        context.start();
    }

    @Override
    protected void tearDown() throws Exception {
        super.tearDown();
        // and we are nice boys so we stop it to allow resources to clean up
        context.stop();
    }
So now we are ready to set the ProducerTemplate on our service, and we get a hold of that baby from the CamelContext as:
    public void testIncident() {
        ReportIncidentService service = new ReportIncidentService();

        // get a producer template from the camel context
        ProducerTemplate template = context.createProducerTemplate();
        // inject it on our service using the setter
        service.setTemplate(template);

        InputReportIncident input = createDummyIncident();
        OutputReportIncident output = service.reportIncident(input);
        assertEquals("OK", output.getCode());
    }
And this time when we run the unit test its a success:
Results :

Tests run: 1, Failures: 0, Errors: 0, Skipped: 0
We would like to test that the file exists so we add these two lines to our test method:
        // should generate a file also
        File file = new File("target/" + input.getIncidentId() + ".txt");
        assertTrue("File should exists", file.exists());
Smarter Unit Testing with Spring
The unit test above requires us to assemble the Camel pieces manually in java code. What if we would like our unit test to use our spring configuration file axis-example-context.xml where we already have setup the endpoint. And of course we would like to test using this configuration file as this is the real file we will use. Well hey presto the xml file is a spring ApplicationContext file and spring is able to load it, so we go the spring path for unit testing. First we add the spring-test jar to our maven dependency:
        <dependency>
            <groupId>org.springframework</groupId>
            <artifactId>spring-test</artifactId>
            <scope>test</scope>
        </dependency>
And then we refactor our unit test to be a standard spring unit class. What we need to do is to extend AbstractJUnit38SpringContextTests instead of TestCase in our unit test. Since Spring 2.5 embraces annotations we will use one as well to instruct what our xml configuration file is located:
@ContextConfiguration(locations = "classpath:axis-example-context.xml")
public class ReportIncidentServiceTest extends AbstractJUnit38SpringContextTests {
What we must remember to add is the classpath: prefix as our xml file is located in src/main/resources. If we omit the prefix then Spring will by default try to locate the xml file in the current package and that is org.apache.camel.example.axis. If the xml file is located outside the classpath you can use file: prefix instead. So with these two modifications we can get rid of all the setup and teardown code we had before and now we will test our real configuration.
The last change is to get hold of the producer template and now we can just refer to the bean id it has in the spring xml file:
        <!-- producer template exposed with this id -->
        <camel:template id="camelTemplate"/>
So we get hold of it by just getting it from the spring ApplicationContext as all spring users is used to do:
        // get a producer template from the the spring context
        ProducerTemplate template = (ProducerTemplate) applicationContext.getBean("camelTemplate");
        // inject it on our service using the setter
        service.setTemplate(template);
Now our unit test is much better, and a real power of Camel is that is fits nicely with Spring and you can use standard Spring'ish unit test to test your Camel applications as well.
Unit Test calling WebService
What if you would like to execute a unit test where you send a webservice request to the AxisReportIncidentService how do we unit test this one? Well first of all the code is merely just a delegate to our real service that we have just tested, but nevertheless its a good question and we would like to know how. Well the answer is that we can exploit that fact that Jetty is also a slim web container that can be embedded anywhere just as Camel can. So we add this to our pom.xml:
        <dependency>
            <groupId>org.mortbay.jetty</groupId>
            <artifactId>jetty</artifactId>
            <version>${jetty-version}</version>
            <scope>test</scope>
        </dependency>
Then we can create a new class AxisReportIncidentServiceTest to unit test with Jetty. The code to setup Jetty is shown below with code comments:
public class AxisReportIncidentServiceTest extends TestCase {

    private Server server;

    private void startJetty() throws Exception {
        // create an embedded Jetty server
        server = new Server();

        // add a listener on port 8080 on localhost (127.0.0.1)
        Connector connector = new SelectChannelConnector();
        connector.setPort(8080);
        connector.setHost("127.0.0.1");
        server.addConnector(connector);

        // add our web context path
        WebAppContext wac = new WebAppContext();
        wac.setContextPath("/unittest");
        // set the location of the exploded webapp where WEB-INF is located
        // this is a nice feature of Jetty where we can point to src/main/webapp
        wac.setWar("./src/main/webapp");
        server.setHandler(wac);

        // then start Jetty
        server.setStopAtShutdown(true);
        server.start();
    }

    @Override
    protected void setUp() throws Exception {
        super.setUp();
        startJetty();
    }

    @Override
    protected void tearDown() throws Exception {
        super.tearDown();
        server.stop();
    }

}
Now we just need to send the incident as a webservice request using Axis. So we add the following code:
    public void testReportIncidentWithAxis() throws Exception {
        // the url to the axis webservice exposed by jetty
        URL url = new URL("http://localhost:8080/unittest/services/ReportIncidentPort");

        // Axis stuff to get the port where we can send the webservice request
        ReportIncidentService_ServiceLocator locator = new ReportIncidentService_ServiceLocator();
        ReportIncidentService_PortType port = locator.getReportIncidentPort(url);

        // create input to send
        InputReportIncident input = createDummyIncident();
        // send the webservice and get the response
        OutputReportIncident output = port.reportIncident(input);
        assertEquals("OK", output.getCode());

        // should generate a file also
        File file = new File("target/" + input.getIncidentId() + ".txt");
        assertTrue("File should exists", file.exists());
    }

    protected InputReportIncident createDummyIncident() {
        InputReportIncident input = new InputReportIncident();
        input.setEmail("davsclaus@apache.org");
        input.setIncidentId("12345678");
        input.setIncidentDate("2008-07-13");
        input.setPhone("+45 2962 7576");
        input.setSummary("Failed operation");
        input.setDetails("The wrong foot was operated.");
        input.setFamilyName("Ibsen");
        input.setGivenName("Claus");
        return input;
    }
And now we have an unittest that sends a webservice request using good old Axis.
Annotations
Both Camel and Spring has annotations that can be used to configure and wire trivial settings more elegantly. Camel has the endpoint annotation @EndpointInjected that is just what we need. With this annotation we can inject the endpoint into our service. The annotation takes either a name or uri parameter. The name is the bean id in the Registry. The uri is the URI configuration for the endpoint. Using this you can actually inject an endpoint that you have not defined in the camel context. As we have defined our endpoint with the id backup we use the name parameter.
    @EndpointInject(name = "backup")
    private ProducerTemplate template;
Camel is smart as @EndpointInjected supports different kinds of object types. We like the ProducerTemplate so we just keep it as it is.
Since we use annotations on the field directly we do not need to set the property in the spring xml file so we change our service bean:
<bean id="incidentservice" class="org.apache.camel.example.axis.ReportIncidentService"/>
Running the unit test with mvn test reveals that it works nicely.
And since we use the @EndpointInjected that refers to the endpoint with the id backup directly we can loose the template tag in the xml, so its shorter:
    <bean id="incidentservice" class="org.apache.camel.example.axis.ReportIncidentService"/>

    <camel:camelContext id="camelContext">
        <!-- producer template exposed with this id -->
        <camel:template id="camelTemplate"/>

        <!-- endpoint named backup that is configued as a file component -->
        <camel:endpoint id="backup" uri="file://target?append=false"/>

    </camel:camelContext>
And the final touch we can do is that since the endpoint is injected with concrete endpoint to use we can remove the "backup" name parameter when we send the message. So we change from:
        // send the data to the endpoint and the header contains what filename it should be stored as
        template.sendBodyAndHeader("backup", data, "org.apache.camel.file.name", filename);
To without the name:
        // send the data to the endpoint and the header contains what filename it should be stored as
        template.sendBodyAndHeader(data, "org.apache.camel.file.name", filename);
Then we avoid to duplicate the name and if we rename the endpoint name then we don't forget to change it in the code also.
The End
This tutorial hasn't really touched the one of the key concept of Camel as a powerful routing and mediation framework. But we wanted to demonstrate its flexibility and that it integrates well with even older frameworks such as Apache Axis 1.4.
Check out the other tutorials on Camel and the other examples.
Note that the code shown here also applies to Camel 1.4 so actually you can get started right away with the released version of Camel. As this time of writing Camel 1.5 is work in progress.
See Also
Tutorial on using Camel in a Web Application
Camel has been designed to work great with the Spring framework; so if you are already a Spring user you can think of Camel as just a framework for adding to your Spring XML files.
So you can follow the usual Spring approach to working with web applications; namely to add the standard Spring hook to load a /WEB-INF/applicationContext.xml file. In that file you can include your usual Camel XML configuration.
Step1: Edit your web.xml
To enable spring add a context loader listener to your /WEB-INF/web.xml file
<?xml version="1.0" encoding="UTF-8"?>
<web-app xmlns="http://java.sun.com/xml/ns/javaee"
         xmlns:xsi="http://www.w3.org/2001/XMLSchema-instance"
         xsi:schemaLocation="http://java.sun.com/xml/ns/javaee http://java.sun.com/xml/ns/javaee/web-app_2_5.xsd"
         version="2.5">

  <listener>
    <listener-class>org.springframework.web.context.ContextLoaderListener</listener-class>
  </listener>

</web-app>
This will cause Spring to boot up and look for the /WEB-INF/applicationContext.xml file.
Step 2: Create a /WEB-INF/applicationContext.xml file
Now you just need to create your Spring XML file and add your camel routes or configuration.
For example
<?xml version="1.0" encoding="UTF-8"?>
<beans xmlns="http://www.springframework.org/schema/beans"
       xmlns:xsi="http://www.w3.org/2001/XMLSchema-instance"
       xmlns:context="http://www.springframework.org/schema/context"
       xsi:schemaLocation="
       http://www.springframework.org/schema/beans
       http://www.springframework.org/schema/beans/spring-beans-2.5.xsd
       http://www.springframework.org/schema/context
       http://www.springframework.org/schema/context/spring-context-2.5.xsd
       http://camel.apache.org/schema/spring
       http://camel.apache.org/schema/spring/camel-spring.xsd">

  <camelContext xmlns="http://camel.apache.org/schema/spring">
    <route>
      <from uri="seda:foo"/>
      <to uri="mock:results"/>
    </route>
  </camelContext>

</beans>
Then boot up your web application and you're good to go!
Hints and Tips
If you use Maven to build your application your directory tree will look like this...
src/main/webapp/WEB-INF
  web.xml
  applicationContext.xml
You should update your Maven pom.xml to enable WAR packaging/naming like this...
<project>
    ...
    <packaging>war</packaging>
    ...
    <build>
	<finalName>[desired WAR file name]</finalName>
        ...
    </build>
To enable more rapid development we highly recommend the jetty:run maven plugin.
Please refer to the help for more information on using jetty:run - but briefly if you add the following to your pom.xml
  <build>
    <plugins>
      <plugin>
        <groupId>org.mortbay.jetty</groupId>
        <artifactId>maven-jetty-plugin</artifactId>
        <configuration>
          <webAppConfig>
            <contextPath>/</contextPath>
          </webAppConfig>
          <scanIntervalSeconds>10</scanIntervalSeconds>
        </configuration>
      </plugin>
    </plugins>
  </build>
Then you can run your web application as follows
mvn jetty:run
Then Jetty will also monitor your target/classes directory and your src/main/webapp directory so that if you modify your spring XML, your web.xml or your java code the web application will be restarted, re-creating your Camel routes.
If your unit tests take a while to run, you could miss them out when running your web application via
mvn -Dtest=false jetty:run
Tutorial Business Partners
Under Construction
This tutorial is a work in progress.
Background and Introduction
Business Background
So there's a company, which we'll call Acme. Acme sells widgets, in a fairly unusual way. Their customers are responsible for telling Acme what they purchased. The customer enters into their own systems (ERP or whatever) which widgets they bought from Acme. Then at some point, their systems emit a record of the sale which needs to go to Acme so Acme can bill them for it. Obviously, everyone wants this to be as automated as possible, so there needs to be integration between the customer's system and Acme.
Sadly, Acme's sales people are, technically speaking, doormats. They tell all their prospects, "you can send us the data in whatever format, using whatever protocols, whatever. You just can't change once it's up and running."
The result is pretty much what you'd expect. Taking a random sample of 3 customers:
- Customer 1: XML over FTP
- Customer 2: CSV over HTTP
- Customer 3: Excel via e-mail
Now on the Acme side, all this has to be converted to a canonical XML format and submitted to the Acme accounting system via JMS. Then the Acme accounting system does its stuff and sends an XML reply via JMS, with a summary of what it processed (e.g. 3 line items accepted, line item #2 in error, total invoice $123.45). Finally, that data needs to be formatted into an e-mail, and sent to a contact at the customer in question ("Dear Joyce, we received an invoice on 1/2/08. We accepted 3 line items totaling $123.45, though there was an error with line items #2 [invalid quantity ordered]. Thank you for your business. Love, Acme.").
So it turns out Camel can handle all this:
- Listen for HTTP, e-mail, and FTP files
- Grab attachments from the e-mail messages
- Convert XML, XLS, and CSV files to a canonical XML format
- read and write JMS messages
- route based on company ID
- format e-mails using Velocity templates
- send outgoing e-mail messages
Tutorial Background
This tutorial will cover all that, plus setting up tests along the way.
Before starting, you should be familiar with:
- Camel concepts including the CamelContext, Routes, Components and Endpoints, and Enterprise Integration Patterns
- Configuring Camel with the XML or Java DSL
You'll learn:
- How to set up a Maven build for a Camel project
- How to transform XML, CSV, and Excel data into a standard XML format with Camel
- How to write POJOs (Plain Old Java Objects), Velocity templates, and XSLT stylesheets that are invoked by Camel routes for message transformation
- How to configure simple and complex Routes in Camel, using either the XML or the Java DSL format
- How to set up unit tests that load a Camel configuration and test Camel routes
- How to use Camel's Data Formats to automatically convert data between Java objects and XML, CSV files, etc.
- How to send and receive e-mail from Camel
- How to send and receive JMS messages from Camel
- How to use Enterprise Integration Patterns including Message Router and Pipes and Filters
- How to use various languages to express content-based routing rules in Camel
- How to deal with Camel messages, headers, and attachments
You may choose to treat this as a hands-on tutorial, and work through building the code and configuration files yourself. Each of the sections gives detailed descriptions of the steps that need to be taken to get the components and routes working in Camel, and takes you through tests to make sure they are working as expected.
But each section also links to working copies of the source and configuration files, so if you don't want the hands-on approach, you can simply review and/or download the finished files.
High-Level Diagram
Here's more or less what the integration process looks like.
First, the input from the customers to Acme:

And then, the output from Acme to the customers:

Tutorial Tasks
To get through this scenario, we're going to break it down into smaller pieces, implement and test those, and then try to assemble the big scenario and test that.
Here's what we'll try to accomplish:
- Create a Maven build for the project
- Get sample files for the customer Excel, CSV, and XML input
- Get a sample file for the canonical XML format that Acme's accounting system uses
- Create an XSD for the canonical XML format
- Create JAXB POJOs corresponding to the canonical XSD
- Create an XSLT stylesheet to convert the Customer 1 (XML over FTP) messages to the canonical format
- Create a unit test to ensure that a simple Camel route invoking the XSLT stylesheet works
- Create a POJO that converts a
List<List<String>>to the above JAXB POJOs- Note that Camel can automatically convert CSV input to a List of Lists of Strings representing the rows and columns of the CSV, so we'll use this POJO to handle Customer 2 (CSV over HTTP)
- Create a unit test to ensure that a simple Camel route invoking the CSV processing works
- Create a POJO that converts a Customer 3 Excel file to the above JAXB POJOs (using POI to read Excel)
- Create a unit test to ensure that a simple Camel route invoking the Excel processing works
- Create a POJO that reads an input message, takes an attachment off the message, and replaces the body of the message with the attachment
- This is assuming for Customer 3 (Excel over e-mail) that the e-mail contains a single Excel file as an attachment, and the actual e-mail body is throwaway
- Build a set of Camel routes to handle the entire input (Customer -> Acme) side of the scenario.
- Build unit tests for the Camel input.
- TODO: Tasks for the output (Acme -> Customer) side of the scenario
Let's Get Started!
Step 1: Initial Maven build
We'll use Maven for this project as there will eventually be quite a few dependencies and it's nice to have Maven handle them for us. You should have a current version of Maven (e.g. 2.0.9) installed.
You can start with a pretty empty project directory and a Maven POM file, or use a simple JAR archetype to create one.
Here's a sample POM. We've added a dependency on camel-core, and set the compile version to 1.5 (so we can use annotations):
<?xml version="1.0" encoding="UTF-8"?>
<project xmlns="http://maven.apache.org/POM/4.0.0">
    <modelVersion>4.0.0</modelVersion>
    <groupId>org.apache.camel.tutorial</groupId>
    <artifactId>business-partners</artifactId>
    <version>1.0-SNAPSHOT</version>
    <name>Camel Business Partners Tutorial</name>
    <dependencies>
        <dependency>
            <artifactId>camel-core</artifactId>
            <groupId>org.apache.camel</groupId>
            <version>1.4.0</version>
        </dependency>
    </dependencies>
    <build>
        <plugins>
            <plugin>
                <groupId>org.apache.maven.plugins</groupId>
                <artifactId>maven-compiler-plugin</artifactId>
                <configuration>
                    <source>1.5</source>
                    <target>1.5</target>
                </configuration>
            </plugin>
        </plugins>
    </build>
</project>
Step 2: Get Sample Files
You can make up your own if you like, but here are the "off the shelf" ones. You can save yourself some time by downloading these to src/test/resources in your Maven project.
- Customer 1 (XML): input-customer1.xml
- Customer 2 (CSV): input-customer2.csv
- Customer 3 (Excel): input-customer3.xls
- Canonical Acme XML Request: canonical-acme-request.xml
- Canonical Acme XML Response: TODO
If you look at these files, you'll see that the different input formats use different field names and/or ordering, because of course the sales guys were totally OK with that. Sigh.
Step 3: XSD and JAXB Beans for the Canonical XML Format
Here's the sample of the canonical XML file:
<?xml version="1.0" encoding="UTF-8"?>
<invoice xmlns="http://activemq.apache.org/camel/tutorial/partners/invoice">
  <partner-id>2</partner-id>
  <date-received>9/12/2008</date-received>
  <line-item>
    <product-id>134</product-id>
    <description>A widget</description>
    <quantity>3</quantity>
    <item-price>10.45</item-price>
    <order-date>6/5/2008</order-date>
  </line-item>
  <!-- // more line-item elements here -->
  <order-total>218.82</order-total>
</invoice>
If you're ambitions, you can write your own XSD (XML Schema) for files that look like this, and save it to src/main/xsd.
Solution: If not, you can download mine, and save that to save it to src/main/xsd.
Generating JAXB Beans
Down the road we'll want to deal with the XML as Java POJOs. We'll take a moment now to set up those XML binding POJOs. So we'll update the Maven POM to generate JAXB beans from the XSD file.
We need a dependency:
<dependency>
    <artifactId>camel-jaxb</artifactId>
    <groupId>org.apache.camel</groupId>
    <version>1.4.0</version>
</dependency>
And a plugin configured:
<plugin>
    <groupId>org.codehaus.mojo</groupId>
    <artifactId>jaxb2-maven-plugin</artifactId>
    <executions>
        <execution>
            <goals>
                <goal>xjc</goal>
            </goals>
        </execution>
    </executions>
</plugin>
That should do it (it automatically looks for XML Schemas in src/main/xsd to generate beans for). Run mvn install and it should emit the beans into target/generated-sources/jaxb. Your IDE should see them there, though you may need to update the project to reflect the new settings in the Maven POM.
Step 4: Initial Work on Customer 1 Input (XML over FTP)
To get a start on Customer 1, we'll create an XSLT template to convert the Customer 1 sample file into the canonical XML format, write a small Camel route to test it, and build that into a unit test. If we get through this, we can be pretty sure that the XSLT template is valid and can be run safely in Camel.
Create an XSLT template
Start with the Customer 1 sample input. You want to create an XSLT template to generate XML like the canonical XML sample above – an invoice element with line-item elements (one per item in the original XML document). If you're especially clever, you can populate the current date and order total elements too.
Solution: My sample XSLT template isn't that smart, but it'll get you going if you don't want to write one of your own.
Create a unit test
Here's where we get to some meaty Camel work. We need to:
- Set up a unit test
- That loads a Camel configuration
- That has a route invoking our XSLT
- Where the test sends a message to the route
- And ensures that some XML comes out the end of the route
The easiest way to do this is to set up a Spring context that defines the Camel stuff, and then use a base unit test class from Spring that knows how to load a Spring context to run tests against. So, the procedure is:
Set Up a Skeletal Camel/Spring Unit Test
- Add dependencies on Camel-Spring, and the Spring test JAR (which will automatically bring in JUnit 3.8.x) to your POM:
<dependency> <artifactId>camel-spring</artifactId> <groupId>org.apache.camel</groupId> <version>1.4.0</version> </dependency> <dependency> <artifactId>spring-test</artifactId> <groupId>org.springframework</groupId> <version>2.5.5</version> <scope>test</scope> </dependency> - Create a new unit test class in
src/test/java/your-package-here, perhaps calledXMLInputTest.java - Make the test extend Spring's AbstractJUnit38SpringContextTests class, so it can load a Spring context for the test
- Create a Spring context configuration file in
src/test/resources, perhaps calledXMLInputTest-context.xml - In the unit test class, use the class-level @ContextConfiguration annotation to indicate that a Spring context should be loaded
- By default, this looks for a Context configuration file called
TestClassName-context.xmlin a subdirectory corresponding to the package of the test class. For instance, if your test class wasorg.apache.camel.tutorial.XMLInputTest, it would look fororg/apache/camel/tutorial/XMLInputTest-context.xml - To override this default, use the locations attribute on the @ContextConfiguration annotation to provide specific context file locations (starting each path with a / if you don't want it to be relative to the package directory). My solution does this so I can put the context file directly in
src/test/resourcesinstead of in a package directory under there.
- By default, this looks for a Context configuration file called
- Add a CamelContext instance variable to the test class, with the @Autowired annotation. That way Spring will automatically pull the CamelContext out of the Spring context and inject it into our test class.
- Add a ProducerTemplate instance variable and a
setUpmethod that instantiates it from the CamelContext. We'll use the ProducerTemplate later to send messages to the route.protected ProducerTemplate<Exchange> template; protected void setUp() throws Exception { super.setUp(); template = camelContext.createProducerTemplate(); } - Put in an empty test method just for the moment (so when we run this we can see that "1 test succeeded")
- Add the Spring <beans> element (including the Camel Namespace) with an empty <camelContext> element to the Spring context, like this:
<?xml version="1.0" encoding="UTF-8"?> <beans xmlns="http://www.springframework.org/schema/beans" xmlns:xsi="http://www.w3.org/2001/XMLSchema-instance" xsi:schemaLocation="http://www.springframework.org/schema/beans http://www.springframework.org/schema/beans/spring-beans-2.5.xsd http://activemq.apache.org/camel/schema/spring http://activemq.apache.org/camel/schema/spring/camel-spring-1.4.0.xsd"> <camelContext id="camel" xmlns="http://activemq.apache.org/camel/schema/spring"> </camelContext> </beans>
Test it by running mvn install and make sure there are no build errors. So far it doesn't test much; just that your project and test and source files are all organized correctly, and the one empty test method completes successfully.
Solution: Your test class might look something like this:
- src/test/java/org/apache/camel/tutorial/XMLInputTest.java
- src/test/resources/XMLInputTest-context.xml (same as just above)
Flesh Out the Unit Test
So now we're going to write a Camel route that applies the XSLT to the sample Customer 1 input file, and makes sure that some XML output comes out:
- Save the input-customer1.xml file to
src/test/resources - Save your XSLT file (created in the previous step) to
src/main/resources - Write a Camel Route, either right in the Spring XML, or using the Java DSL (in another class under
src/test/javasomewhere). This route should use the Pipes and Filters integration pattern to:- Start from the endpoint direct:start (which lets the test conveniently pass messages into the route)
- Call the endpoint xslt:YourXSLTFile.xsl (to transform the message with the specified XSLT template)
- Send the result to the endpoint mock:finish (which lets the test verify the route output)
- Add a test method to the unit test class that:
- Get a reference to the Mock endpoint
mock:finishusing code like this:MockEndpoint finish = MockEndpoint.resolve(camelContext, "mock:finish");
- Set the expectedMessageCount on that endpoint to 1
- Get a reference to the Customer 1 input file, using code like this:
InputStream in = XMLInputTest.class.getResourceAsStream("/input-partner1.xml"); assertNotNull(in); - Send that InputStream as a message to the
direct:startendpoint, using code like this:Note that we can send the sample file body in several formats (File, InputStream, String, etc.) but in this case an InputStream is pretty convenient.template.sendBody("direct:start", in); - Ensure that the message made it through the route to the final endpoint, by testing all configured Mock endpoints like this:
MockEndpoint.assertIsSatisfied(camelContext);
- If you like, inspect the final message body using some code like
finish.getExchanges().get(0).getIn().getBody().- If you do this, you'll need to know what format that body is – String, byte array, InputStream, etc.
- Get a reference to the Mock endpoint
- Run your test with mvn install and make sure the build completes successfully.
Solution: Your finished test might look something like this:
- src/test/java/org/apache/camel/tutorial/XMLInputTest.java
- For XML Configuration:
- src/test/resources/XMLInputTest-context.xml
- Or, for Java DSL Configuration:
- src/test/resources/XMLInputTest-dsl-context.xml
- src/test/java/org/apache/camel/tutorial/routes/XMLInputTestRoute.java
Test Base Class
Once your test class is working, you might want to extract things like the @Autowired CamelContext, the ProducerTemplate, and the setUp method to a custom base class that you extend with your other tests.
Step 5: Initial Work on Customer 2 Input (CSV over HTTP)
To get a start on Customer 2, we'll create a POJO to convert the Customer 2 sample CSV data into the JAXB POJOs representing the canonical XML format, write a small Camel route to test it, and build that into a unit test. If we get through this, we can be pretty sure that the CSV conversion and JAXB handling is valid and can be run safely in Camel.
Create a CSV-handling POJO
To begin with, CSV is a known data format in Camel. Camel can convert a CSV file to a List (representing rows in the CSV) of Lists (representing cells in the row) of Strings (the data for each cell). That means our POJO can just assume the data coming in is of type List<List<String>>, and we can declare a method with that as the argument.
Looking at the JAXB code in target/generated-sources/jaxb, it looks like an Invoice object represents the whole document, with a nested list of LineItemType objects for the line items. Therefore our POJO method will return an Invoice (a document in the canonical XML format).
So to implement the CSV-to-JAXB POJO, we need to do something like this:
- Create a new class under
src/main/java, perhaps calledCSVConverterBean. - Add a method, with one argument of type
List<List<String>>and the return typeInvoice - In the method, the logic should look roughly like this:
- Create a new
Invoice, using the method on the generatedObjectFactoryclass - Loop through all the rows in the incoming CSV (the outer
List) - Skip the first row, which contains headers (column names)
- For the other rows:
- Create a new
LineItemType(using theObjectFactoryagain) - Pick out all the cell values (the Strings in the inner
List) and put them into the correct fields of theLineItemType- Not all of the values will actually go into the line item in this example
- You may hardcode the column ordering based on the sample data file, or else try to read it dynamically from the headers in the first line
- Note that you'll need to use a JAXB
DatatypeFactoryto create theXMLGregorianCalendarvalues that JAXB uses for thedatefields in the XML – which probably means using aSimpleDateFormatto parse the date and setting that date on aGregorianCalendar
- Add the line item to the invoice
- Create a new
- Populate the partner ID, date of receipt, and order total on the
Invoice - Throw any exceptions out of the method, so Camel knows something went wrong
- Return the finished
Invoice
- Create a new
Solution: Here's an example of what the CSVConverterBean might look like.
Create a unit test
Start with a simple test class and test Spring context like last time, perhaps based on the name CSVInputTest:
/**
* A test class the ensure we can convert Partner 2 CSV input files to the
* canonical XML output format, using JAXB POJOs.
*/
@ContextConfiguration(locations = "/CSVInputTest-context.xml")
public class CSVInputTest extends AbstractJUnit38SpringContextTests {
@Autowired
protected CamelContext camelContext;
protected ProducerTemplate<Exchange> template;

protected void setUp() throws Exception {
    super.setUp();
    template = camelContext.createProducerTemplate();
}
public void testCSVConversion() {
// TODO
}
}
<?xml version="1.0" encoding="UTF-8"?>
<beans xmlns="http://www.springframework.org/schema/beans"
       xmlns:xsi="http://www.w3.org/2001/XMLSchema-instance"
       xsi:schemaLocation="http://www.springframework.org/schema/beans
                               http://www.springframework.org/schema/beans/spring-beans-2.5.xsd
                           http://activemq.apache.org/camel/schema/spring
                               http://activemq.apache.org/camel/schema/spring/camel-spring-1.4.0.xsd">

    <camelContext id="camel" xmlns="http://activemq.apache.org/camel/schema/spring">
        <!-- TODO -->
    </camelContext>
</beans>
Now the meaty part is to flesh out the test class and write the Camel routes.
- Update the Maven POM to include CSV Data Format support:
<dependency> <artifactId>camel-csv</artifactId> <groupId>org.apache.camel</groupId> <version>1.4.0</version> </dependency> - Write the routes (right in the Spring XML context, or using the Java DSL) for the CSV conversion process, again using the Pipes and Filters pattern:
- Start from the endpoint direct:CSVstart (which lets the test conveniently pass messages into the route). We'll name this differently than the starting point for the previous test, in case you use the Java DSL and put all your routes in the same package (which would mean that each test would load the DSL routes for several tests.)
- This time, there's a little preparation to be done. Camel doesn't know that the initial input is a CSV, so it won't be able to convert it to the expected
List<List<String>>without a little hint. For that, we need an unmarshal transformation in the route. Theunmarshalmethod (in the DSL) or element (in the XML) takes a child indicating the format to unmarshal; in this case that should becsv. - Next invoke the POJO to transform the message with a bean:CSVConverter endpoint
- As before, send the result to the endpoint mock:finish (which lets the test verify the route output)
- Finally, we need a Spring
<bean>element in the Spring context XML file (but outside the<camelContext>element) to define the Spring bean that our route invokes. This Spring bean should have anameattribute that matches the name used in thebeanendpoint (CSVConverterin the example above), and aclassattribute that points to the CSV-to-JAXB POJO class you wrote above (such as,org.apache.camel.tutorial.CSVConverterBean). When Spring is in the picture, anybeanendpoints look up Spring beans with the specified name.
- Write a test method in the test class, which should look very similar to the previous test class:
- Get the MockEndpoint for the final endpoint, and tell it to expect one message
- Load the Partner 2 sample CSV file from the ClassPath, and send it as the body of a message to the starting endpoint
- Verify that the final MockEndpoint is satisfied (that is, it received one message) and examine the message body if you like
- Note that we didn't marshal the JAXB POJOs to XML in this test, so the final message should contain an
Invoiceas the body. You could write a simple line of code to get the Exchange (and Message) from the MockEndpoint to confirm that.
- Note that we didn't marshal the JAXB POJOs to XML in this test, so the final message should contain an
- Run this new test with mvn install and make sure it passes and the build completes successfully.
Solution: Your finished test might look something like this:
- src/test/java/org/apache/camel/tutorial/CSVInputTest.java
- For XML Configuration:
- src/test/resources/CSVInputTest-context.xml
- Or, for Java DSL Configuration:
- src/test/resources/CSVInputTest-dsl-context.xml
- src/test/java/org/apache/camel/tutorial/routes/CSVInputTestRoute.java
Step 6: Initial Work on Customer 3 Input (Excel over e-mail)
To get a start on Customer 3, we'll create a POJO to convert the Customer 3 sample Excel data into the JAXB POJOs representing the canonical XML format, write a small Camel route to test it, and build that into a unit test. If we get through this, we can be pretty sure that the Excel conversion and JAXB handling is valid and can be run safely in Camel.
Create an Excel-handling POJO
Camel does not have a data format handler for Excel by default. We have two options – create an Excel DataFormat (so Camel can convert Excel spreadsheets to something like the CSV List<List<String>> automatically), or create a POJO that can translate Excel data manually. For now, the second approach is easier (if we go the DataFormat route, we need code to both read and write Excel files, whereas otherwise read-only will do).
So, we need a POJO with a method that takes something like an InputStream or byte[] as an argument, and returns in Invoice as before. The process should look something like this:
- Update the Maven POM to include POI support:
<dependency> <artifactId>poi</artifactId> <groupId>org.apache.poi</groupId> <version>3.1-FINAL</version> </dependency> - Create a new class under
src/main/java, perhaps calledExcelConverterBean. - Add a method, with one argument of type
InputStreamand the return typeInvoice - In the method, the logic should look roughly like this:
- Create a new
Invoice, using the method on the generatedObjectFactoryclass - Create a new HSSFWorkbook from the
InputStream, and get the first sheet from it - Loop through all the rows in the sheet
- Skip the first row, which contains headers (column names)
- For the other rows:
- Create a new
LineItemType(using theObjectFactoryagain) - Pick out all the cell values and put them into the correct fields of the
LineItemType(you'll need some data type conversion logic)- Not all of the values will actually go into the line item in this example
- You may hardcode the column ordering based on the sample data file, or else try to read it dynamically from the headers in the first line
- Note that you'll need to use a JAXB
DatatypeFactoryto create theXMLGregorianCalendarvalues that JAXB uses for thedatefields in the XML – which probably means setting the date from a date cell on aGregorianCalendar
- Add the line item to the invoice
- Create a new
- Populate the partner ID, date of receipt, and order total on the
Invoice - Throw any exceptions out of the method, so Camel knows something went wrong
- Return the finished
Invoice
- Create a new
Solution: Here's an example of what the ExcelConverterBean might look like.
Create a unit test
The unit tests should be pretty familiar now. The test class and context for the Excel bean should be quite similar to the CSV bean.
- Create the basic test class and corresponding Spring Context XML configuration file
- The XML config should look a lot like the CSV test, except:
- Remember to use a different start endpoint name if you're using the Java DSL and not use separate packages per test
- You don't need the
unmarshalstep since the Excel POJO takes the rawInputStreamfrom the source endpoint - You'll declare a
<bean>and endpoint for the Excel bean prepared above instead of the CSV bean
- The test class should look a lot like the CSV test, except use the right input file name and start endpoint name.
Logging
You may notice that your tests emit a lot less output all of a sudden. The dependency on POI brought in Log4J and configured commons-logging to use it, so now we need a log4j.properties file to configure log output. You can use the attached one (snarfed from ActiveMQ) or write your own; either way save it to src/main/resources to ensure you continue to see log output.
Solution: Your finished test might look something like this:
- src/test/java/org/apache/camel/tutorial/ExcelInputTest.java
- For XML Configuration:
- src/test/resources/ExcelInputTest-context.xml
- Or, for Java DSL Configuration:
- src/test/resources/ExcelInputTest-dsl-context.xml
- src/test/java/org/apache/camel/tutorial/routes/ExcelInputTestRoute.java
Step 7: Put this all together into Camel routes for the Customer Input
With all the data type conversions working, the next step is to write the real routes that listen for HTTP, FTP, or e-mail input, and write the final XML output to an ActiveMQ queue. Along the way these routes will use the data conversions we've developed above.
So we'll create 3 routes to start with, as shown in the diagram back at the beginning:
- Accept XML orders over FTP from Customer 1 (we'll assume the FTP server dumps files in a local directory on the Camel machine)
- Accept CSV orders over HTTP from Customer 2
- Accept Excel orders via e-mail from Customer 3 (we'll assume the messages are sent to an account we can access via IMAP)
...